This article was co-authored by Andrea Beaulieu. Andrea Beaulieu is a Professional Tailor, Fashion Designer, and the Owner of MOORE, a Brooklyn, New York based storefront and apparel workshop for gender-neutral, contemporary streetwear as well as custom-tailored products. Andrea has over 20 years in the fashion design and marketing industries and specializes in pattern making, draping, and the construction of garments. She holds a BS in Fashion Design and Merchandising from the University of North Carolina at Greensboro.
There are 10 references cited in this article, which can be found at the bottom of the page.
This article has been viewed 657,443 times.
Before you sew up the hole, consider the size and raggedness of the rip, along with the type of fabric in question. A narrow "split seam" is much easier to sew up than a large, proper hole in the fabric. If the hole is a split seam, then you should be able to sew the seam back together with strong thread. If there is actually fabric missing, you can reinforce the hole with thread, or sew a patch over the hole.[1]
Steps
Choosing the Needle and Thread
-
1Get a thread roll and a needle. If possible, use thread that matches the color of your clothing. If the stitch won't be visible from outside the garment, then the color of the thread does not matter. You may also choose to use a vibrantly-colored thread to complement or contrast with the fabric.
-
2Pick the right needle for the cloth. If the fabric is thick and tough (denim, leather, and multi-layered cloth), use a sharp, heavy needle so that you can pierce the cloth without too much effort. If the fabric is soft or thin, you may use any needle – though you might want to use a more delicate needle. To be sure you're using the right needle, check the packaging to see what kind of fabric it's recommended for.[2]
- Needles are sized based on the gauge of the needle—the larger the needle, the smaller the gauge. For example, an 8-gauge needle is very thick, so it's best for heavy woven materials. A 16-gauge needle is very thin, so it's suited for more delicate fabrics.[3]
- Use a needle with a rounded tip for knits and a needle with a sharp tip for woven fabrics.[4]
- Cotton, nylon, silk, jute, mixed fabric, and any other thin, soft fabric is better stitched with a lighter needles. The needle can be as short as 1-2 inches, or longer as needed. If you use a thick needle—approximately 1 mm in thickness—it may leave visible holes in the fabric. You may use a finger cap to prevent being poked by the needle while stitching.
- Opt for a thicker needle to avoid breaking any needles. Use a solid board to push the needle through while stitching if your finger hurts. Some thick fabrics like denim need pushing against a hard surface.
Advertisement -
3Make sure that you have enough thread. If unsure, try laying the thread over the torn area for reference. Take about 10 inches more than you think you'll need. The in-and-out sewing motion will take up a lot of thread, and you'll also need a bit more thread than the needle's length in order to tie the final knot. Remember: the thicker the fabric, the more thread you'll need. You may choose to take two times more thread if the fabric is thicker than 5mm.
-
4
-
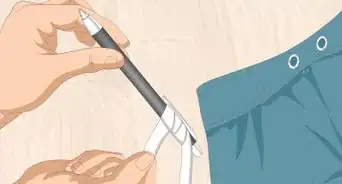
5Knot the thread. Hold both ends of the thread. Tie a small knot to keep the far tip (the one that you didn't thread through the eye of the needle) from slipping through the fabric after the needle.
- If you intend to make a stitch to a torn knit wear, then you must make a bigger effort. Knit wear or woolen clothes contain much bigger gaps than other fabrics. Here, to begin with, you must make a knot with the threaded needle so that your thread has something holding it in place.


Sewing a Split Seam
-
1Identify a split seam. Compared to a larger hole, a split seam is fairly easy to deal with. This means: where two pieces of fabric were joined by stitching, the thread is broken or missing and the seam is now open, creating a "hole." In most cases, you can simply sew the seam back together.[7]
- This can be inside a pocket, causing all your change to drop through. It may also appear in a sleeve seam, causing your elbow to stick out.
-
2Turn the garment inside out. Expose the seam. You may wish to gently iron the garment on the appropriate heat setting for the fabric, and then pin the seams carefully back together.
-
3Sew along the seam line. Sew by hand (needle and thread) or machine along the original seam line with nice, small stitches for strength. Overlap the intact part of the original seam, and make sure to knot the thread well. Carefully clip any hanging threads to finish the job.
- Sometimes, you will need to deal with top-stitching rather than a seam: as in an applique or a patch pocket. In this case, you will want to exactly match the thread to the original, since it will be highly visible. Try to match the stitch length in making the repair.

Reinforcing a Hole
-
1Measure the hole. If the hole is too big, you'll need some cloth. If the pockets were ripped too, you'll have to sew it. The patch needs to be the same color as the clothes, and it should also be big enough to sew up the hole.
-
2Evaluate the missing fabric. The most difficult type of hole to sew up is one where there is actually fabric missing – as in a worn-out hole in the knees of trousers, or in the elbow of a jacket. Do not try to sew the hole up without adding any additional fabric. This will only pucker the fabric together, tugging at the shape of the garment and creating a messy lump.[8]
-
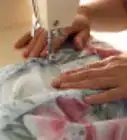
3Use a reinforcing patch. If the hole is frayed into the seam line or somewhere in the middle of the garment (other than a seam), then you will need to reinforce the area. Cut to size a small piece of fabric of the same weight and color of the garment. Lay the patching fabric under the hole, right side up. Then, bring the edges of the hole as close together as possible, without puckering the hole. Use a small zig zag stitch on the sewing machine to stitch around the edges of hole, catching as much fabric (patch and garment) as possible to make the patch hold.
- This isn't going to be a "pretty fix," but it should be serviceable. If the garment is casual, you can buy extra fabric in a contrasting color or pattern and sew patches in several areas to make the hole patch look decorative. Do this patch from the outside of the garment, or use appliqués in the same manner to add a designer touch.
-
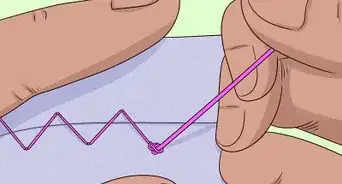
4Strengthen the torn ends. Start stitching about an inch before the torn area. This is especially important if an existing stitch was loosened or ripped. Stitching a little back from the ends will support the fabric and stop further tearing. Slip the needle through the cloth, and carefully weave the thread in and out of the cloth. For consistency, try to keep the distance between each stitch to about 2 mm.
- If the hole is especially frayed, try reinforcing with a liquid seam sealant before you start stitching. This can help make the fix more sustainable.
- If the cloth is too tight, a stitch may tear again once you wear the garment. Try adding another layer of a piece of a cloth beneath the hole, and then stitching that cloth for added strength. Try stitching a button to the area, if it goes with the fabric. Consider darning the hole so the space is filled with many interlacing stitches.
-
5Circle back next to the first stitch. Repeat until there is nothing left to sew.
- If the cloth is badly frayed, it may require an "over-locking." Hold the cloth and stitch it so that the frayed end is folded inwards. Fold the cloth one or two times, then stitch it "shut" to prevent the cloth from tearing again.
-
6Finish the job. Stretch and press the cloth. Take care that the thread does not get tangled midway through the stitch. Press the stitched area between your fingers. Then, run through the stitch to remove air gaps or unevenness of the cloth. To finish the job, make a knot and snip the thread.

Patching a Hole
-
1Try using an iron-on patch for heavier fabrics. You can simply lay the patch over the hole, then iron it flat with enough heat that the patch binds to the fabric. Make sure to reinforce an iron-on patch with stitching around the edges. Trim the square corners to a rounded shape before ironing them onto the garment. Both the stitching and the corner trimming will increase the useful life of the patch.[9]
- Iron-on patches are suitable for heavier fabrics such as denim and canvas. However, they may distort the shape of thinner fabrics.
-
2Make the patch discreet. If the hole is in a visible part of the garment, prepare the self patch from the inside. If this isn't possible, purchase fabric as close in color to the garment as possible in a fabric with the same properties.[10]
- Alternately, pick a patch that stands out. For some, patched clothing is a stylistic choice.
-
3Hand-sew a patch for thinner fabrics. First, trim the frayed threads and treat the hole's edges with seam sealant. Make two patches: one with any fabric for the bottom, and one with the matching/self fabric for the top patch.[11] Treat the edges of the bottom patch with seam sealant. Then, turn a small amount of fabric at the edge of your top patch, and iron this folded edge in place.
- Use the free embroidery settings on your sewing machine. Place the bottom patch underneath the hole, and run the lines of stitching very close together to completely catch all edges of the hole onto the bottom patch.
- Sew the bottom patch into place. Stitch back and forth, and up and down, creating a "fabric" of stitching across the hole or tear. Sew in straight stitch all around the edges of the bottom patch to keep the hole reinforced.
- Cover with the top patch. Place the folded-edge side down onto the fabric so it completely covers all the machine stitching. Hand-sew with matching thread (applique style) onto the top of the garment. Work the thread around it several times for strength. If you prefer a "rustic" look, you can also embroider with blanket stitch around this patch.

Community Q&A
-
QuestionHow do I pick the right needle for the material I'm sewing?
 Andrea BeaulieuAndrea Beaulieu is a Professional Tailor, Fashion Designer, and the Owner of MOORE, a Brooklyn, New York based storefront and apparel workshop for gender-neutral, contemporary streetwear as well as custom-tailored products. Andrea has over 20 years in the fashion design and marketing industries and specializes in pattern making, draping, and the construction of garments. She holds a BS in Fashion Design and Merchandising from the University of North Carolina at Greensboro.
Professional Tailor & Fashion DesignerAll needles have a label on the packaging that will tell you the specific kind of fabric they work best on. Needles are also sized based on the gauge of the needle—the larger the gauge, the smaller the needle. Lighter fabrics need a smaller needle, and heavier wovens need a larger needle. -
QuestionI have a hole in my leather shoe, and the needle is not going through, what should I do?
 Community AnswerYou are using a regular sewing needle for fabric, you need a needle specially designed for leather. These sorts of specialty needles are called glover's needles or leather needles and they usually come in packages with curved needles and sack needles and other specialty household needles. They can also be ordered online at taxidermy supply outlets.
 -
QuestionIs there any way to mend a hole in Spandex?
 Community AnswerYou may be able to machine sew it up from the inside, or zig-zag stitch it from the outside. A patch also might work.
Things You'll Need
- Scissors
- Needle
- Thread
- Seam Ripper (Optional)
- Finger cap or thimble to protect your fingers from being poked repeatedly. (Optional)


References
- ↑ http://www.theguardian.com/lifeandstyle/2014/sep/22/how-to-mend-moth-holes
- ↑ Andrea Beaulieu. Professional Tailor & Fashion Designer. Expert Interview. 1 May 2020.
- ↑ Andrea Beaulieu. Professional Tailor & Fashion Designer. Expert Interview. 1 May 2020.
- ↑ Andrea Beaulieu. Professional Tailor & Fashion Designer. Expert Interview. 1 May 2020.
- ↑ http://www.artofmanliness.com/2013/12/14/the-easiest-way-to-thread-a-needle/
- ↑ https://www.ifixit.com/Guide/How+to+Use+a+Needle+Threader/21024
- ↑ http://www.frugalupstate.com/frugal-living/fixing-a-split-seam/
- ↑ http://www.manmadediy.com/users/dan_e_t/posts/2651-the-diy-tailor-an-easy-way-to-fix-holes-in-your-jeans-and-other-garments
- ↑ https://www.youtube.com/watch?v=mW9iDH07j40
About This Article

To sew up a hole, first thread a needle using thread that’s the same color as the fabric you’ll be sewing. Turn the fabric inside out so you’re sewing on the wrong side of the fabric. Then, insert the needle through the fabric and back out again just below the hole. Pull the thread all the way through to the knot, then go back in and out of the same spot with the needle a few more times to make a secure knot in the fabric. Next, bring the needle through one side of the hole and out the other side, pulling the thread tight. Go through the same side again, slightly above where you went through before, and out the other side. Repeat this process all along the hole. When you get to the end of the hole opposite from where you started, go in and out of the fabric in the same spot a few times like you did before to make another secure knot. Finally, snip off the excess thread at each end. To learn how to fix a hole with an iron-on patch, read on!