This article was co-authored by Alterations Express. Alterations Express is a salon-style alteration and tailoring house with walk-in service, spacious dressing rooms, fitting specialists, and an extraordinary team of tailors and seamstresses at 13 storefront locations. With over 70 years of experience, they specialize in guiding individuals through a professional fitting, evaluating an alteration project on the spot, express alterations, and immediately providing pricing for any alteration. Alterations Express has been featured on multiple websites such as TheKnot.com.
There are 9 references cited in this article, which can be found at the bottom of the page.
This article has been viewed 26,485 times.
Fleece vests are a cozy way to dress up for the winter, but they can get expensive if you buy them from the store. Luckily, it is easy to make a fleece vest at home without any patterns. All you need to start is a loose-fitting vest, shirt, or jacket to use as a base. Once you know the basics, you can create all sorts of fashionable fleece vests.
Steps
Creating the Base
-
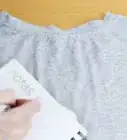
1Trace a loose-fitting top onto a sheet of fleece, then cut it out. Choose a loose-fitting fleece or winter vest and place it on top of a sheet of fleece. Trace around the vest with a marker, adding a 1-inch (2.5-cm) seam allowance. Cut the fleece along the lines that you traced.[1]
- If you don't have a loose-fitting vest handy, a T-shirt or sweatshirt may also work--just tuck the sleeves out of the way first!
- You are only cutting out the back piece for now. You will cut the front pieces next; they need an additional seam.
- You can also buy anti-peel fleece from a fabric store to make your vest.[2]
-
2Fold the back piece in half, and use it to trace the front pieces. Take the back piece that you just cut out and fold it in half lengthwise. Fold your fleece in half too, then place the folded back piece on top. Trace around the back piece, adding a 1-inch (2.5-cm) seam allowance to the folded edge. This will give you space for the zipper.
- You don't need to add seam allowances to the other edges because the folded piece already includes them.
Advertisement -
3Cut the front pieces out, then deepen the collar. Cut along the lines that you traced, making sure to cut through both layers of fleece. Keep the pieces stacked together, and cut the collar deeper. Begin cutting 1 inch (2.5 cm) below the collar along the straight edge, and finish cutting right at the corner of the collar.
- Do not cut the collar wider at the shoulder. If you do, it won't match up with the collar on the back piece.
-
4Pin and sew the shoulders together. Place the front pieces on top of the back pieces with the right sides facing in. Sew across both shoulders using a straight stitch and a 1-inch (2.5-cm) seam allowance. Backstitch when you start and finish sewing and remove the pins when you are done.[3]
- Match the thread color to the fleece.
- For even better results, use a ball point needle, polyester thread, and a longer stitch length.[4]
-
5Pin and sew the sides of the vest together. Fold the front pieces of the vest down to the back. Make sure that the right sides are touching. Secure the sides with pins, then sew them using a 1-inch (2.5-cm) seam allowance and a straight stitch. As before, backstitch when you start and finish sewing, and remove the pins when you are done.
-
6Hem the armholes by 1 inch (2.5 cm). Fold the armholes into wrong side of the vest by 1 inch (2.5 cm). Secure them with pins, as needed, then sew them with a straight stitch as close to the inside edge as possible. Use a matching thread color and remember to backstitch. If you used pins earlier, remember to take them out once you are finished.
- Don't worry about hemming the bottom edge of the vest just yet. You'll do that after you add the zipper.


Adding a Collar
-
1Measure the circumference of your collar. Fold the vest in half along the back so that the shoulders, armholes, and center-front opening all match up. Measure along the collar with a measuring tape, then double your measurement. This is how long your collar will be.
-
2Cut 2 rectangles for the collar, adding a 1-inch (2.5-cm) seam allowance. The rectangles need to be the circumference of your collar, plus 2 inches (5.1 cm) for the seams. The height is up to you, but anything between 1 to 2 inches (2.5 to 5.1 cm) would be good. Remember to add 2 inches (5.1 cm) to the final height for the seams, however.
-
3Sew the top and side edges of the rectangles together. Pin the rectangles so that the right sides are facing in. Sew along 1 of the long edges and both of the narrow edges. Use a straight stitch and a 1-inch (2.5-cm) seam allowance.[5]
- You can round the top corners instead if you want a softer look.
-
4Clip the corners, then turn the collar right-side-out. Cut the corners off, as close to the stitching as possible. If you rounded the corners, cut notches into them instead. Once you are done, turn the collar right-side-out.
-
5Sew around the collar seams to keep it flat. You can't really iron fleece, so you have to top stitch the collar instead. Start sewing at the bottom corner of the collar. Work your way around the first narrow edge, then the long top edge, then back down the second narrow edge.[6]
- Use a 1/4-inch (0.64-cm) seam allowance.
- Backstitch when you start and finish sewing.
-
6Pin and sew the collar to the vest. Turn the vest so that the right side is facing you. Pin the collar to the top of the vest so that the raw edges match up. Sew around the collar of the vest using a 1-inch (2.5-cm) seam allowance and a matching thread color.
- Remember to backstitch!
-
7Finish the hem with topstitching, if desired. For a nicer touch, fold the hem against the body of the vest. Sew it down, 1⁄4 inch (0.64 cm) from the seam. Trim the excess hem below the stitch down to 1⁄4 inch (0.64 cm).


Adding a Zipper
-
1Measure the front of your vest, excluding the bottom 1 inch (2.5 cm). Measure the front of your vest, starting at the collar and finishing 1 inch (2.5 cm) from the bottom hem. Purchase a separating zipper that matches your measurement and open it up. If you cannot find the right length, buy a longer zipper.
-
2Pin a separating zipper face-down to the right side of the vest. The bottom of the zipper should be 1 inch (2.5 cm) from the bottom of the vest. The side of the zipper tape should be 1⁄4 inch (0.64 cm) away from the edge of the fabric. If the zipper is too long and extends past the collar seam, fold the zipper tape towards the edge of the fabric.[7]
-
3Sew the zipper using a straight stitch. Try to sew as close to the zipper teeth as you can. If your sewing machine has a zipper foot, now would be a good time to use it. Backstitch when you start and finish sewing to prevent unraveling.[8]
- If the zipper is too long for the jacket, fold the zipper tape into the collar.
-
4Repeat the process for the other side of the zipper. When you finish sewing the zipper, it would be a good idea to close it and make sure that everything matches up. If the zipper is askew, or if you can't close it, take the zipper out with a seam ripper and try again.
-
5Flip the zipper tape to the inside of the vest and pin it. Turn the vest so that the wrong side is facing you. Fold the zipper down so that you can see the zipper tape, and the teeth stick out over the folded edge of the fabric. Pin the zipper tape in place. Make sure that you extend the fold down to the bottom of the vest, and to the top of the collar.[9]
-
6Topstitch the zipper using a straight stitch. Begin sewing at the top edge of the collar and finish sewing at the bottom edge of the hem. Try to sew as close to the edge of the zipper tape as possible.[10]
- If your zipper was too long, you may have excess zipper sticking out from under the topstitching. Cut this excess zipper off.
-
7Fold the bottom hem up by 1 inch (2.5 cm) and sew it down. Turn the vest so that the wrong side is facing you. Fold the entire bottom hem up by 1 inch (2.5 cm), then secure it with pins. Sew the hem down as close to the inside edge as possible. Use a matching thread color and a straight stitch, as before. Remember to backstitch and to remove the pins.


Things You'll Need
- Fleece, about 1 yard (0.91 m)
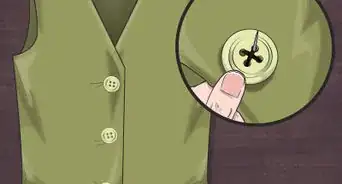
- Loose-fitting vest or shirt (for pattern)
- Fabric scissors
- Sewing pins
- Sewing machine
- Thread
- Needle
- Measuring tape
- Marker
- Separating zipper


References
- ↑ https://www.youtube.com/watch?v=lfJP2KKVUNk&feature=youtu.be&t=2m33s
- ↑ Alterations Express. Alteration, Tailoring, and Dry Cleaning Specialists. Expert Interview. 15 September 2021.
- ↑ http://www.madebymarzipan.com/?tutorial=very-cozy-vest
- ↑ https://sewguide.com/fleece-fabric/
- ↑ https://www.fleecefun.com/child-fleece-vest-pattern-free.html
- ↑ https://www.fleecefun.com/child-fleece-vest-pattern-free.html
- ↑ https://www.youtube.com/watch?v=pi5Q6BmKNEg&feature=youtu.be&t=1m30s
- ↑ https://www.youtube.com/watch?v=pi5Q6BmKNEg&feature=youtu.be&t=2m20s
- ↑ https://www.youtube.com/watch?v=pi5Q6BmKNEg&feature=youtu.be&t=4m40s
About This Article