wikiHow is a “wiki,” similar to Wikipedia, which means that many of our articles are co-written by multiple authors. To create this article, 29 people, some anonymous, worked to edit and improve it over time.
wikiHow marks an article as reader-approved once it receives enough positive feedback. This article received 12 testimonials and 91% of readers who voted found it helpful, earning it our reader-approved status.
This article has been viewed 774,497 times.
Learn more...
If you hunt deer and other animals for their meat, why not use their hides as well? Treating a hide with a tanning process ensures you'll end up with a supple piece of leather that can be used to make shoes and clothing or hung on the wall. Read on for two methods for tanning a hide: a traditional method that requires using the animal's natural brain oils and a quicker chemical method.
Steps
Using Brain Oils
-
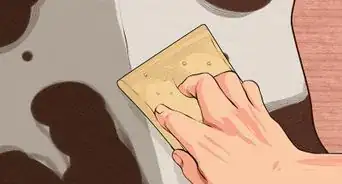
1Flesh the hide. Fleshing the hide is the process of scraping off the flesh and fat, which prevents the hide from rotting. Place the hide on a fleshing beam (a beam designed to hold the hide in place as you work) or on a tarp on the ground. Use a fleshing blade to scrape off all visible traces of flesh and fat using quick, strong strokes.
- Flesh the hide immediately after cutting the hide from the animal's body. If you wait more than a few hours, the hide will begin to decompose, and it will fall apart during the tanning process.
- Be careful not to damage the hide as you scrape. Don't use a knife not intended to be used for fleshing, since it might puncture or scratch the hide.
-
2Wash the hide. Use clean water and soap made from natural substances to wash away dirt, blood, and other impurities before you begin softening the skin.Advertisement
-
3Dry the hide. Let it dry out for a few days to prepare it for the tanning process. Bore holes along the edge of the hide and use twine to attach it to a drying rack. These wooden racks, which can be purchased at game shops, hold the hide in place as it thoroughly dries.
- Make sure that the hide is actually stretched, not just hung, on the drying rack. The more the hide is stretched, the larger it will be once the tanning process is complete.
- If you stretch your hide over a wall or barn, make sure there's ample space for air to circulate between the hide and the wall, or it won't dry properly.
- The drying process can take up to a week, depending on your climate.
-
4De-hair the hide. Take the hide off of the dryer and use a rounded steel blade with a handle or an elk antler hide scraper to remove the hair from the hide. This ensures that the tanning solution can thoroughly soak the skin. Carefully scrape the hair and the epidermis from the hide.
- If the hair is long, cut it first. Scrape against the grain of the hair, and scrape away from yourself.
- Be careful near the belly area, since the skin there is thinner than the skin on the rest of the hide.
-
5Brain the hide. The oils in an animal's brain provide a natural tanning method, and each animal has a brain just big enough to tan its entire hide. Cook the animal's brain in a cup of water until the brain breaks down and the mixture resembles soup. Place it in a blender so it is completely smooth. Take the following steps to apply the brain to the hide:
- Wash the hide with water. This removes any remaining grease and debris and makes the hide more malleable, so it will be better able to absorb brain oils.
- Wring the hide out, so it will be able to take in the oils. Squeeze out the excess water by placing the hide between two towels and squeezing, then repeating the process with two dry towels.
- Rub the brain mixture into the hide. Make sure you cover every inch of the hide.
- Roll up the hide and store it in a large plastic freezer bag or food storage bag. Put it in the refrigerator to let the brains soak in for at least 24 hours.
-
6Soften the hide. Now that the oils have soaked into the hide, it's ready for softening. Take the hide out of the refrigerator and place it back on the drying rack. Wipe off as much of the brain mixture as possible. Use a heavy stick or a hide breaker to soften the hide by running the tool back and forth across it.
- You can also have a partner help you stretch and soften it by taking it off the drying rack and pulling on the edges from either side. Continue doing so until you are both tired, then place it back on the rack and use the hide breaker to keep working the hide.
- A heavy rope can also be used to soften the hide. Have a partner hold one side of the rope and work together to rub it back and forth against the hide.
-
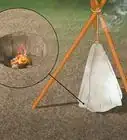
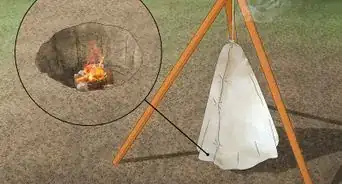
7Smoke the hide. When the skin is soft, pliable, and dry it is ready to be smoked. Stitch up any holes in the hide, then sew it up the sides of the hide to make a bag. Close one end so it is tight enough to hold the smoke. Invert the skin bag over a hole about a foot across and half that deep. Use sticks to make a rough frame to hold the skin bag open, and tie the closed end to a tree or use another long stick to keep it held up. Build a small, smoky fire inside the bag to smoke the skin.
- Once the little fire has a coal bed built up, start adding smoke chips to it and peg the skin around the hole. A little channel tunneled out to one side will allow you to keep the fire supplied.
- After smoking the first side for half an hour, turn the bag inside out and smoke the other side.


Using Tanning Chemicals
-
1Flesh the hide. Fleshing the hide is the process of scraping off the flesh and fat, which prevents the hide from rotting. Place the hide on a fleshing beam (a beam designed to hold the hide in place as you work) or on a tarp on the ground. Use a fleshing blade to scrape off all visible traces of flesh and fat using quick, strong strokes.
- Flesh the hide immediately after cutting the hide from the animal's body. If you wait more than a few hours, the hide will begin to decompose, and it will fall apart during the tanning process.
- Be careful not to damage the hide as you scrape. Don't use a knife not intended to be used for fleshing, since it might puncture or scratch the hide.
-
2Salt the hide. After fleshing, immediately lay the hide in the shade on a tarp and cover it with three to five pounds of salt. Make sure it is completely coated.
- Over the course of a couple of weeks, continue salting the hide until it has become crispy.
- If you see a pool of liquid emerge from an area of the hide, cover it with more salt.
-
3Gather tanning equipment. Tanning solution is made from a combination of household ingredients and chemicals you'll need to source elsewhere.[1] Gather the following ingredients:
- 2 gallons (7.6 L) water
- 1 1/2 gallons (7.6 L) bran flake water (Make this by boiling 1 1/2 gallons of water and pouring it over a pound of bran flakes. Let the mixture sit for one hour, then strain and reserve the water.)
- 8 cups salt (not iodized)
- 1 1/4 cups battery acid
- 1 box baking soda
- 2 large trash cans
- 1 large stick, for stirring and moving hides
-
4Tan the hide. Begin by soaking the hide in clean water until it is soft and pliable, so it will absorb the tanning chemicals more easily. When the hide is ready to tan, peel off its dried inner skin. Then take the following steps to tan the hide:
- Put the salt in a trash can and pour 2 gallons (7.6 L) of boiling water inside. Add the bran flake water and stir until the salt has completely dissolved.
- Add the battery acid. Make sure you wear gloves and take other precautions to prevent getting burned.
- Put the hide in the trash can, punching it down with the stick to make sure it is completely covered in liquid. Let it soak for 40 minutes.[2]
-
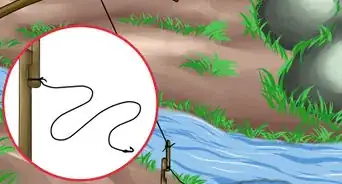
5Wash the hide. Fill the second trash can with clean water while the hide is soaking in the tanning solution. After 40 minutes have passed, use the stick to move the hide from the tanning solution to the clean water. Swish it around to wash off the solution. When the water looks dirty, pour it out, refill it with clean water, and wash the hide for another 5 minutes.
- If you plan to use the hide to make clothing, add a box of baking soda to the rinse to neutralize the remaining acid. This will prevent the acid from harming people's skin.
- If you don't plan to use the hide to make clothing, you can forgo the box of baking soda, since in neutralizing the acid it lessens the acid's effectiveness in preserving the hide.[3]
-
6Drain and oil the hide. Remove the hide from the rinse and hang over a beam to drain. Swab it with neat foot oil[4] to condition the skin.
-
7Stretch the hide. Hang the hide on a stretcher or hide dryer to finish the process. Place it in a place out of the sun to dry.
- After a few days the hide should feel dry and flexible. Take it down from the rack and go over the skin side with a wire brush until it has a suede-like appearance.[5]
- Let the hide finish drying until it is fully dry, which should take a few more days.


Community Q&A
-
QuestionHow do I tan a hide like a Native American and without using any modern technologies?
 Community AnswerNatives still had Access to salt, smoke and water, and also used the animal's urine to help cure the hide. There is a curing process that was accomplished with these techniques, but with more primitive methods, like using stone or glass to cut away the flesh instead of modern steel or aluminum.
 -
QuestionThese methods both involve losing the hair. What if you want to retain it to use as a fur?
 Community AnswerSkip the hair removal step, then rub the brain solution onto the bare side, working it in thoroughly. Fold the hide in such a way that the brain solution doesn't get onto the fur side. Then follow the rest of the steps.
 -
QuestionWhy do I have to take the hair off?Community AnswerTaking the hair off is mostly for aesthetic purposes. Many people find hairless leather easier to take care of than fur. If you really want to, you can leave the hair on. Be sure to only apply the solutions to the leather side, and not the hair side.
Warnings
- While the hides are smoking, stay right there and keep an eye on the fire.⧼thumbs_response⧽
- Always wear gloves and eye protection when handling battery acid, as it is corrosive and can burn the skin and eyes.⧼thumbs_response⧽
- Be very careful when you are scraping and stretching the hide. Work away from yourself. Scraping and stretching tools shouldn't be sharp, but because you are applying pressure, they can hurt you if you slip.⧼thumbs_response⧽


References
- ↑ http://www.motherearthnews.com/modern-homesteading/how-to-tan-a-hide.aspx?page=2#axzz2Oa1yp4Gk
- ↑ http://www.motherearthnews.com/modern-homesteading/how-to-tan-a-hide.aspx?page=2#axzz2Oa1yp4Gk
- ↑ http://www.motherearthnews.com/modern-homesteading/how-to-tan-a-hide.aspx?page=2#axzz2Oa1yp4Gk
- ↑ http://www.motherearthnews.com/modern-homesteading/how-to-tan-a-hide.aspx?page=2#axzz2Oa1yp4Gk
- ↑ http://www.motherearthnews.com/modern-homesteading/how-to-tan-a-hide.aspx?page=3#axzz2Oa1yp4Gk
About This Article
If you've already scraped the flesh from a hide and want to tan it, start by washing it with water and natural soap to get rid of blood and dirt. Next, stretch out the hide over a drying rack for a few days. When the hide is dry, scrape the hair off so the tanning solution can soak into the skin more easily. To make the tanning solution, cook the deer's brain with water until it breaks down, then rub the oil into the hide. Finally, put the hide in a freezer bag and store it in the fridge for 24 hours to allow the oils to soak in. To learn how to soften the hide and how to smoke it, read on!