Easy step-by-step guide to turn off Defender antivirus protection
This article was co-authored by wikiHow staff writer, Jack Lloyd. Jack Lloyd is a Technology Writer and Editor for wikiHow. He has over two years of experience writing and editing technology-related articles. He is technology enthusiast and an English teacher.
This article has been viewed 1,861,129 times.
Learn more...
This wikiHow will show you how to turn off Microsoft Defender (formerly Windows Defender), in Windows 10. Microsoft Defender can be turned off in Settings, but will turn back on when you restart your computer. Installing a 3rd party antivirus program will permanently turn off Microsoft Defender. Keep in mind that turning off Defender will open up your computer to security threats.
Things You Should Know
- Go to Settings > Update & Security > Windows Security > Virus & threat protection.
- Switch off Defender’s real-time protection feature.
- Defender will turn back on after restarting your computer.
- If Defender doesn’t turn back on automatically, you can switch it on manually in the Settings menu.
Steps
-
1Open Start . Click the Windows logo in the bottom-left corner of the screen. The Start menu will pop up.
- This method turns off Microsoft Defender’s real-time protection temporarily. It will turn back on after restarting your computer.
- To turn off Microsoft Defender permanently, install a 3rd party antivirus software that you trust. This will automatically turn off Defender.
- For more general info, check out how to protect your computer with antivirus software.
-
2Open Settings . Click the gear-shaped Settings icon in the lower-left side of the Start menu. Doing so opens the Settings window.Advertisement
-
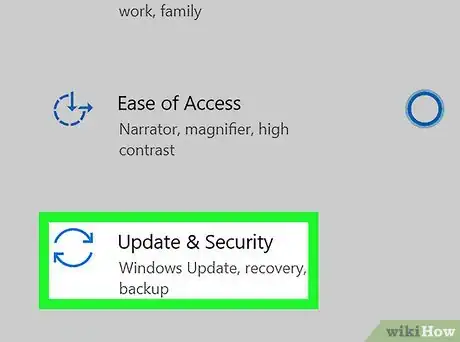
3
-
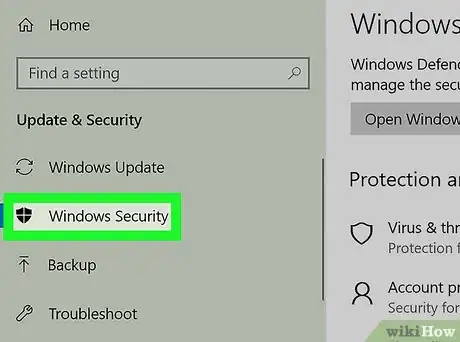
4Click Windows Security. This tab is in the upper-left side of the window.
-
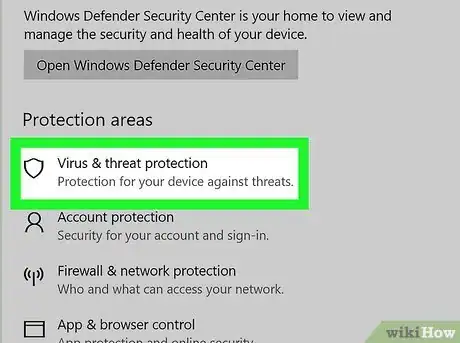
5Click Virus & threat protection. It's the first option below the "Protection areas" heading near the top of the page. Doing so opens the Windows Defender window.
-
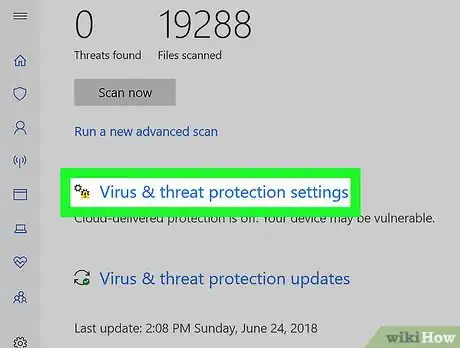
6Click Virus & threat protection settings. You'll find this option in the middle of the page.
-
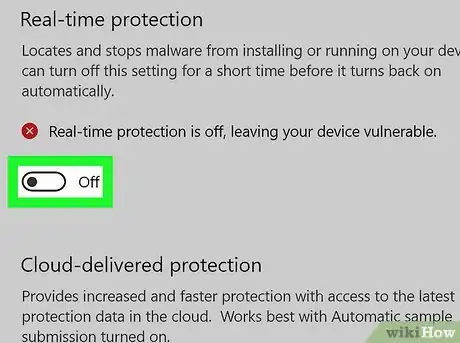
7Disable Microsoft Defender's real-time scanning. Turning off real-time protection will mean your device is vulnerable until it turns back on.[1]
- Click the blue "On" switch below the "Real-time protection" heading.
- Click Yes when prompted. This will turn off the real-time scanning feature of Microsoft Defender.
- You can also disable Microsoft Defender's cloud-based protection by clicking the blue "On" switch below the "Cloud-delivered protection" heading and then clicking Yes when prompted.
- Microsoft Defender will turn itself back on the next time you restart your computer.
Community Q&A
-
QuestionI did not order Microsoft Defender, how do I delete it?
 R2_d2000Top AnswererMicrosoft Defender comes with Windows 10, and, unfortunately, it cannot be deleted.
 -
QuestionIs there a way to turn it off without admin privileges?
 Community AnswerNo, you need to be an administrator to disable Windows Defender. This is a security measure to prevent viruses from turning Windows Defender off. However, if you know what you are doing and are certain of the safety of a third party app, it is possible to turn it off by using third party operating systems or startup disks which can access system settings of this system or user account, and disabling services with help of third party apps.
 -
QuestionIt keeps getting switched back to on. Why?
 R2_d2000Top AnswererThis is because Microsoft Defender automatically turns itself back on whenever Windows restarts.
Warnings
- Disabling Microsoft Defender may also disable any other antivirus programs, such as Norton or McAfee.⧼thumbs_response⧽
- Disabling Microsoft Defender may open your computer up to security threats. You should not do this unless you know what you are doing.⧼thumbs_response⧽
References
About This Article
1. Open the Start menu.
2. Click Settings.
3. Click Update & Security.
4. Click Windows Security.
5. Click Virus & threat protection.
6. Click Virus & threat protection settings.
7. Toggle off "Real-time protection."
For more information on how to disable Microsoft Defender, read on!


