This article was co-authored by wikiHow staff writer, Jack Lloyd. Jack Lloyd is a Technology Writer and Editor for wikiHow. He has over two years of experience writing and editing technology-related articles. He is technology enthusiast and an English teacher.
The wikiHow Tech Team also followed the article's instructions and verified that they work.
This article has been viewed 184,480 times.
Learn more...
This wikiHow teaches you how to update an ASUS computer's motherboard software. You can update this software, known as the BIOS, by downloading an update file from ASUS's website and then selecting the update file from within the BIOS. Keep in mind that the BIOS doesn't usually need to be updated if you're still installing regular Windows updates.
Steps
Finding Your Computer's Model Name
-
1
-
2Advertisement
-
3Click System. It's a monitor-shaped icon in the upper-left side of the Settings window.
-
4Click About. This tab is in the lower-left side of the window.
-
5Find your computer's model name. You should see the model name between the "Device specifications" heading and the "Device name" heading.


Downloading a BIOS Update
-
1Open the ASUS support site. Go to https://www.asus.com/support/Download-Center/ in your computer's web browser.
-
2Click the "Please enter a model name" text box. It's near the top of the page.
-
3Enter your computer's model name. Type in the model name you found in the "About" section of the System Settings menu. As you type, a drop-down menu with matching results will appear.
-
4Select the correct model name. In the drop-down menu, click your computer's model number.
-
5Click Driver & Utility. It's a link on the right side of the page.
-
6Click the BIOS & FIRMWARE tab. You'll find this near the middle of the page.
-
7Look for an available update. You'll see the latest BIOS update file here. If the date on the BIOS update file is more recent than the date on which your computer was manufactured, your BIOS most likely needs to be updated.
- If the file is several years old, chances are that your BIOS isn't in need of an update.
-
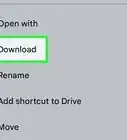
8Click DOWNLOAD. It's to the right of the BIOS file. Doing so prompts the BIOS file's ZIP folder to download onto your computer.


Placing the BIOS Update File
-
1Unzip the downloaded update folder. You'll need to use WinRAR to unzip the BIOS archive:
- Install WinRAR if you don't have it.
- Double-click the downloaded update folder.
- Click Extract To at the top of the window.
- Click OK.
-
2Copy the BIOS file. Once the folder finishes extracting, double-click the extracted folder to open it, then find the BIOS file (usually a blank, white file with your computer's model number), click it, and press Ctrl+C.
-
3Open This PC. Click This PC on the left side of the File Explorer window.
-
4Double-click your hard drive. It's under the "Devices and drives" heading.
-
5Double-click the "Windows" folder. You'll find this near the bottom of the window.
- You may have to scroll down to see this folder.
-
6Double-click the "ASUS" folder. It's in the "Windows" folder.
-
7Paste in the copied file. Press Ctrl+V to do so. You should see the copied file appear in the "ASUS" folder.
- You may need to click Continue after pasting in the file to confirm your decision.


Updating the BIOS
-
1
-
2Hold down F2. Once your computer has completely shut down, begin holding down this key.
-
3(On some models, e.g. X102BA, you have to use the "Delete" key instead of "F2").
-
4Press the Power button. With the F2 key held down, press your computer's physical "Power" button to turn it back on.
-
5Release F2 when the BIOS opens. The BIOS screen will appear after a few seconds, at which point you may release the F2 key.
-
6Select the Advanced tab. It's at the top of the BIOS.
-
7Select Start Easy Flash. You'll find this option at the top of the "Advanced" page.
-
8(On some models, e.g. X102BA, a message is displayed saying that a battery with at least 20% capacity must be plugged in before Easy Flash will work. Just a mains connection with an exhausted battery will not work.)
-
9Select your BIOS update file. You'll do this by using the FS1 directory to browse to the ASUS folder on your computer:
- Use the "Down" arrow key to select FS1.
- Use the "Right" arrow key to open FS1.
- Select Windows and press ↵ Enter.
- Select ASUS and press ↵ Enter.
- Select your update file at the bottom of the list and press ↵ Enter.
-
10Confirm the installation. Press the "Confirm" key as specified in the prompt when asked to confirm that you want to update your BIOS. This will prompt the BIOS to begin updating.
-
11Wait for your BIOS to finish updating. This can take anywhere from a couple of minutes to around half an hour. While your BIOS is updating, make sure you do the following:
- Keep your computer plugged into a power source if the computer is in danger of running out of power.
- Refrain from restarting (or touching in general) the computer until it finishes rebooting.


Warnings
- Unplugging your computer or attempting to force-restart it during the BIOS update process can cause the BIOS to become corrupted, thus making your computer's motherboard impossible to use and "bricking" your computer.⧼thumbs_response⧽