This article was co-authored by Anjuli Yera, MD. Dr. Anjuli Yera is a Certified Professional Makeup Artist based out of West Palm Beach, FL. With over 15 years of experience, she specializes in makeup artistry, airbrush application, and bridal and wedding party makeup. Her work has been featured in St. Louis Bride, STL Today as well as the Miami Times. She has received the WeddingWire Couples’ Choice Award, Best of The Knot Award, and Top Pro Status on Thumbtack. Additionally, Anjuli has been invited to KSDK’s, 'Show Me St. Louis,' to cover Makeup Trends of the year. Anjuli is a self-taught professional makeup artist who received further training from the Artistry Makeup Academy.
There are 15 references cited in this article, which can be found at the bottom of the page.
This article has been viewed 6,098 times.
The Maybelline Master Camo line comes in palette and individual stick form for you to use as a fine-tuned color correcting concealer. If the number of colors available as pens or on the palette is overwhelming, it’s important to focus on what you want out of this popular concealer line. By thinking about the areas on your face you need to correct and understanding the order each product should be applied in, you’ll be able to get an even, unblemished skin tone in no time.
Steps
Choosing a Color for Correcting
-
1Find your skin tone by looking at your veins. Under natural light, your veins will appear blue or purple with a light or cool skin tone, light green if you have a warm or deep skin tone, and if you have medium or neutral skin, you might not be able to tell what color your veins appear.[1]
- There are many ways to determine skin tone, including looking for undertones by comparing your skin to various shades of paper and jewelry.
-
2Use the green pen to cover up redness. If your main concern is redness on your face, you can use the green pen to counteract the red tones and even them out with a green hue. The green and the red will balance each other out, leading to a clearer, less red appearance.[2]
- The green pen is designed for use by people of any skin tone.
- Redness includes irritated areas, from plucking hairs, for instance, as well as redness from acne.
Advertisement -
3Choose the blue shade to correct yellow discoloration on light skin. If you have sallow, yellowish skin, using the blue corrector will help cancel out the yellow coloration and darken the area. This pen is designed for those with fair or light skin, as sallowness affects people with those tones more others.[3]
-
4Brighten dull areas with yellow for medium skin, and pink for light skin. If your face looks dull or dark, the pink and yellow pens will help add color and brighten up the affected area. The yellow works best on those with medium skin, whereas light-skinned people will want to use the pink pen to avoid getting yellow discoloration.[4]
- Dull skin color is often caused by a lack of circulation, alcohol consumption, and other factors that make you appear pale in the face.
-
5Cover up dark under-eye circles with red for deep tones. Regular concealer can lighten up under-eye bags too much, drawing attention to the area. The Master Camo red pen help you avoid this by changing the color, rather than concealing the area.[5]
-
6Correct under-eye circles with the apricot pen for light or medium skin. Just like the red pen, the apricot pen will help the dark color appear closer to your skin tone without making the area more visible. If you have a medium skin tone, you could also choose the red pen, depending on how light or dark your skin tone is.[6]


Applying the Corrector Pens
-
1Put on foundation before using correctors or concealers. You can best use Master Camo correcting pens right after you have applied a foundation that matches your face and neck skin tone. Use a powder brush, or your fingers for liquid foundation, to evenly apply the foundation all over your face.[7]
- If you want an even stronger concealing effect, you could put on foundation after applying the corrector and concealer.
- Liquid foundation will not apply quite as well if you choose to do this.
-
2Twist the bottom of the pen to soak the sponge. In order for the product to enter the applicator sponge, twist the black cylinder just above the applicator area. You may have to do this as many as 15 times, but you’ll need to do it at least until you can see the pen’s color on the tip.[8]
-
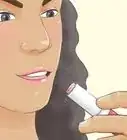
3Dab the corrector onto the affected area. Tap the pen onto the entire affected part of your face. Make sure that you dab the pen onto the entire area, even going a little outside of it to make it easier to blend the corrector with your skin. Tap as many times as you need in order to cover the area.[9]
- You can use the pen to brush the product in, but be careful not to damage the fragile sponge applicator.
-
4Blend the corrector into your skin with a blending brush or sponge. Gently rub the makeup until it spreads out evenly around the affected area. Move the brush in a circular fashion and don’t press too hard on your skin.[10]
- The goal is for the pigment to completely disappear into your face so that the color of your skin appears even.
-
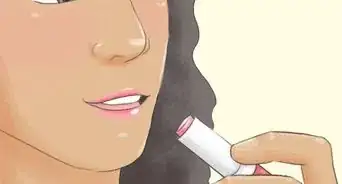
5Apply concealer over the correcting pen. Once you have chosen your corrector, or correctors for multiple trouble spots, go over the area with concealer by dabbing it on with a brush.[11] Try to cover the entire area that you applied corrector to with the concealer.[12]
- Use a cream concealer that is two shades lighter than your skin tone to correct any color. Apply several layers of concealer, this will make your skin look natural when color correcting.[13]
- There is a Maybelline Master Camo liquid concealer available in a wide variety of skin tones.
-
6


Correcting, Concealing, and Highlighting with the Palette
-
1Purchase a palette that matches your skin tone. Maybelline offers separate Master Camo palettes with powder shades to match light, medium, and deep skin tones. For best results when using the palette to correct and conceal, choose the palette with colors that most closely match your skin.
-
2Choose the corrector, concealer, and highlighter track. Each palette includes 2 options for each type of makeup on the palette. While you can mix-and-match them, the 3 products in each row were designed to be used together.
- If a concealer doesn’t match your skin tone, or the highlighter is too shimmery, you should definitely choose the one that fits you better rather than the one Maybelline intended you to use.
- The greener shades of corrector reduce redness, more yellow or pink pigments brighten the skin, and red and apricot shades are best for under-eye circles.
-
3Brush the corrector onto the affected area. You can use the included brush, or any other small, flat round-tip brush. Apply the makeup onto the area you want to correct, and let the powder spread out onto the skin around it so that it will blend better with your natural skin tone.[16]
-
4Blend the corrector in with your fingers. For the powder corrector, you can simply rub it in with your fingers. Use a brushing motion with the tips of your fingers to pull the powder around and blend it in with your skin. It’s okay if a little powder is visible, since you will be blending in concealer later.[17]
-
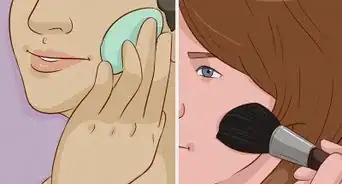
5Apply the concealer powder that best matches your skin tone. You should use a clean, flat round-tip brush to lightly cover up the discoloration. Make sure that concealer is going right on top of the areas you just applied corrector to.[18]
- You can mix the 2 included concealers together in varying amounts to get a closer match.[19]
-
6Dab the concealer with your fingers or blending sponge to blend. Create a seamless, natural-looking blend between the two by fully blending them together until the skin matches the rest of your face. Your fingertips or the sponge should simply press into the skin and pull off, very slightly rubbing the makeup in.[20]
-
7Use the highlighter powder on your high points. Even though the corrector and concealer will do a great job of covering up discolored or blotchy areas, highlighter will accentuate other areas. You can use your fingers to dab on 1 or both of the included highlighters on areas like your cheekbones and the bridge of your nose.[21]


Community Q&A
-
QuestionIs color corrector bad for skin?
 Anjuli Yera, MDDr. Anjuli Yera is a Certified Professional Makeup Artist based out of West Palm Beach, FL. With over 15 years of experience, she specializes in makeup artistry, airbrush application, and bridal and wedding party makeup. Her work has been featured in St. Louis Bride, STL Today as well as the Miami Times. She has received the WeddingWire Couples’ Choice Award, Best of The Knot Award, and Top Pro Status on Thumbtack. Additionally, Anjuli has been invited to KSDK’s, 'Show Me St. Louis,' to cover Makeup Trends of the year. Anjuli is a self-taught professional makeup artist who received further training from the Artistry Makeup Academy.
Certified Professional Makeup ArtistNot really. Color correctors have a tendency of making the skin appear dry in the areas where it’s applied, though. That's why it's best to apply a thick concealer instead.
-Step-16-Version-5.webp)


References
- ↑ https://www.paulaschoice.com/expert-advice/makeup-tips/face/how-to-determine-your-skin-tone-and-undertone.html
- ↑ https://www.maybelline.com/face-makeup/concealer/master-camo-color-correcting-pen/green-for-redness-all-skin-tones
- ↑ https://www.maybelline.com/face-makeup/concealer/master-camo-color-correcting-pen/blue-for-sallowness-fair-to-light-skin-tones
- ↑ https://www.maybelline.com/face-makeup/concealer/master-camo-color-correcting-pen/yellow-for-dullness-light-to-medium-skin-tones
- ↑ https://www.maybelline.com/face-makeup/concealer/master-camo-color-correcting-pen/red-for-dark-circles-deep-skin-tones
- ↑ https://www.maybelline.com/face-makeup/concealer/master-camo-color-correcting-pen/apricot-for-dark-circles-light-to-medium-skin-tones
- ↑ https://youtu.be/RcyJW2-rBVo?t=89
- ↑ https://www.maybelline.com/face-makeup/concealer/master-camo-color-correcting-pen/green-for-redness-all-skin-tones
- ↑ https://www.maybelline.com/face-makeup/concealer/master-camo-color-correcting-pen/green-for-redness-all-skin-tones
- ↑ https://www.maybelline.com/face-makeup/concealer/master-camo-color-correcting-pen/green-for-redness-all-skin-tones
- ↑ Anjuli Yera, MD. Certified Professional Makeup Artist. Expert Interview. 29 September 2021.
- ↑ https://www.maybelline.com/face-makeup/concealer/master-camo-color-correcting-pen/red-for-dark-circles-deep-skin-tones
- ↑ Anjuli Yera, MD. Certified Professional Makeup Artist. Expert Interview. 29 September 2021.
- ↑ Anjuli Yera, MD. Certified Professional Makeup Artist. Expert Interview. 29 September 2021.
- ↑ https://youtu.be/RcyJW2-rBVo?t=87
- ↑ https://youtu.be/N_Eyh8xyz7M?t=16/
- ↑ https://youtu.be/N_Eyh8xyz7M?t=20
- ↑ https://www.maybelline.com/face-makeup/concealer/facestudio-master-camo-color-correcting-kit/deep
- ↑ https://youtu.be/N_Eyh8xyz7M?t=30
- ↑ https://youtu.be/N_Eyh8xyz7M?t=31
- ↑ https://youtu.be/N_Eyh8xyz7M?t=37/
About This Article

-Step-16-Version-5.webp)