wikiHow is a “wiki,” similar to Wikipedia, which means that many of our articles are co-written by multiple authors. To create this article, 12 people, some anonymous, worked to edit and improve it over time.
This article has been viewed 17,002 times.
Learn more...
Square is an iOS and Android app that provides a low overhead means of collecting payments.[1] When you sign up for Square, you'll receive a free credit card reader that will plug in to your iOS or Android device. Square is not available on BlackBerry and Windows devices and laptop and desktop computers.[2]
Steps
Signing Up for Square
-
1Go to the Square website. Before you can use the Square app with your iOS or Android device, you'll need to sign up for a Square account.
- The Square website is https://squareup.com.
- In order to sign up with Square, you'll need a Social Security Number, a US-based bank account number, date of birth, and a US mailing address that's not a PO Box.[3]
- When you sign up with Square, you'll get a free Square Reader for swiping credit cards.
-
2On the Square website, click GET STARTED.Advertisement
-
3Enter your email address. In the Enter your email and Confirm your email fields, enter the email address you'd like to use for your Square registration.
-
4Enter a password. In the Create a password field, enter a password you'd like to use.
- Because Square involves monetary transactions, make sure that your password is hard to guess. Stronger passwords use a mix of letters, numbers, and other characters.[4]
- Don't use a password that you use on another site.
- Your password must be at least 8 characters long.
- Click Show to see the password you're entering.
- If you think you might have trouble remembering your password, write it down on a piece of paper.
-
5If necessary, click the Country (Language) dropdown menu, and click your country. The default is United States.
-
6Click CONTINUE.
-
7Describe your business. Click the What type of business is it? dropdown menu, and then click the phrase that best describes your business. Click the Business category dropdown menu, and then click the phrase that best describes your business.
- The Business category dropdown will have different options depending on what you selected in the first dropdown menu.
- Everything on this screen is optional.
-
8Enter the name of your business. In the What is your business name? field, enter the name of your business. If you don't have a name for your business, enter your own name.
-
9If you have one, enter your Employer Identification Number. If you're setting up a Square account on behalf of an employer, in the Employer Identification Number (optional) field, enter your EIN.
- If you don't have this number now, you can add it later.
-
10Enter information Square will use to verify your identify. Enter your legal first and last name. Enter your current street address. Enter your date of birth. Enter the last four digits of your Social Security Number. Enter your phone number.
- Square will use this information to verify your identity.
- All of the field on this screen are required.
-
11Click CONTINUE.
-
12Enter a phone number or email address. You'll receive an SMS message or email with a link you can use to download the Square Register app to your device.


Installing Square
-
1Download and install the Square Register app. On iOS devices, download and install the Square Register app from the iTunes Store app. On Android devices, download and install the Square Register app from the Google Play store.
-
2Add your bank account. Before you can receive payment, you'll need to link the Register app with a bank account. Open the Register app. In iOS, touch the gear icon. In Android, touch the three horizontal lines. Touch Link Bank Account, and then enter your name, routing number, and account number for your bank account. Touch Continue.
- You can find your routing number on your checks. It is a 9-digit number.
- You can find your account number on your checks. It is an 8-digit number.


Setting Up Square
-
1Login to your Square Dashboard. Before you can use Square to accept payments, you'll need to add items to sell. Go to https://squareup.com/dashboard/.
-
2Start creating a new item. Click ITEMS. Click Create an Item.
-
3Create a new item. In the Item field, type an item name. In the Regular field, type an item price. Click Save.
- All of the other fields are optional, but let you add things like Categories, Descriptions, and Inventory amounts.


Accepting Payment Using Square
-
1Accept in-person payments with the Square Reader. Open the Register app. Plug the Square Reader into the device's headset jack. Select the item being sold. Swipe the card through the reader.[5]
-
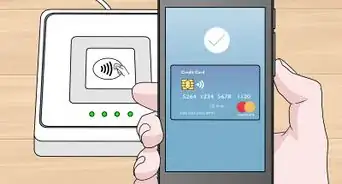
2Accept payments without the Square Reader. Open the Register app. Select the item being sold or enter a custom amount using the keypad. Touch Charge. Touch Credit Card or Card, and then enter the card number, expiration date, security code, and the billing ZIP code. Touch Charge. Have the customer sign or write "Phone or Internet Order," and then have them touch Done Signing.


References
- ↑ https://squareup.com/help/us/en/article/5123-square-register-guide
- ↑ https://squareup.com/help/us/en/article/3887-devices-compatible-with-square-register
- ↑ https://squareup.com/help/us/en/article/4955-sign-up-for-square-register
- ↑ https://support.google.com/accounts/answer/32040?hl=en
- ↑ https://squareup.com/help/us/en/article/5174-swipe-card-payments-with-the-square-reader
About This Article
1. Sign up at https://squareup.com.
2. Install the mobile app.
3. Link your bank account.
4. Log in to your dashboard.
5. Add your inventory.
6. Accept in-person payments.