This article was co-authored by James Sears and by wikiHow staff writer, Megaera Lorenz, PhD. James Sears leads the customer happiness team at Neatly, a group of cleaning gurus based in Los Angeles and Orange County, California. James is an expert in all things clean and provides transformative experiences by reducing clutter and renewing your home environment. James is a current Trustee Scholar at the University of Southern California.
This article has been viewed 591,126 times.
The Keurig is a type of single-brew coffee maker that works with specially designed coffee pods called “K-Cups.” With a little preparation, these machines are quick, convenient, and easy to use. Once you’ve set up your machine and run a cleaning cycle, you’ll be ready to brew your first cup! To keep your Keurig in good working order, don’t forget to descale and clean it occasionally.
Steps
Assembling and Running Your Keurig for the First Time
-
1Plug the Keurig into a grounded outlet. Before you use your Keurig for the first time, check it over and remove any adhesive tape or protective films. Place the Keurig on your counter and plug it into a grounded outlet.[1]
Grounded outlets have three holes: two for the live wires that bring power to your appliances and one for a ground wire to prevent dangerous surges. For safety reasons, the Keurig is designed to only plug into grounded outlets.
-
2Remove the water reservoir and rinse it with clean water. Depending on your Keurig model, the water reservoir may be located on the side or back of the machine. Remove the lid of the reservoir and set it aside, then lift the reservoir itself up and away from the Keurig. Rinse it with cool, clean water in your sink.[2]
- Some Keurig reservoirs can’t be removed from the machine. If your Keurig has a built-in reservoir, you’ll have to clean it simply by filling it and running water through it.
Advertisement -
3Fill the reservoir with clean water and replace it. Once you’ve rinsed the reservoir a little, fill it with clean water up to the max fill line marked on the side. Put the reservoir back in place and lock it in, then put the lid back on.[3]
If the reservoir is built into the Keurig, use a separate container to pour in water up to the fill line.
-
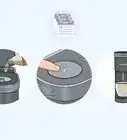
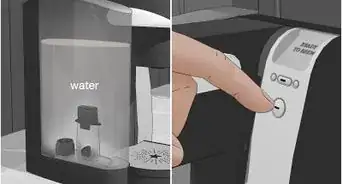
4Press the power button to start heating the water. Once the Keurig is set up with water in the reservoir, hit the power button to turn it on. The water should start heating up automatically.[4]
- Depending on your model, your Keurig may display a red “Heating” light while it is warming up. This light will turn off once the machine is done heating.
- If your model doesn’t have a heating light, wait for the heating sound to stop.
-
5Run a brew cycle without using a K-Cup and discard the water. Before brewing your first beverage in the Keurig, you will need to run a cleansing brew. Place a mug on the drip tray, then open and close the K-Cup holder as if you were brewing a beverage. The brewing buttons on the control panel should blink to let you know the machine is ready. Press the “Small Cup” button to start brewing. Let the brew cycle run, then pour out the water in the cup.[5]
- Don’t put a K-Cup pod in the machine when you run the cleaning cycle!
- Make sure you use a cup that’s at least 10 fluid ounces (300 mL) for the cleansing brew process, unless your user manual instructs otherwise.
- On some models, such as the K-Elite, you will need to press the “Hot Water” button before you select the brewing button. The correct cup size for the cleansing brew cycle may also vary, so check your instructions.

Brewing a Beverage Using a K-Cup
-
1Place a mug on the drip tray. Before you brew your first beverage, choose a mug and place it on the drip tray plate. Depending on the model of Keurig you have, you should be able to use a range of mug or cup sizes with your machine.
- For example, if you have the K-Elite, you can use containers ranging in size from a 4 fl oz (120 mL) cup to a 12 fl oz (350 mL) travel mug.
- To use a travel mug with some models, you may need to remove the drip tray and put the mug directly on the base for it to fit.
-
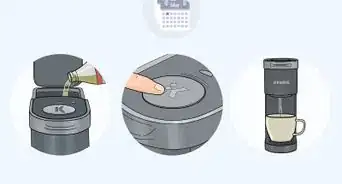
2Lift the handle of the machine and insert a K-Cup. Select the K-Cup pod of your choice and lift the handle at the top of the machine to access the K-Cup holder. Insert the pod into the holder with the foil-side up.[6]
- Don’t remove the foil from the lid before putting the K-Cup into the machine! The Keurig has built-in needles that pierce the foil during the brewing process.
-
3Push the handle down completely to close the lid. Once you insert the K-Cup securely into the holder, push the handle down until the lid is securely closed. Depending on the model you have, you may see the message “Ready to Brew” in the display window.[7]
- If you’ve just brewed a cup, your Keurig will need a little time to warm up again before you can brew another cup. This generally takes a little less than a minute.
- Double-check that the reservoir still has water in it before you start brewing!
-
4Press the appropriate brew size button and wait for the brewing to finish. When the Keurig is ready to brew, select the brew size button of your choice. On most models, brewing takes about 1 minute.
- Depending on your model, you may have options other than cup size to choose from. For example, the K-Elite allows you to select the strength of your coffee and also choose between hot and iced options.
- The Keurig will let out a loud burst of air to let you know when the brewing process is finished.
- To protect yourself from being injured by hot water or steam, don’t lift the lid of the K-Cup holder while the Keurig is brewing.
Tip: If you see a message that says “Prime” and nothing comes out of the Keurig machine when you hit the brew buttons, you may need to clean your Keurig.

Cleaning and Maintaining Your Keurig
-
1Descale your Keurig with white vinegar every 3-6 months. Over time, mineral deposits will build up inside your Keurig. To keep your machine running smoothly, you’ll need to descale it every few months. To do this, fill the reservoir halfway with white vinegar and run several brewing cycles without a K-Cup until the reservoir is empty. Repeat this process with plain water.[8]
- You can prevent scale buildup by using bottled water instead of hard tap water. Keurig does not recommend using distilled or softened water.[9]
- You can also purchase a Keurig descaling solution as an alternative to vinegar. Follow the directions on the package if you choose a commercial descaler. While Keurig recommends their own descaling solution, many users find that vinegar works just as well and is less expensive.
-
2Wipe down the outside with a damp cloth to clean up grime. The outside of your Keurig may start to build up grime, dirt, and coffee residue after a while. To keep your Keurig looking clean and shiny, dampen a microfiber cloth and put a couple of drops of liquid dish soap on it. Wring out any excess liquid and use the cloth to wipe down the outside of the Keurig.
- You can also use an all-natural plant-based cleaner for this.
- Never immerse your Keurig in water, since this can damage the electrical components inside.
- You can also keep the reservoir clean by detaching it and rinsing it occasionally.
-
3Empty and rinse the drip tray when it gets full. The drip tray catches excess coffee or water when it drips out of the Keurig during and after brewing. On most models, the tray can hold up to 8 fluid ounces (240 mL) of overflow. When the tray starts to get full or dirty, remove it by pulling it toward you and emptying it into the sink. Clean the tray with a damp, soapy cloth and rinse it with clean water.
- You can also clean the tray in the top rack of a dishwasher.
-
4Take out the K-Cup holder and wash it if it gets dirty. Sometimes the internal components of the Keurig can get dirty or clogged, affecting the machine’s performance or the taste of your coffee. To clean the K-Cup holder, lift the handle and pull up on the holder while pushing on it from beneath at the same time. You can then pull the funnel off of the K-Cup holder and rinse both parts in soap and water.
- Be careful of the sharp needle inside the K-Cup holder.
- If your Keurig is clogged, try inserting a straightened paperclip into the underside of the exit needle to clean out any built-up coffee grounds.
- You can also use a damp cotton swab to clean the area underneath the K-Cup holder.
Tip: The entrance needle under the lid may need to be cleaned occasionally as well. To do so, lift the lid and insert a straightened paper clip all the way through the needle. Wiggle it around to dislodge any clogs, then run 2 cleansing brew cycles.
-
5Run a cleansing brew after brewing sticky drinks. If you brew a sticky, sugary drink (such as hot chocolate, apple cider, or a sweet coffee drink), it’s a good idea to flush the Keurig with hot water afterward. Simply run a brewing cycle with plain water immediately after brewing your drink.[10]
- This will help prevent sugar from crystalizing in your Keurig.

Community Q&A
-
QuestionHow do I drain the water completely from my Keurig?
 wikiHow Staff EditorThis answer was written by one of our trained team of researchers who validated it for accuracy and comprehensiveness.
Staff AnswerwikiHow Staff EditorStaff AnswerMost Keurig models can't be drained completely. You can drain some models, such as the K15 and Mini Plus, by pressing and holding the brew button while the Keurig is plugged in but powered off. -
QuestionSince I cleaned my Keurig, it trips the electric socket when I plug it in. What could be the problem?wikiHow Staff EditorThis answer was written by one of our trained team of researchers who validated it for accuracy and comprehensiveness.
Staff AnswerwikiHow Staff EditorStaff AnswerIt sounds like it could be an issue with your wiring. You may need to talk to an electrician. -
QuestionWhat do I do if my Keurig won't warm up?wikiHow Staff EditorThis answer was written by one of our trained team of researchers who validated it for accuracy and comprehensiveness.
Staff AnswerwikiHow Staff EditorStaff AnswerYou may need to empty the internal hot water tank. Try powering the Keurig brewer off but keeping it plugged in. Close the lid of the cold water reservoir and put a cup on the drip tray. Press and hold the brew button to empty the hot water tank completely (there will be a delay of 3 to 5 seconds before the tank begins to drain). Then, turn your brewer back on and refill the cold water reservoir. If the Keurig still won't heat, contact their customer service at 1-866-901-BREW(2739).


References
- ↑ https://www.kitchensanity.com/coffee/how-to-use-a-keurig/
- ↑ https://www.kitchensanity.com/coffee/how-to-use-a-keurig/
- ↑ https://www.kitchensanity.com/coffee/how-to-use-a-keurig/
- ↑ https://www.keurig.com/medias/K55-User-Care-Guide.pdf?context=bWFzdGVyfGstY3VwLWJyZXdlcnMtdXNlci1ndWlkZXMtcGRmc3w2Mzc5MTF8YXBwbGljYXRpb24vcGRmfGstY3VwLWJyZXdlcnMtdXNlci1ndWlkZXMtcGRmcy9oOGEvaDFlLzQ0MjIzODcxNDUxMTY2LnBkZnxhZDAyNDc2ZjlhYjA1ODFkMmJkMjc4ZDExZWI4NjdmYWY5YjBlMjdmZTgyYWY2YmFkMWIyNTQ2ODI4ZDE2ZjIz
- ↑ https://www.keurig.com/medias/K55-User-Care-Guide.pdf?context=bWFzdGVyfGstY3VwLWJyZXdlcnMtdXNlci1ndWlkZXMtcGRmc3w2Mzc5MTF8YXBwbGljYXRpb24vcGRmfGstY3VwLWJyZXdlcnMtdXNlci1ndWlkZXMtcGRmcy9oOGEvaDFlLzQ0MjIzODcxNDUxMTY2LnBkZnxhZDAyNDc2ZjlhYjA1ODFkMmJkMjc4ZDExZWI4NjdmYWY5YjBlMjdmZTgyYWY2YmFkMWIyNTQ2ODI4ZDE2ZjIz
- ↑ https://www.kitchensanity.com/coffee/how-to-use-a-keurig/
- ↑ https://www.kitchensanity.com/coffee/how-to-use-a-keurig/
- ↑ https://www.thekitchn.com/how-to-clean-a-keurig-cooking-lessons-from-the-kitchn-218103
- ↑ https://www.thekitchn.com/how-to-clean-a-keurig-cooking-lessons-from-the-kitchn-218103
About This Article

To use a Keurig machine to make coffee, start by filling the water reservoir and pressing the power button so the water starts heating up. When it's finished, place a mug on the drip tray, and lift the handle on the front and put a K-cup inside. To start brewing, close the handle, and press the "brew" button or select a mug size from your machine's options. Once liquid stops pouring, remove your cup from the machine. To dispose of the K-cup, lift the top handle and throw the K-cup in the trash. For tips on how to clean and descale your Keurig machine, keep reading!