X
wikiHow is a “wiki,” similar to Wikipedia, which means that many of our articles are co-written by multiple authors. To create this article, 11 people, some anonymous, worked to edit and improve it over time.
This article has been viewed 50,424 times.
Learn more...
The Canon Power Winder A is a very simple, very easy to use 2 FPS motor drive for Canon's manual focus A-series cameras. If you've acquired or inherited one, these simple instructions will tell you how to fit and use one with your camera.
Steps
-
1Unclip the battery pack. There's a small catch right next to the power switch. Push it away from the power switch.
-
2Slide off the battery pack. It slides towards the power switch.Advertisement
-
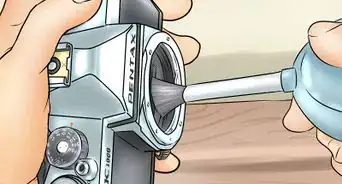
3Fit four AA batteries. Lift the hinged silver cover away first, then fit four batteries in the battery compartment. Press the silver cover back into place.
-
4Refit your battery back to the winder. This is almost exactly the opposite of removing it; it'll click right into place.
-
5Remove the winder coupler cover from the camera. This is a small, silver cover on the base of the camera (on the right hand side, if you're looking at the camera the right way up from the back). Use a coin or a large screwdriver to unscrew it.
-
6Store the winder coupler cover in the power winder. There's a holder for it on the top of the winder so you don't lose it. Slide it in as illustrated.
-
7Line up the winder with the base of the camera. Make sure the tripod socket on the camera and the screw on the winder, the electrical contacts, and the winder couplers are aligned. Gently push the winder onto the base of the camera.
-
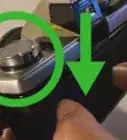
8Tighten the fastening screw. The fastening screw is the large, silver knob on the front of the camera. Turn it in the direction illustrated. It only needs to be as tight as your finger can do it; don't bother using any tools to get it tighter.
-
9Load a film if you haven't already, and then put the winder's power switch to "On". If the camera is not already wound on, the winder will advance the camera to the next frame.
-
10Shoot your way through the film. According to Canon's own literature, the winder will not advance the film to the next frame until you remove your finger from the shutter. Oddly, in practice (on the A-1 and AE-1 at least), it works continuously.[1] Try it on your camera and see what happens.
When you reach the end of your film, the winder will audibly refuse to advance the film any further, and a red LED will illuminate on the winder. The good news for cheapskates is that you can milk as many frames as possible out of a film this way, because it'll keep going until the film cannot be advanced any further, and (unlike with manual winding) you can't wind it too far. -
11Turn off the winder and rewind the film. Fortunately, the Power Winder A provides a rewind release button. Push it, then rewind your film as normal.


Advertisement
Community Q&A
-
QuestionIs there any way to test the winder without connecting to the camera?
 Community AnswerJust install batteries, turn on, then close the circuit with any metal (touching the two little terminal). If it works, each touch will give you a nice little wind.
Advertisement
Things You'll Need
- The Power Winder A and a compatible camera. It should work with all the electronic A-series models, including the AE-1 (and AE-1 Program), A-1 (used here), and the original F-1 as well.[1]
- Four AA batteries. One reputable site warns against using Ni-Cd batteries,[2] so don't do that. Our example used Ni-Mh rechargeable batteries, which work fine.


References
- ↑ 1.01.1The Canon AE-1 - Automatic Film Advance Canon Winder A from Photography in Malaysia.
- ↑ Canon Winder A - Instruction Manual from Photography in Malaysia.
About This Article
Advertisement