This article was co-authored by Lauren Kurtz. Lauren Kurtz is a Naturalist and Horticultural Specialist. Lauren has worked for Aurora, Colorado managing the Water-Wise Garden at Aurora Municipal Center for the Water Conservation Department. She earned a BA in Environmental and Sustainability Studies from Western Michigan University in 2014.
wikiHow marks an article as reader-approved once it receives enough positive feedback. This article received 11 testimonials and 100% of readers who voted found it helpful, earning it our reader-approved status.
This article has been viewed 606,979 times.
Everyone needs a vacation from time to time. Pets often get put under the care of a friend, neighbor, or pet boarding house, but what about plants? Some plants can last a long time without water, but other plants need weekly or even daily care. If you are going away for a trip, you need to ensure that your plants will receive enough water to survive your absence. In some cases, you might not even need a friend or neighbor to plant-sit for you!
Steps
Making a Watering Bottle
-
1Make sure that the soil is completely saturated. If the soil is too dry, it will soak up all of the water that is in the bottle. If the soil is dry, water it now.[1]
-
2Get a glass bottle with a narrow neck. A wine bottle will be ideal, because it will be large enough to water 4 to 6 square feet (0.38 to 0.56 square meters) for up to 3 days. If you don't need to water such a large area, you can use a smaller bottle, such as a soda or beer bottle.[2]
- Alternatively, you can also use a store-bought watering globe or aqua globe.
Advertisement -
3Fill the bottle with water, place your thumb it, and turn it upside down. Don't fill it all the way; just up to where the neck starts will be plenty. At this time, you can also add additional items, such as liquid fertilizers. Use your thumb to plug the hole in the mouth of the bottle when you flip it over. Position the bottle right next to the plant you need to be watered.
-
4Push the bottle neck into the soil. As you're pushing the neck into the soil, move your thumb out of the way. Make sure that the bottle's neck is several inches in the soil. It's okay if the bottle leans to the side, but it should be sturdy and secure.[3]
-
5Make sure that the water is draining properly. If the water is not draining at all, the soil might be clogging the bottle. If this happens, take the bottle out of the soil, clean it, and glue a piece of screening over the mouth. Refill the bottle, and insert it into the soil again.[4]
- Draw a line on the bottle with a permanent marker, right at the water level. Check back after a few hours (or even a whole day). If the water level is below the line you drew, the water is draining properly. If the water level has not changed, something might be blocking it.


Making a String Drip System
-
1Saturate the soil before you begin. If the soil is too dry, it will soak up all of the water from the jug before you leave on your trip. By the time you get back, there may not even be any water left in the jug. Water the soil before making the string drip system to avoid this issue.
-
2Place 1 gallon (3.8 L) jug next to your plant. Position the jug so that it is out of direct sunlight; this will reduce the amount of evaporation. If you are only going for a few days and have a small plant, a mason jar will be enough.[5] Don't fill the jug with water yet.
- This method will keep your plants watered for up to a week.
-
3Cut a long piece of cotton or nylon twine. The twine needs to be long enough to extend from the bottom of the jug to the base of the plant. If you can't find cotton or nylon twine, or if it is too thin, braid 3 strips of cotton fabric together, and use that instead.[6]
- The string must be able to hold water. If it can't hold water, this method won't work.[7]
-
4Place 1 end of the string into the jug. The string must reach the bottom of the jug. If you wish to water more than 1 plant, it might be a good idea to set up more jugs, 1 for each plant. This way, you won't run into the risk of the jug running out of water while you are away.
- If you have a few plants that don't require a lot of water, such as succulents, you might be able to get away with a single jug for 2 or 3 plants. Even if the jug does run out of water, your plants may still survive because of their water-retaining properties.
-
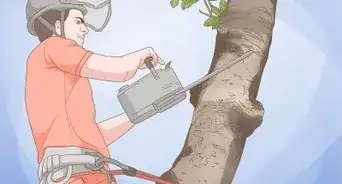
5Poke the other end of the string into the soil at the base of the plant. The string needs to be about 3 inches (7.6 cm) deep.[8] Also, make sure that the string is out of direct sunlight. Partial sun is fine, but if there is too much sunlight, the string will dry out before it can get the water to the plant.[9]
-
6Fill the jug with water. If your plants need fertilizer, you can also add some liquid fertilizer into the water at this time. If your plant is in a sunny spot, consider putting a piece of duct tape over the mouth of the jug; be careful not to cover the string, however. This will help slow down the rate of evaporation.
-
7Make sure that the mouth of the jug is above the base of the plant. If the jug is too low, put it on top of a book, a block, or an upturned pot to raise it up a little. This way, the water will be able to drip down the string.


Making a Bottle Drip System
-
1Make sure that the soil is completely damp. If the soil is too dry, it will soak up all the water from your bottle before you even leave for your trip. Having the soil already damp before you begin will ensure that the plant doesn't soak up the water too fast.
-
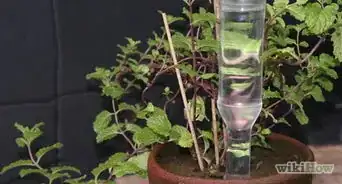
2Get a plastic 2 litres (2.1 US qt) bottle. If you have a smaller plant to take care of, a smaller bottle will do just fine. Since you will be burying this bottle in the soil, this method will work best for garden plants or plants in large containers.
-
3Use a hammer and nail to poke 2 holes into the bottom of the bottle. This is very important. If you don't have any drain holes at the bottom of the bottle, the water will sit instead of draining out. This can lead to algae growth.[10]
-
4Poke 3-5 holes in the sides of the bottle. You don't need a lot; 3 to 5 holes will be plenty. If you put in too many holes, the water will leak out too fast, which you don't want.
- Place the holes on 1 side of the bottle. When you put the bottle into the soil, turn it so that the holes face the plant you are watering.
- It's better to start with too few holes than too many. You can always add more holes later if there aren't enough, but it will be difficult to cover up holes that are already there.
-
5Dig a hole in the dirt next to your plant. The hole needs to be deep enough to cover the bottle up to the neck.
-
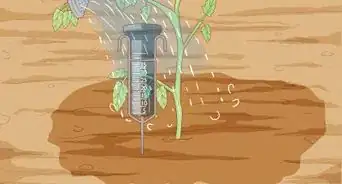
6Fill the bottle with water, then insert it into the hole. At this point, you can also add some liquid fertilizer as well. Gently pat the soil around the bottle and be careful not to get any inside it.
-
7Put the lid onto the bottle, if desired. The lid will help slow down the rate of water flow; this is great for plants that don't need a lot of water, or if you will be gone for a long time. The tighter you screw on the lid, the slower the water will flow out.
- Make a mark on the bottle with a marker, right at the water level. Check back after a few hours. If the water level has not changed, loosen the cap a little. If the water level has dropped significantly, tighten the cap.


Asking a Friend or Neighbor
-
1Find a friend or neighbor who you trust. This person will have access to your lawn, and in some cases, your house (if you need indoor plants watered). Make sure that you trust this person. If this person is watering indoor plants, remember to leave behind a spare key so that they will have access to your plants.
-
2Be reasonable. Do not ask someone who lives far away, or for whom getting to your place would be a big deal or hassle. Try to keep the visits to a minimum. Someone might be willing to visit your place once or twice a week, but they might not be willing to visit it every single day, especially if your home is out of the way for them.
- Consider using some homemade watering systems as well. This way, your plants will rely on the homemade watering systems, and all your neighbor will have to do is refill the bottles when they get empty.
-
3Group potted plants together based on watering needs. This will be easier for your neighbor to keep track of. For example, you can keep all of the succulents in 1 area, and the ivies in another.[11] To keep your house clean, consider storing the plants on a tray.
-
4Write down specific care and watering instructions. Be detailed, but not complex, and do not make assumptions. Your friend or neighbor may not have the same gardening skills as you do. What might seem like basic information to you might not even cross your friend or neighbor's mind.
- An example of specific watering instructions would include: Give this plant 0.5 c (120 mL)of water every Saturday evening.
- An example of specific care instructions would include: Tip the excess water out of the basil dish daily.[12]
-
5Water check your plants for pests and disease before you leave. Watering your plants will reduce the amount of work or visits your plant sitter has to do. Checking your plants for pests or disease will ensure that they are healthy during your trip. If your plants succumb to pests or disease while you are away, your friend or neighbor might be at a loss of what to do. If your plants die while under their care, they may feel guilty!
-
6Offer to return the favor. Even if you know that your friend or neighbor will say "no," it would still be polite to offer. This will reassure your friend or neighbor that you aren't just using them. They will also be more likely to help plant sit for you the next time you go on a trip. If they do accept your offer, remember to hold up to it!


Setting Up a Mini Greenhouse
-
1Choose a clear, plastic bag big enough to fit your potted plant. The bag will trap moisture released by the plants. This moisture will then drip back down onto the plants, watering them. The bag must be clear in order to allow sunlight to pass through.
-
2Place a damp towel in the bottom of the bag and put the plants on top. The towel will help the plants retain moisture and prevent the soil from getting too dry. Only put as many plants on top of the towel as you can fit. The leaves should just barely be touching each other. If the leaves are getting cramped, get another bag.
-
3Tie the bag shut while trapping as much air as possible inside. You can tie the bag shut with a rubber band or twist tie. For extra security, fold the tied part of the bag down, and wrap another rubber band around it.
-
4Move the plants away from direct sunlight. You can keep them indoors or outdoors, but make sure that they are out of direct sunlight—partial sunlight is fine, however. If you keep your plants in direct sunlight, they will get cooked due to the trapped heat.
-
5Keep bigger plants in the bathtub. If the plants are too big to fit inside of a plastic bag, simply line your bathtub with a plastic sheet and several newspapers. Place the plants on top, water them until the newspapers get soaked, and close the shower curtains.[13]
- Leave the light on, if you can.


Community Q&A
Did you know you can get expert answers for this article?
Unlock expert answers by supporting wikiHow
-
QuestionI returned home to find my outdoor plants unwatered and so dry they looked almost dead. I immediately soaked them and they came back to life. Did I do the right thing?
 Lauren KurtzLauren Kurtz is a Naturalist and Horticultural Specialist. Lauren has worked for Aurora, Colorado managing the Water-Wise Garden at Aurora Municipal Center for the Water Conservation Department. She earned a BA in Environmental and Sustainability Studies from Western Michigan University in 2014.
Professional GardenerIf your plants came back to life then you did the right thing! You came home at a good time. Any longer and your plants probably would have died. Avoid this problem by using one of the methods detailed above to water your plants while you’re away.
Support wikiHow by unlocking this expert answer.
-
QuestionCan I water on a tray of water?Lauren KurtzLauren Kurtz is a Naturalist and Horticultural Specialist. Lauren has worked for Aurora, Colorado managing the Water-Wise Garden at Aurora Municipal Center for the Water Conservation Department. She earned a BA in Environmental and Sustainability Studies from Western Michigan University in 2014.
Professional GardenerYes this can work if you are leaving for less than a week. This will work best with terracotta pots. Place the pots on a tray of shallow water.Support wikiHow by unlocking this expert answer.
-
QuestionThe string that I am using to water my plants dries out, and my plants are dry as well. What am I doing wrong?
 Community AnswerThe string or cord that you use must be able to "hold" water. Usually that means that some part or all of it is cotton. The Dollar Stores sell synthetic twisted cord that cannot transit water. The round braided cord often has a cotton outside braid with a nylon or other synthetic core. These WILL transmit water. The way to test is to drop 6" of the end of the cord length into water in the sink for 30 seconds, then lift it out and see if you can squeeze water out of it easily. If you can, then this is the cord to use.
Warnings
- These suggestions will not water your plants forever!⧼thumbs_response⧽
- Use caution when telling someone you will be away for a while.⧼thumbs_response⧽
Things You'll Need
Watering Bottle
- Glass wine bottle
String Drip System
- Mason jar
- Natural twine or cotton fabric
Bottle Drip System
- 2 litres (2.1 US qt) plastic bottle
- Nail
- Hammer
Setting Up a Mini Greenhouse
- Clear, plastic bag
- Twist tie or rubber band
- Towel
- Bathtub (optional)


References
- ↑ https://www.houselogic.com/by-room/yard-patio/how-to-water-plants-while-on-vacation/
- ↑ http://dontwastethecrumbs.com/2015/07/how-to-vacation-proof-your-garden/
- ↑ http://www.thegardenglove.com/going-on-vacation-3-diy-self-watering-ideas-for-the-garden/
- ↑ https://www.houselogic.com/by-room/yard-patio/how-to-water-plants-while-on-vacation/
- ↑ http://dontwastethecrumbs.com/2015/07/how-to-vacation-proof-your-garden/
- ↑ http://dontwastethecrumbs.com/2015/07/how-to-vacation-proof-your-garden/
- ↑ https://www.houselogic.com/by-room/yard-patio/how-to-water-plants-while-on-vacation/
- ↑ https://www.goodhousekeeping.com/home/gardening/a20720951/how-to-water-plants-while-away/
- ↑ http://dontwastethecrumbs.com/2015/07/how-to-vacation-proof-your-garden/
- ↑ https://www.inabottle.it/en/trends/drip-irrigation-can-also-be-done-plastic-bottles
- ↑ http://www.gardeners.com/how-to/vacation-watering/8534.html
- ↑ http://www.gardeners.com/how-to/vacation-watering/8534.html
- ↑ http://www.gardeners.com/how-to/vacation-watering/8534.html
- ↑ http://www.gardeners.com/how-to/vacation-watering/8534.html
- ↑ http://www.gardeners.com/how-to/vacation-watering/8534.html
- ↑ http://www.gardeners.com/how-to/vacation-watering/8534.html
About This Article

One easy way to water plants while you’re away is to make a watering bottle. Choose a wine bottle or another glass bottle with a narrow neck. Fill the bottle up to the base of the neck with water. If you like, add a small amount of fertilizer or plant food. Place your thumb over the opening of the bottle and turn it upside down. Position the opening of the bottle over the soil in the plant’s container, then quickly move your thumb out of the way and push the neck of the bottle down into the soil. Check the bottle occasionally over the next few hours to make sure the water is slowly draining. If it isn’t, you may need to tape a small piece of screen or fabric over the opening of the bottle to keep soil from clogging it. To learn other ways you can water your plants while you're away, scroll down!