This article was co-authored by wikiHow Staff. Our trained team of editors and researchers validate articles for accuracy and comprehensiveness. wikiHow's Content Management Team carefully monitors the work from our editorial staff to ensure that each article is backed by trusted research and meets our high quality standards.
This article has been viewed 22,119 times.
Learn more...
The Bargello stitch, also known as the long stitch, is a simple cross stitch that is worked vertically across a canvas to produce a colorful wave-like design. The peaks of this design can be worked so that they appear sharp or soft. People started using this design during the 15th century for tapestries, but it is versatile.[1] Try using the Bargello stitch for your next cross stitch project to get dramatic colorful results.
Steps
Planning Your Project
-
1Gather your materials. Working the Bargello stitch requires the same basic materials that you need to do other needlecraft stitches. You will need:[2]
- Embroidery floss. It is best to opt for a thicker floss, but otherwise you can choose the color and type of floss that best suits your project. You can also use yarn if you are working on a plastic canvas, but yarn is not appropriate for a cloth canvas.
- Canvas. You can use a cloth canvas if you will be using embroidery floss or a plastic canvas if you will be using yarn.
- Embroidery hoop. This is only necessary if you will be working with a cloth canvas. You can skip the hoop if you are using a plastic canvas.
- Tapestry needle. Make sure the eye of the needle is large enough to fit your thread or yarn through.
-
2Consider your color scheme. Bargello stitch looks best when you use a variety of different colors to create your designs. In general, the two types of color schemes that people use for the Bargello stitch include:[3]
- Monochromatic. This means that the colors are all different shades of the same color. For example, you might begin with a dark blue, then switch to a medium blue, then a light blue, and then a pale baby blue.
- Contrasting. These are colors that are across from each other on the color wheel, such as yellow and purple or red and green.
Advertisement -
3Choose or design a pattern. You can find pre-made Bargello stitch patterns to follow, or you can just use a basic Bargello stitch to create a design. If you want to create a custom design, then you could even draw one out on graph paper.
- To create your own design using the basic Bargello stitch, use colored pencils to mark spaces on a piece of graph paper.
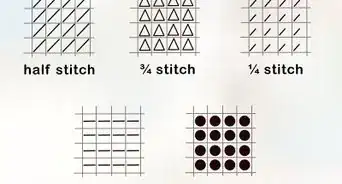
- The Bargello stitch can be worked over two to six canvas spaces, but the stitches are always vertical or horizontal.
- The stitches occur in gradations that create the appearance of waves or sharp peaks depending on how far apart your space them.


Working a Basic Bargello or Long Stitch
-
1Mount your canvas in an embroidery hoop. Start by placing your canvas in an embroidery hoop and securing it in place. This will help to ensure that you have a taut surface to embroider, which will make your work much easier.
- The only exception is if you are using plastic canvas with yarn. In this case, you do not need to use an embroidery hoop because the plastic canvas is thick enough to hold its shape.
-
2Insert your thread through the first hole in your pattern. When you are ready to begin working the Bargello stitch, thread your tapestry needle with an 18 inch (46 cm) strand of embroidery floss. Then, insert the needle going through the back of the canvas and into the top part of the first stitch.
- Make sure to tie a knot in the end of your strand of thread to anchor it to the back of the first stitch. Otherwise, your thread will pull right through the hole.
-
3Bring the thread down to the end point of the stitch. Next, pull the thread through until it is anchored by the knot and then bring the thread down towards the end point of your first stitch. Keep in mind that a Bargello stitch may cross over two to six canvas spaces to create each stitch.
- For example, if you started your stitch in the top corner space of your canvas, then you might bring the needle down and through the fourth space from the top of the canvas in the same row.
-
4Go up through your next stitch. Next, you will need to make an upward stitch. Insert your needle through the back of your canvas where you want the bottom of your next stitch to be. The location of this next stitch will depend on how sharp or soft you want your peaks to be.
- If you want to create a sharp peak for your next stitch, then you would insert the needle through a space in the next row that is near the center of your first stitch or two or more spaces above it.
- If you want to create a soft peak or wave-like design, then you would insert the needle so that it comes out only one space above or below your first stitch.
-
5Bring the thread up to the next endpoint. After you bring your thread up through the canvas again, pull the thread up and across the spaces and bring it down through the endpoint for that stitch. Make sure that the stitch covers the same amount of canvas spaces as your first stitch even though the stitch will have shifted up or down.
-
6Continue to stitch up and down until you complete your pattern. You will need to start the process over again after you complete your second stitch. Keep repeating this stitch sequence and moving the locations of your stitches according to your design until you have completed your project.


Getting the Best Results
-
1Choose a thick floss. Since the Bargello stitch covers multiple canvas spaces, a thick floss is best. A thick floss will make it easier to cover the surface area of your canvas. If you do not have a thick floss, then combine two or three strands of the floss you do have to ensure good coverage of the canvas.[4]
- If you are working with a multi-ply thread, such as Watercolors, then you will need to separate the threads and then regroup them together before using the thread. This will help to increase the surface coverage and ensure that the threads lay flat.
-
2Use spacing to change the appearance of the design. As you plan out your Bargello stitch design, keep in mind that the amount of space between your stitches will affect the way that the completed design looks. Adding more vertical space between the stitches will result in sharper peaks while keeping your stitches closer together will result in softer peaks that look like waves.[5]
- For extra soft peaks, you can even try putting two or three stitches parallel with each other in the valleys of your design.
-
3Avoid working too close to another design. The Bargello stitch is striking and it can be overwhelming when placed alongside other designs. Therefore, it is best to avoid placing Bargello stitches right next to other design elements. If you want to use Bargello stitch to frame another design, such as a cross stitch animal, then surround the design with some basic cross stitching. This will form a cushion between the design and the Bargello stitches.


Things You’ll Need
- Embroidery floss
- Tapestry needle
- Embroidery canvas
- Embroidery hoop


References
- ↑ http://www.needlework-tips-and-techniques.com/bargello.html
- ↑ http://www.needlework-tips-and-techniques.com/bargello.html
- ↑ http://www.needlework-tips-and-techniques.com/bargello.html
- ↑ http://www.nordicneedle.net/guides/stitching-techniques-guides/canvaswork-needlepoint/bargello-canvaswork/
- ↑ http://www.needlework-tips-and-techniques.com/bargello.html
About This Article