Dick Johnson Racing
Dick Johnson Racing (formerly DJR Team Penske) is Australia's oldest motor racing team competing in the Supercars Championship. Founded by Dick Johnson, the team's drivers have won ten Australian Touring Car Championship titles (five of them by Johnson himself) and the team has taken four victories in Australia's premier race, the Bathurst 1000. The team currently competes under the commercial title Shell V-Power Racing Team with two Ford Mustang GTs. Anton de Pasquale drives the No. 11 car, while Will Davison drives the No. 17 car.
| Manufacturer | Ford |
|---|---|
| Team Principal | Ryan Story |
| Team Manager | Ben Croke |
| Race Drivers | 11. Anton de Pasquale 17. Will Davison |
| Race Engineers | 11. Perry Kapper 17. Richard Harris |
| Chassis | Mustang GT |
| Debut | 1980 CRC 300 (first race) 1981 (ATCC) |
| Drivers' Championships | 10 (1981, 1982, 1984, 1988, 1989, 1995, 2010, 2018, 2019, 2020) |
| Teams' Championships | 3 (2017, 2019, 2020) |
| Round wins | 46 |
| Race wins | 103 |
| Pole positions | 140 |
| 2023 position | 5th (3604 pts) |
.jpg.webp)
In August 2022, DJR announced that The Ralph Family will become majority shareholders of Dick Johnson Racing as of January 2023, with the Family's interest being held through the Melbourne Aces Baseball Club, adding to the Aces expansive sporting portfolio.[1][2]
Brett Ralph is the figurehead of the Ralph family’s endeavours working alongside brother Shaun, with business interests in the transport and sport sectors.
Dick Johnson and Executive Chairman Ryan Story both retain significant shareholdings in DJR, and maintain their day-to-day positions, overseeing operations of the Shell V-Power Racing Team as the new structure evolves.
Overview
The team was initially based out of Johnson's family home in Daisy Hill in Brisbane's southern suburbs, before moving to facilities within sponsor Palmer Tube Mills' factory. In the late 1990s it relocated to a specialist workshop in Stapylton.
In September 2014 it was announced that American motor racing team owner Roger Penske had taken a 51% shareholding interest in DJR, rebranding it as DJR Team Penske with former V8 Supercar champion and NASCAR regular Marcos Ambrose joining the team at the final event of the 2014 season ahead of a full 2015 program. It was the first time that Team Penske expanded its involvement to a non-US based championship since their days in Formula 1.
After Penske sold it to Ryan Story in 2020, the team restored its original name. However, with the sponsorship of the giant Shell organisation, DJR is also being known as Shell V-Power Racing.
Subsequently, in 2023, The Ralph Family has taken up a majority shareholding in DJR.
The team also raced several races in the NASCAR Winston Cup Series in 1989 and 1990 with Johnson being an owner driver and up and coming driver Jay Sauter crew chiefed by future Championship winning crew chief with Jeff Gordon, Ray Evernham.
History
Early years and Group C
The longest-established motor racing team in Australia, Dick Johnson Racing was founded in 1980. The team was originally based out of Johnson's home in Daisy Hill in Brisbane's southern suburbs.
During the 1970s, Johnson was only a sporadic competitor in the Australian Touring Car Championship (ATCC), but a regular competitor, and victor in the Queensland Touring Car Championship driving a Holden LJ Torana GTR XU-1 backed by petroleum giant Shell, and later by prominent Brisbane Holden dealership, Zupps. Johnson's national profile increased with the formation of Bryan Byrt Racing with Johnson as lead driver late in 1976, giving Johnson his first drives in a Ford XB Falcon GT Hardtop. The team folded at the end of the 1979 season, but Johnson was able to use some of its resources to establish his own team for the following season with financial hold from Johnson's long time friend Ross Palmer and his Brisbane-based business Palmer Tube Mills.
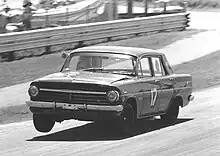
After briefly investigating running a Mazda RX-7, Johnson came to the fore when a change in regulations introduced the Ford XD Falcon to the series. Johnson debuted his new Falcon at a non-championship meeting at Lakeside in June,[3] and then finished second in the car in the 1980 CRC 300 at Amaroo Park in August. Johnson served notice of his and the XD's arrival to a delighted Peter Brock when he led the Holden Dealer Team VB Commodore early in the race and it was only tyre troubles that dropped him to second behind the Commodore. Brock was delighted as other than Kevin Bartlett's 5.7L Chevrolet Camaro Z28 (which had proved its speed, but its drum rear brakes were not up to the job), his HDT Commodore had proven near unbeatable in 1980 and Johnson and the new model Ford Falcon provided a welcome new challenger.[3]
The largely unheralded Johnson then surprised everyone when he qualified on the front row for the 1980 Hardie-Ferodo 1000 alongside Bartlett's Camaro and in front of Brock (who had qualified on pole for all 12 races touring car races he had entered to that point of the year). Bartlett had been the fastest in official qualifying, but Dick matched his time by the 1/100th of a second. When the flag dropped to start the race, the Camaro bogged down and Johnson took off, quickly building a large lead over the first sixteen laps of the race, including putting a lap on four time and reigning Bathurst champion Brock after the Dealer Team Commodore had to pit for minor repairs. On the seventeenth lap after just having lapped Brock, Johnson collided with the wall coming out of The Cutting after running over a large rock in the road. Coming out of The Cutting (in the days before the use of the Safety car), Johnson found a tilt-tray tow truck that was retrieving a mechanically failed car from the circuit on one side of the road and a basketball sized rock sitting right on the only path past the truck. The Falcon ran over the rock with its left wheels and caused Johnson to impact the wall which was enough to all but destroy the car. In the aftermath of the crash, as Johnson was standing beside the car as it lay across the track (partially blocking it and leaving only one line through), he was almost cleaned up by the 3rd placed Falcon of Bob Morris who was forced to lock his brakes in a successful bid to avoid hitting Johnson after apparently not paying attention to the yellow flags.[4]
The tale of Johnson's battle with the rock at Bathurst in 1980 is still remembered, and some AU$72,000 was donated by the Australian public who pledged money through the race broadcasters, the Seven Network after watching the crash and a subsequent TV interview with Johnson conducted by visiting American commentator Chris Economaki (with a visibly moved Johnson thanking both Seven and the Australian public). The amount pledged by Channel 7 viewers was matched by dollar for dollar by then Ford Australia boss Edsel Ford II who recognised the significance of Johnson's performance at Bathurst in keeping Ford at the sharp end of touring car racing.[5] The overall donation of $144,000 plus the sale of the crashed Falcon to fellow Queenslander John Donnelly who repaired and returned it to racing, was enough to get Johnson back on track with a new XD Falcon for 1981.
Inspired by the support and feeling a great sense of debt to the Australian public, Johnson went on to win the 1981 Australian Touring Car Championship in a thrilling duel with Peter Brock which went down to the last race of the series at his home track of Lakeside in Brisbane. There Johnson led from the front and just managed to win by a second from Brock in what many believe to be one of the best touring car races seen in Australia with both drivers praising each other (and winning universal praise) for a clean race in which Brock had many chances to actually punt the Tru-Blu Falcon off the road but resisted the temptation to do so. After leading early in the Hang Ten 400 at Sandown Raceway in Melbourne, a couple of spins thanks to a new suspension set up that was not working handed Brock his seventh Sandown endurance race win in a row. The suspension problems were fixed by the time the team got to Bathurst for the James Hardie 1000 and Johnson again put the Falcon on the front row alongside Bartlett's Camaro. There, alongside veteran co-driver John French they becoming the first Queenslander's to win the event. With Allan Moffat becoming a factory Mazda driver, Johnson became Ford's lead driver and 'folk hero'. The 1981 race is remembered not only as DJR's first win at The Mountain, but also because the race was red flagged on lap 121 of 163 because of a crash at McPhillamy Park on lap 122 which blocked the track. As the Johnson/French car was leading at the end of lap 121 and the race had travelled more than ⅔ distance, the race was declared with Johnson and French the winners. It was the first time in the races history that the race had been declared short of the required distance.
Johnson won the touring car championship again in 1982 in the Tru Blu XD Falcon, though he had actually finished second in points behind Peter Brock. However, Brock was disqualified for the use of yet to be homologated engine parts and the subsequent loss of points gave Johnson his second ATCC championship win. At Bathurst, DJR had the new model Ford XE Falcon, but they had been overtaken in speed by the lighter Holden Commodore SS'. Despite running strong all day and having no major troubles other than a broken front sway bar late in the race which slowed the car by approximately one second per lap, the No. 17 Falcon finished in 4th place on the road (although three laps down on race winners Peter Brock and Larry Perkins in their Holden Dealer Team Commodore), but was disqualified after post race scrutineering for illegal engine modifications. In his biography, Johnson maintains that they were legal, over the counter Ford parts but that the team did not have the money to fight the ruling. The 1982 race was the first time that Johnson's car carried Channel 7's Racecam unit which brought television viewers footage from inside the car. It was the start of Johnson's long run with Racecam and made him more popular with the Australian public, even with Holden fans, thanks to his quick wit and seemingly endless number of one-liners while driving in races.
The 1983 Australian Touring Car Championship was a disappointment as the heavy (approximately 1,400 kg (3,100 lb)) XE Falcon was not competitive against the lighter (by around 200 kg (440 lb)) Commodores, the Nissan Bluebird turbo or Allan Moffat's Mazda RX-7 which won the title. To help fix the problems with the Falcon, Johnson enlisted the services of former Williams Formula One mechanic Wayne Eckersley, who was now based in Brisbane. Eckersley's work with the cars suspension, plus new parts (including 19" rear wheels, up from the previous 10") in the August homologation saw the Falcon back as a competitive car, as displayed by Johnson when he easily led the Valvoline 250 at Sydney's Oran Park Raceway before a slow pit stop dropped his car, now painted Green to promote major sponsor Palmer Tube Mills' latest product "Greens-Tuf", back to second behind the Bluebird of George Fury. The Falcon was also on the pace at the 1983 Castrol 400 at Sandown where the long front and back straights suited the over 450 bhp (336 kW; 456 PS) of the 351 V8 engine. Dick qualified the car in 2nd place behind Brock's HDT Commodore (also benefiting from the August homologation) and won the jump at the start. However, his charge would only last only a few hundred metres and before the first turn the Falcon's clutch shredded itself, ending his race. Johnson attributed the failure to the condition of the pit paddock which had been turned to mud following a couple of days of heavy rain, with Dick claiming it was mud in the clutch that had caused the problem.
Then came the 1983 James Hardie 1000 where Johnson's Falcon was one of the favourites to claim pole position. Johnson also had a new co-driver in 1983 with 1974 race winner Kevin Bartlett replacing John French who was driving for the factory backed Nissan team. During qualifying it was again the Commodore of Peter Brock which had set the pace, with Johnson a close second and predicting that the Falcon could go even faster. During the Hardies Heroes Top 10 runoff on the Saturday morning, Johnson had his second major accident at Bathurst. On his lap for pole, Johnson ran slightly wide at Forrest's Elbow, with the rear of the Falcon clipping the wall on the exit of the corner. The car then hit tyres which were protruding from the edge of the wall which tore the right front wheel to the right and broke the cars steering. The Greens-Tuf Falcon was destroyed as it ran through a grove of trees. While the car was a write-off, Johnson thankfully emerged from the wreck with little more than a headache and a small cut over his left eye, though he has no memory of the crash, or the lift back to the pits with Peter Brock who was on his warm up lap for his second run.[6]
In a very generous move, fellow Falcon runner and reporter for The Mike Walsh Show, Andrew Harris, approached Johnson's wife Jill in the pits shortly after the crash and offered his car to the Johnson team if a replacement car could not be found for him (Harris reasoned that the fans on the hill would have wanted to see the popular Johnson racing more than they would himself). Johnson's sponsor and friend Ross Palmer leased the Harris Falcon, while also buying the Barry Lawrence / Geoff Russell Holden Commodore for Harris to drive (Palmer would sell the car back to Barry Lawrence after the race).
The Harris Falcon, which was actually the then Alan Jones owned, Bob Morris XE Falcon that had crashed in practice at Bathurst in 1982 and could not be repaired in time to take the start, was converted by Dick's and the TAFE smash repair team overnight in a marathon rebuild which included help from other leading teams (including the HDT's sign writer), while the Commodore was re-painted in the colours of Harris' sponsors which also included a Bendigo Ford dealer. Unfortunately for Johnson and new co-driver Bartlett, the hastily rebuilt car (which was allowed to start tenth and was only completed moments before the start) was to only last 61 laps before being withdrawn with terminal electrical trouble (not before Johnson went on television and said that the car was "such a dog we should have tied it to the fence"). Better luck fell on Harris and co-driver Gary Cooke, who would finish tenth outright in the car dubbed as a "Falcodore" by its new team (although the car ran a 5.0L V8, the team cheekily placed the Falcon's 5.8L badge on the car), with Harris winning the "Wynns Rookie of the Year" award. Despite their troubles, the Johnson Falcon was the fastest recorded car on Conrod Straight during the race, hitting a reported 263 km/h (163 mph).
The troubles for DJR didn't finish at Bathurst though. On their way back to Brisbane after the race, the car towing the trailer with the crashed Falcon actually crashed and inflicted even further damage to the wrecked race car. The Falcon, dubbed "Greens Stuffed", was later broken up and used as paperweights.
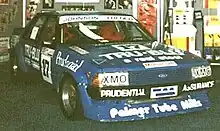
Dick Johnson Racing then built a new XE Falcon to run in the 1984 Australian Touring Car Championship. Johnson's consistent run saw him finish no lower than third at each round while winning in the wet at Surfers Paradise. This saw Dick Johnson win his third ATCC and the final ATCC to be run under the locally developed Group C rules. During the ABC's coverage of the final round at the Adelaide International Raceway where Johnson finished a close third behind race winner Allan Grice (Commodore) and Peter Brock, commentator Will Hagon noted that following the championship trail in 1984 had seen the Johnson team cover more than 20,000 km. Although Johnson won the championship, and pointed to the cars reliability, he did acknowledge that other top contenders not running the full series (Allan Grice didn't have enough money, Peter Brock missed rounds while racing at Le Mans, Nissan missed rounds chasing development, and defending champion Allan Moffat suffered a bad crash at Surfers in which he was injured and missed the remainder of the series) did help his championship cause.
Mustangs
With no local Ford product suitable following a change to international Group A touring car regulations at the end of 1984, and as Ford Australia were not interested in homologating a mooted turbocharged XF Falcon sedan for Group A racing, Johnson ventured to Germany and purchased a pair of Zakspeed constructed Ford Mustangs for the 1985 and 1986 seasons. While the Mustang years brought limited success, reliability and good-handling in the underpowered cars enabled Johnson to claim runner-up in the 1985 Australian Touring Car Championship, while his one and only victory aboard the Mustang was in the Group A support race at the 1985 Australian Grand Prix in Adelaide. The Mustang, like almost all other cars in the ATCC, was outclassed by the JPS Team BMW 635 CSi of Jim Richards who won seven of the championships ten races. The team had actually entered and qualified one of the Mustangs at Bathurst in 1984 (painted white with #71) in the new Group A category, but it was only there for a shakedown run and insurance should there a repeat of 1983 and was withdrawn after Johnson had put the XE Falcon onto fourth on the grid.
When the team purchased the Mustangs from Zakspeed, the engine power was quoted as 310 bhp (231 kW; 314 PS). However, the car the team took to Bathurst in 1984 was described as 'sluggish' by both Dick Johnson and his co-driver John French with Johnson's best time being 5 seconds slower than the class leading V8 Rover Vitesse and some 14 seconds slower than his Group C Falcon. In the weeks following the race the team put the 5.0L Ford V8 engines on the dyno and found them to be only producing approximately 260 bhp (194 kW; 264 PS). Extensive rebuild and development of the engines at Johnson's Brisbane Engine Centre before the start of the 1985 ATCC saw power figures back to what was originally quoted.
While the Mustang struggled to match the pace of the Richards BMW in the ATCC, the August homologation (which also increased power to around 340 bhp (254 kW; 345 PS) brought the car back into winning contention. Dick dominated the Valvoline 250 at Oran Park and was heading for an easy win until an axle broke causing a wheel to fall off the car, ironically handing the win to Richards. The Mustang had received larger axles as part of the homologation package and the team had the new parts available, but had simply run out of time to fit them before the Oran Park race.
In mid-1985, Johnson signed triple and defending Bathurst 1000 winner Larry Perkins to be his co-driver for the Castrol 500 at Sandown and the James Hardie 1000 at Bathurst. Johnson led early at Sandown until a broken axle saw the team lose many laps in the pits repairing the car. At Bathurst, the team entered both Mustangs but only Johnson and Perkins as drivers. After the 1983 Hardies Heroes crash, the second No. 18 car (Johnson's ATCC car) was entered as an insurance policy in case something happened to the No. 17 Mustang. Ironically Johnson and Perkins qualified both cars for Hardies Heroes, though the No. 18 car was withdrawn before the race started. Against the might of Tom Walkinshaw Racing's three V12 Jaguar XJS', Johnson qualified fourth and ran strongly until the cars oil cooler broke a weld and had to be bypassed on lap 16, losing the team three laps. Johnson was unhappy as the oil cooler had actually split the day before when the car was going over the speed humps in the pit lane. Before he left the circuit that night he left instructions for his crew to replace the cooler, but returned on race morning to find it had only been repaired and not replaced (ironically the split occurred not at the repaired weld, but on the opposite side of the cooler). With no time left to change it the car was forced to start with the repaired cooler which subsequently failed. From then Johnson and Perkins drove as hard as they could with the engine temperature "off the clock" and were rewarded with a seventh-place finish, though Perkins' first lap of the race was a slow one as the left front wheel had not been secured properly with the wheel nut spinning off in the braking area at the top of Mountain Straight. Perkins then managed to get the car back to the pits without the wheel falling off the car.
Rumours had floated around the Bathurst pits that DJR had toyed with the idea of actually running both Mustangs in the race with the second car to be driven by Belgian jeweller Michel Delcourt and none other than former Ford hero Allan Moffat who was without a drive for the year thanks to Mazda pulling out and was actually commentating on the race for Channel 7. Moffat indeed drove the Mustang during practice, but this had only been part of his duties as an expert commentator to evaluate the leading (Australian) contenders. Delcourt was entered in the race in Graham Moore's Mitsubishi Starion Turbo, but the car was withdrawn following practice. Larry Perkins reportedly stopped DJR from fully entering the second car, rightfully (according to Johnson) reasoning that the team was not set up to race both cars.
With the arrival of the first truly competitive Group A Holden Commodore, the new VK SS Group A, and the new turbocharged Nissan Skyline DR30 RS, plus the continued development of the Volvo 240T, the Mustang quickly fell behind its rivals in 1986 and Johnson could only finish sixth in the ATCC with a best finish of 4th in the opening round at Amaroo Park. For Sandown and Bathurst the team signed former Grand Prix motorcycle star and Moffat team driver Gregg Hansford to be Johnson's co-driver. After failing to finish at Sandown, extra development work saw the Mustang competitive at Bathurst where Johnson qualified the car in sixth place, though the car was still out paced by the Nissans and Commodores. Before Hardies Heroes Johnson actually tripped while exiting the traditional breakfast and broke a bone in his foot, though he still drove in the runoff. Johnson and Hansford drove a steady race to finish in fourth place outright despite the 302 cui Ford V8 engine running low oil pressure throughout thanks to a crack in the engine block that was only discovered when the team stripped down the car and engine after Dick had raced it in the Group A support race at the 1986 Australian Grand Prix meeting in Adelaide. The Mustang also had a cracked windscreen from which had been there since before Hardies Heroes, and like 1985 before he left the circuit for the night Johnson instructed the team to change the windscreen. Upon returning to the circuit on race morning an angry Johnson found the cracked windscreen still on the car with no time to change it before the race, though thankfully the crack did not spread during the race.
Johnson's last drive in the Mustang came in the Group A support race for the 1986 Australian Grand Prix in Adelaide. After qualifying 8th, he failed to finish the 32 lap race.
Sierras

In 1987 the team switched to the Ford Sierra RS Cosworth and began a 17-year run of naming rights sponsorship with petrochemical company Shell. It expanded to a two-car effort for the first time with Gregg Hansford becoming Johnson's first full-time teammate. The new 340 bhp (254 kW; 345 PS), turbocharged Sierra's were plagued with reliability problems, usually blown turbos (according to Johnson in a 2015 interview with Australian Muscle Car magazine, DJR went through some 37 turbochargers in testing and race meetings in 1987), and this let the team down considerably, with only one win recorded in the 1987 Australian Touring Car Championship at the Adelaide International Raceway (Dick's first ATCC win since 1984), though significantly this was the first Group A win anywhere in the world for the RS Cosworth. Following the ATCC, the Ford Sierra RS500 was homologated which addressed most of the car's shortcomings. The RS500 was more powerful (470 bhp (350 kW; 477 PS) in 1987) with larger turbos and was also more reliable.
The team's poor run continued at the Sandown 500, where Johnson easily qualified his new Sierra RS500 on pole but the car blew its engine in the race morning warm up and was withdrawn, and Bathurst 1000 where both team cars were out of the 161 lap race before the end of lap 4 (Neville Crichton crashed the No. 18 Sierra he was to share with Charlie O'Brien on the 3rd lap with the Commodore of Larry Perkins which the Johnson / Hansford car suffered differential failure a lap later). Qualifying at bathurst also proved controversial for the team with the two Sierra's excluded from the results of Hardies Heroes when they failed a post runoff fuel check. While the fuel was found to be a lower grade and actually produced less power, the rules had been broken. But the year ended well, with Johnson again winning the Group A support race in Adelaide at the Australian Grand Prix in November. Johnson, who was suffering fuel feed problems late in the race, just held on for his first win in the RS500 from the fast closing Nissan Skyline of George Fury.
In 1988 John Bowe replaced Hansford in the team and began an eleven-year stint as the driver of DJR's second car. With the team having overcome the reliability problems of the previous year and team manager Neal Lowe having come to grips with the engine management system earlier than his Australian counterparts (to the point where Lowe and the team were the first in Australia with the expertise to burn EPROM chips for the Sierra's), Johnson and Bowe finished an easy first and second in the 1988 and 1989 championships. Dick Johnson would later claim that he and his team were on a mission in 1988 after having been embarrassed at 1987 World Touring Car Championship round at Bathurst by the Ford Europe backed Eggenberger Motorsport Sierra's which not only proved faster but far more reliable (the Eggenberger cars would finish 1–2 on the road at Bathurst but would later be disqualified for technical infringements). He would also claim in the interview with Australian Muscle Car magazine in 2015 that another part of his motivation was that he had originally tried to buy an EPROM chip burning machine from British Sierra expert Andy Rouse in 1987, but Rouse had refused to sell one and that a chance meeting with one of the engineers involved with the Ford RS200 rally car project led to the purchase of the machine as well as Lowe travelling to the United States to learn how to use it.[7]
After the differential failure which had put the No. 17 Johnson car out of the 1987 Bathurst 1000 on just lap 4, Johnson took it upon himself to solve the problem of the Sierra's weak drive train. In April 1988 after working with Melbourne-based Harrop Engineering (run by former racer / engineer Ron Harrop), DJR successfully homologated a modified version of the Ford 9-inch differential for the RS500 Sierra. Although the Sierra was a European car, the near bullet proof differential was seen as vital to Sierra runners in Australia due to the standing starts used in Australian racing rather than the rolling starts used overseas. Later in 1988, Ford also released their own official, lighter version of the 9-inch diff, but the DJR unit would prove to be popular due to its lower cost. During 1988 Johnson also managed to homologate the Australian designed and built Hollinger gearbox for the cars which proved more reliable than the German built Getrag gearboxes that were common in most Group A cars at the time.[8]
In August 1988 the team air-freighted Johnson's ATCC winning car to England to compete in the RAC Tourist Trophy at Silverstone which was a round of the European Touring Car Championship. Johnson easily qualified on pole, almost half a second ahead clear of the leading Eggenberger Motorsport and Andy Rouse Sierras, and went on to an early race lead. The car was eventually slowed by a lengthy stop to replace a failed water pump and would ultimately finish the race in 21st place, but they had proven that the DJR Sierras were now the fastest in the world after also claiming the touring car lap record with the fastest lap of the race.[9][10] The speed of the DJR Sierra created interest and at the end of 1988 Robb Gravett of British team Trakstar purchased two DJR Sierras to supply his team with his Sierra RS500s, winning four races to finish the 1989 season 2nd in class and 4th overall (Gravett, thanks to his Shell sponsorship in the British Touring Car Championship through its Gemini Oils brand, had driven for DJR at Bathurst in 1988 and 1989).[11] In 1990, Robb Gravett won the championship with nine race wins.
After the two lead cars suffered mechanical troubles, Johnson and Bowe commandeered the John Smith / Alfredo Costanzo car (the oldest and slowest of the three entered being Johnson's 1987 Bathurst and Bowe's 1988 ATCC car) to finish second in the 1988 Bathurst 1000 behind the Sierra of fellow Queenslander Tony Longhurst and his co-driver Tomas Mezera, before winning in 1989 after leading every lap despite a late race loss of turbo power. Johnson claimed his first pole position at Bathurst in 1988, and again sat on the front row in 1989 alongside Peter Brock, who was now Sierra mounted. Brock won the start of the 1989 race, but in a show of power, Johnson blasted past the No. 05 Mobil 1 Racing Sierra on Conrod Straight into a lead that he and Bowe would not lose.
In 1990 Johnson narrowly lost the ATCC to the Gibson Motorsport Nissan Skyline R32 GT-R of Jim Richards (who also drove the previous model Skyline HR31 GTS-R until the car dubbed "Godzilla" arrived late in the series). The team's second car with Englishman Jeff Allam and Kiwi Paul Radisich finished second at the 1990 Bathurst 1000. Dick Johnson recorded two wins during the series in round 2 at Symmons Plains and again in round 3 at Phillip Island. The win at the Island (another 1–2 with Bowe finishing 2nd) would prove to be Dick Johnson's 30th and last ATCC race win.
In the 1991 ATCC, the DJR team were outpaced by the Nissans of Richards and Mark Skaife with Bowe finishing sixth and Johnson ninth, with the Tooheys 1000 at Bathurst proving no different. In 1992, a team restructure saw Ross Stone appointed team manager with Lowe concentrating on building the first 1993-spec Ford EB Falcon V8. Bowe finished fourth and Johnson eighth in the ATCC. The Shell Sierras showed more speed in 1992 which both Johnson and Bowe attributed to the CAMS imposed 7,500 rev limit on the Sierra's (this was also applied to the V8 Holden Commodore's), and against the GT-Rs which had turbo and weight restrictions placed on them by CAMS, Bowe won the round at Sandown, before Johnson claimed pole at Bathurst with the fastest ever time recorded by a Sierra on The Mountain of 2:12.898, undercutting the previous Sierra best time set in 1990 by German driver Klaus Niedzwiedz by over a second.[12] In the wet, crash shortened race, Johnson and Bowe finished second behind the GT-R of Richards and Skaife despite the Nissan crashing after the red flag was shown.
The final races for the DJR Shell Sierras came in the Group A support races for the 1992 Australian Grand Prix in Adelaide in November where John Bowe finished both races in second place behind Jim Richards. Johnson debuted the team's new EB FalconV8, the first Falcon built by the team since 1984. Despite trouble over the interpretation of the new 5.0L V8 rules which saw Johnson start from the rear of the grid, he finished the first race in a strong eleventh place before improving to ninth in the second.
1990s
.jpg.webp)


.JPG.webp)

For the new all V8 era, DJR switched to Ford EB Falcons. Aside from John Bowe winning the opening 1993 round at Amaroo Park the team remained winless until it won both the Sandown and Bathurst endurance races in 1994, as well as the season ending Australian Grand Prix support races. In 1995 Bowe won the championship. A repeat victory at Sandown that year augured well for another Bathurst win until an incident with Glenn Seton forced the number 17 Falcon from the track while leading.
At the end of 1995 team manager Ross Stone and chief engineer Jim Stone left to form Alan Jones Racing. While the Holden Racing Team dominated the 1996 season, Bowe finished the championship in second and combined with Johnson to finish second at Bathurst. Consistency in the 1997 championship enabled Bowe to again claim the runner-up position in the championship. DJR's only win in 1998 was by Bowe at Winton. For the endurance races Johnson and Bowe drove separate cars for the first time since 1988 with Steven Johnson joining his father.
At the end of 1998, Bowe left DJR after eleven years to join PAE Motorsport. Paul Radisich was hired as his replacement. While the team struggled in the 1999 Australian Touring Car Championship developing new Falcon AUs, the team was competitive at the Bathurst 1000 with Radisich and Steven Ellery leading most of the race until making contact late in the race with a slower car. In his final race, Dick Johnson finished fourth with son Steven.
2000s
In 2000 Steven Johnson took over the number 17 Falcon from his retiring father. Radisich teamed with Jason Bright to finish second at the Bathurst 1000. In 2001, Johnson won the Canberra 400 and teamed with Radisich to win the 2001 Queensland 500. This would be the team's last win for seven years.
In 2002 a third car was entered at selected events for Greg Ritter. At the end of 2002 Paul Radisich left the team. Max Wilson, Warren Luff and Glenn Seton would each complete one year stints as the driver of the second car between 2003 and 2005. At the end of 2004, Shell brought their 17-year naming rights sponsorship of the team to an end.
For 2005 sponsorship from Westpoint Corporation was secured. However, by the beginning of 2006 Westpoint was in receivership. Sponsorship for the 2006 season came from two of Dick Johnson's own business ventures, FirstRock Mortgage Centre and V8 Telecom with Will Davison driving the second car. The ventures were not successful and by the end of the year, the team's long term viability was in doubt. As a result, businessman and sponsor Charlie Schwerkolt bought a 50% shareholding in the team.
For 2007 sponsorship from Jim Beam was secured with the year highlighted by a third place at Bathurst. At the Bahrain round, Johnson finished third and Davison fourth. In 2008, Davison won the Eastern Creek round, the team's first win since the 2001 Queensland 500.
In 2009, James Courtney replaced Davison. Two Triple Eight built Falcon FGs were purchased with Courtney winning at the Townsville 400 and Sydney 500.
2010s
In 2010, James Courtney won the series. A third customer entry was prepared for Tekno Autosports, driven by Jonathon Webb. By mid-season owners Dick Johnson and Charlie Schwerkolt were reported to no longer be on speaking terms, and the team became fractured. Team manager Adrian Burgess announced he would join Triple Eight in 2011, and as a result of a clause in his contract giving him an 'out' if Burgess left, Courtney also left at the end of 2010 after winning the series.[13]
At the end of 2010, Johnson and Schwerkolt dissolved their partnership. Scherkolt retained ownership of one Racing Entitlement Contract (REC) which was leased back to DJR for 2011 and 2012.[14]
For 2011, James Moffat was signed to replace Courtney.[15]
For 2012, the team expanded to a four car team, preparing customer cars for Triple F Racing with Dean Fiore driving and Paul Morris Motorsport with Steve Owen.[16][17] At the end of the year, Jim Beam elected not to renew it sponsorship, the REC leased from Team 18 was returned, while the Paul Morris Motorsport REC was sold to Lucas Dumbrell Motorsport.[18][19][20]
A sponsor was lined up for 2013, but it was conditional on V8 Supercars confirming its television arrangements by the end of 2012. As this did not happen, the deal lapsed and again DJR's future appeared in jeopardy. A last minute sponsorship with Wilson Security was secured and the team appeared with two entries for Tim Blanchard and Jonny Reid,[21][22] with Steven Johnson moving into position of General Manager. Wilson Security remained with the team as title sponsor for the remainder of 2013.[23] Reid was replaced by Chaz Mostert before the Wanneroo Raceway round of the championship.[24] Mostert won a race at the Queensland Raceway round.[25]
For 2014, Scott Pye and David Wall were recruited to drive.[26][27] The REC leased from Triple F Racing was returned and another purchased from Paul Morris Motorsport.[28]
DJR Team Penske
In September 2014, it was announced a 51% stake in the team had been sold to United States businessman and racer Roger Penske, who is the Australian distributor for MAN Truck & Bus, Western Star Trucks, MTU Friedrichshafen, and Detroit Diesel. The remaining 49% is retained by Johnson, Steve Brabeck and Ryan Story. The team was renamed DJR Team Penske.[29]
In 2015, the team scaled back to one Ford Falcon FG X with Marcos Ambrose to drive. Prior to Round 2 Ambrose stepped aside from full-time driving, handing the duties of Car No. 17 to Scott Pye. Ambrose returned as the team's co driver for the Pirtek Enduro Cup.[30] The team scored one race podium in 2015, for Pye at the 2015 ITM 500 Auckland, and finished 12th in the Teams' Championship.
In 2016, the team expanded to two cars, with Pye returning and Fabian Coulthard joining the team. They scored two podiums each, with Coulthard finishing 12th in the Drivers' Championship and Pye finishing 15th. DJR Team Penske ranked fifth in the Teams' Championship.
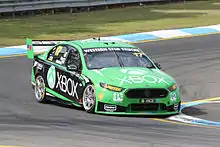
In 2017, Scott McLaughlin replaced Pye, joined by new engineer Ludo Lacroix.[31] Having operated a rotating sponsorship model for the previous two seasons largely with Penske Corporation subsidiaries, in 2017 Shell returned as the team's full-time title sponsor.[32] After losing the Drivers Championship title to Jamie Whincup in the last race of the 2017 season after he was given a penalty for colliding with Craig Lowndes (Whincup's teammate at Holden team Triple Eight), Scott McLaughlin won the Drivers Championship in 2018 in Car No. 17 after a closely contested season-long battle with Shane van Gisbergen. In 2019, the team along with Tickford Racing homologated the Ford Mustang GT, replacing the retiring Falcon.
In October 2020, it was announced that Penske would sell its stake in the team to Ryan Story with it to be return to being named Dick Johnson Racing.[33][34] Later, with its sale to Story, the team restored its original name. Subsequently, in 2023, The Ralph Family has taken up a majority shareholding in DJR.
DJR performance cars
DJR had various attempts at building road cars, with the XE Grand Prix and BA DJR 320 being the most successful models. Johnson planned on building a XF Falcon, but like the XE before it, Ford showed no interest in it, meaning that only one prototype XF was built. Johnson tried again with a model built upon the EA in an attempt to draw attention from Ford, who were looking for a performance partnership in 1990. Tickford won out the contract, and again, only one EA DJR was completed.
XE Grand Prix
In 1982, Johnson partnered up Turbocharging expert David Inall, to produce a turbocharged performance version of the 4.1 litre six. The idea was to create a performance arm for Ford Australia in the style of Holden Dealer Team, in the wake of Ford's waning interest in performance cars and the discontinuation of the V8. Ford, unwilling to warrant the modifications however, declined to invest in the product.
The result was the Grand Prix Falcon that came with 190 kW, and was capable of mid 14-second 1/4-mile times.[35] All came in distinctive "Tru Blue" paintwork, and a styling kit consisting of fender flares and Front and Rear spoilers. The interior and drive train featured parts from the European Sports Pack options that were available for the Falcon at the time.
DJR320
In 2003, DJR joined with Herrod Motorsport to build the DJR 320, a performance car based on the BA XR8 falcon. A body styling kit was added to the existing XR parts, consisting of new side skirts, and front and rear spoiler lips. Herrod retuned the ECU, installed DJR camshafts, high-flow dual exhaust system with twin tailpipes and a cold-air intake; this increased the engine output from 260 kW to 320 kW. Suspension was improved by the use of adjustable dampers, and larger brakes rounded off the package. Only 14 were built.[36]
Other interests
The Dick Johnson Group also ran financial, real estate, and telecommunications services, which have since been sold.
DJR is based in Stayplton on the Gold Coast. The factory also housed a museum of the team's history. In 2006 Johnson sold his museum racing vehicles to car collector David Bowden.[37] By arrangement with Bowden, a selection of Bowden's significant racing cars will rotate through the museum in DJR's workshop.
Australian Touring Car and Supercars drivers
The following is a list of drivers who have driven for the team in the Australian Touring Car Championship and Supercars Championship, in order of their first appearance. It also includes drivers who drove for the team in the Bathurst 1000 before it became a championship event. Drivers who only drove for the team on a part-time basis are listed in italics.
.svg.png.webp) Dick Johnson (1980–2000)
Dick Johnson (1980–2000)- John French (1980–82, 1984)
- Kevin Bartlett (1983)
- Larry Perkins (1985)
- Gregg Hansford (1986–87)
 Neville Crichton (1987–88)
- Neal Lowe (1987)
- Charlie O'Brien (1987, 1995–96)
- John Bowe (1988–98)
- Alfredo Costanzo (1988)
- John Smith (1988)
 Robb Gravett (1988–89)
- Jeff Allam (1989–90)
- Tony Noske (1989)
- Paul Radisich (1990–91, 1993, 1999–2002)
- Terry Shiel (1990–91)
- Kayne Scott (1991)
- Gregg Taylor (1991)
- Greg Crick (1992)
- Cameron McConville (1993, 1998)
- Allan Grice (1994)
- Steven Johnson (1994–2012, 2014)
 Tommy Kendall (1996)
- Craig Baird (1997)
- Steven Ellery (1999)
- Cameron McLean (2000–01)
- Jason Bright (2000)
- Paul Stokell (2001)
- Greg Ritter (2001–02)
- Alan Jones (2002)
 Max Wilson (2003)
- Warren Luff (2003–04, 2008–10)
- Owen Kelly (2004)
- David Brabham (2004)
- Glenn Seton (2005)
- Dean Canto (2005–06)
- Will Davison (2006–08, 2021–present)
- Alex Davison (2006–07, 2021–present)
- Grant Denyer (2006)
- Andrew Thompson (2007)
- Steve Owen (2008)
- James Courtney (2009–10)
- Jonathon Webb (2009)
- Marcus Marshall (2011)
- Dario Franchitti (2010)
- David Besnard (2011)
- Matt Halliday (2011–12)
- James Moffat (2011–12)
- Joey Hand (2011)
 Allan Simonsen (2012)
 Dirk Müller (2012)
- Tim Blanchard (2013)
- Jonny Reid (2013)
- Chaz Mostert (2013)
- Dale Wood (2013)
- Ashley Walsh (2013–14)
- Scott Pye (2014–16)
- David Wall (2014)
- Marcos Ambrose (2014–15)
- Fabian Coulthard (2016–20)
- Tony D'Alberto (2016–present)
- Luke Youlden (2016)
- Scott McLaughlin (2017–20)
 Alexandre Prémat (2017–19)
- Tim Slade (2020)
- Anton de Pasquale (2021–present)
.svg.png.webp) Simona de Silvestro (2023)
Simona de Silvestro (2023)- Kai Allen (2023)
Results
Car No. 11 results
| Year | Driver | No. | Make | 1 | 2 | 3 | 4 | 5 | 6 | 7 | 8 | 9 | 10 | 11 | 12 | 13 | 14 | 15 | 16 | 17 | 18 | 19 | 20 | 21 | 22 | 23 | 24 | 25 | 26 | 27 | 28 | 29 | 30 | 31 | 32 | 33 | 34 | 35 | 36 | 37 | 38 | 39 | 40 | Position | Pts |
|---|---|---|---|---|---|---|---|---|---|---|---|---|---|---|---|---|---|---|---|---|---|---|---|---|---|---|---|---|---|---|---|---|---|---|---|---|---|---|---|---|---|---|---|---|---|
| 1987 | Gregg Hansford | 18 | Ford | CAL R1 Ret |
SYM R2 6 |
LAK R3 DSQ |
BAR R4 5 |
ADE R5 Ret |
SUR R6 Ret |
CAL R7 Ret |
AMA R8 8 |
ORA R9 Ret |
10th | 25 | |||||||||||||||||||||||||||||||
| 1988 | John Bowe | CAL R1 Ret |
SYM R2 2 |
WIN R3 1 |
BAR R4 3 |
ADE R5 2 |
SUR R6 Ret |
CAL R7 2 |
AMA R8 1 |
ORA R9 2 |
2nd | 112 | |||||||||||||||||||||||||||||||||
| 1989 | AMA R1 1 |
SYM R2 3 |
LAK R3 3 |
BAR R4 1 |
MAL R5 3 |
SAN R6 3 |
WIN R7 8 |
ORA R8 3 |
2nd | 94 | |||||||||||||||||||||||||||||||||||
| 1990 | AMA R1 2 |
SYM R2 3 |
PHI R3 2 |
WIN R4 6 |
LAK R5 4 |
MAL R6 14 |
BAR R7 6 |
ORA R8 5 |
5th | 72 | |||||||||||||||||||||||||||||||||||
| 1991 | SAN R1 3 |
SYM R2 11 |
BAR R3 8 |
LAK R4 10 |
WIN R5 7 |
AMA R6 4 |
MAL R7 7 |
LAK R8 Ret |
ORA R9 Ret |
7th | 34 | ||||||||||||||||||||||||||||||||||
| 1992 | AMA R1 6 |
AMA R2 10 |
SAN R3 1 |
SAN R4 1 |
SYM R5 Ret |
SYM R6 DNS |
WIN R7 13 |
WIN R8 5 |
LAK R9 9 |
LAK R10 3 |
EAS R11 1 |
EAS R12 1 |
MAL R13 5 |
MAL R14 5 |
BAR R15 1 |
BAR R16 1 |
ORA R17 15 |
ORA R18 5 |
4th | 175 | |||||||||||||||||||||||||
| 1993 | AMA R1 4 |
AMA R2 1 |
SYM R3 7 |
SYM R4 3 |
PHI R5 2 |
PHI R6 3 |
LAK R7 4 |
LAK R8 3 |
WIN R9 DSQ |
WIN R10 7 |
EAS R11 2 |
EAS R12 3 |
MAL R13 5 |
MAL R14 3 |
BAR R15 4 |
BAR R16 Ret |
ORA R17 2 |
ORA R18 8 |
3rd | 140 | |||||||||||||||||||||||||
| 1994 | AMA R1 |
AMA R2 |
SAN R3 |
SAN R4 |
SYM R5 |
SYM R6 |
PHI R7 |
PHI R8 |
LAK R9 |
LAK R10 |
WIN R11 |
WIN R12 |
EAS R13 |
EAS R14 |
MAL R15 |
MAL R16 |
BAR R17 |
BAR R18 |
ORA R19 |
ORA R20 |
7th | 156 | |||||||||||||||||||||||
| 1995 | SAN R1 |
SAN R2 |
SYM R3 |
SYM R4 |
BAT R5 |
BAT R6 |
PHI R7 |
PHI R8 |
LAK R9 |
LAK R10 |
WIN R11 |
WIN R12 |
EAS R13 |
EAS R14 |
MAL R15 |
MAL R16 |
BAR R17 |
BAR R18 |
ORA R19 |
ORA R20 |
1st | 314 | |||||||||||||||||||||||
| 1996 | EAS R1 |
EAS R2 |
EAS R3 |
SAN R4 |
SAN R5 |
SAN R6 |
BAT R7 |
BAT R8 |
BAT R9 |
SYM R10 |
SYM R11 |
SYM R12 |
PHI R13 |
PHI R14 |
PHI R15 |
CAL R16 |
CAL R17 |
CAL R18 |
LAK R19 |
LAK R20 |
LAK R21 |
BAR R22 |
BAR R23 |
BAR R24 |
MAL R25 |
MAL R26 |
MAL R27 |
ORA R28 |
ORA R29 |
ORA R30 |
2nd | 344 | |||||||||||||
| 1997 | CAL R1 |
CAL R2 |
CAL R3 |
PHI R4 |
PHI R5 |
PHI R6 |
SAN R7 |
SAN R8 |
SAN R9 |
SYM R10 |
SYM R11 |
SYM R12 |
WIN R13 |
WIN R14 |
WIN R15 |
EAS R16 |
EAS R17 |
EAS R18 |
LAK R19 |
LAK R20 |
LAK R21 |
BAR R22 |
BAR R23 |
BAR R24 |
MAL R25 |
MAL R26 |
MAL R27 |
ORA R28 |
ORA R29 |
ORA R30 |
2nd | 608 | |||||||||||||
| 1998 | SAN R1 |
SAN R2 |
SAN R3 |
SYM R4 |
SYM R5 |
SYM R6 |
LAK R7 |
LAK R8 |
LAK R9 |
PHI R10 |
PHI R11 |
PHI R12 |
WIN R13 |
WIN R14 |
WIN R15 |
MAL R16 |
MAL R17 |
MAL R18 |
BAR R19 |
BAR R20 |
BAR R21 |
CAL R22 |
CAL R23 |
CAL R24 |
HDV R25 |
HDV R26 |
HDV R27 |
ORA R28 |
ORA R29 |
ORA R30 |
5th | 684 | |||||||||||||
| 1999 | Paul Radisich | EAS R1 |
EAS R2 |
EAS R3 |
ADE R4 |
BAR R5 |
BAR R6 |
BAR R7 |
PHI R8 |
PHI R9 |
PHI R10 |
HDV R11 |
HDV R12 |
HDV R13 |
SAN R14 |
SAN R15 |
SAN R16 |
QLD R17 |
QLD R18 |
QLD R19 |
CAL R20 |
CAL R21 |
CAL R22 |
SYM R23 |
SYM R24 |
SYM R25 |
WIN R26 |
WIN R27 |
WIN R28 |
ORA R29 |
ORA R30 |
ORA R31 |
QLD R32 |
BAT R33 |
16th | 812 | |||||||||
| 2000 | PHI R1 |
PHI R2 |
BAR R3 |
BAR R4 |
BAR R5 |
ADE R6 |
ADE R7 |
EAS R8 |
EAS R9 |
EAS R10 |
HDV R11 |
HDV R12 |
HDV R13 |
CAN R14 |
CAN R15 |
CAN R16 |
QLD R17 |
QLD R18 |
QLD R19 |
WIN R20 |
WIN R21 |
WIN R22 |
ORA R23 |
ORA R24 |
ORA R25 |
CAL R26 |
CAL R27 |
CAL R28 |
QLD R29 |
SAN R30 |
SAN R31 |
SAN R32 |
BAT R33 |
4th | 1260 | ||||||||||
| 2001 | PHI R1 |
PHI R2 |
ADE R3 |
ADE R4 |
EAS R5 |
EAS R6 |
HDV R7 |
HDV R8 |
HDV R9 |
CAN R10 |
CAN R11 |
CAN R12 |
BAR R13 |
BAR R14 |
BAR R15 |
CAL R16 |
CAL R17 |
CAL R18 |
ORA R19 |
ORA R20 |
QLD R21 |
WIN R22 |
WIN R23 |
BAT R24 |
PUK R25 |
PUK R26 |
PUK R27 |
SAN R28 |
SAN R29 |
SAN R30 |
7th | 2109 | |||||||||||||
| 2002 | ADE R1 |
ADE R2 |
PHI R3 |
PHI R4 |
EAS R5 |
EAS R6 |
EAS R7 |
HDV R8 |
HDV R9 |
HDV R10 |
CAN R11 |
CAN R12 |
CAN R13 |
BAR R14 |
BAR R15 |
BAR R16 |
ORA R17 |
ORA R18 |
WIN R19 |
WIN R20 |
QLD R21 |
BAT R22 |
SUR R23 |
SUR R24 |
PUK R25 |
PUK R26 |
PUK R27 |
SAN R28 |
SAN R29 |
26th | 398 | ||||||||||||||
| 2003 | Max Wilson | ADE R1 26 |
ADE R1 Ret |
PHI R3 16 |
EAS R4 16 |
WIN R5 9 |
BAR R6 24 |
BAR R7 17 |
BAR R8 13 |
HDV R9 Ret |
HDV R10 20 |
HDV R11 16 |
QLD R12 24 |
ORA R13 Ret |
SAN R14 19 |
BAT R15 12 |
SUR R16 9 |
SUR R17 23 |
PUK R18 18 |
PUK R19 24 |
PUK R20 19 |
EAS R21 5 |
EAS R22 3 |
17th | 1214 | ||||||||||||||||||||
| 2004 | Warren Luff | ADE R1 11 |
ADE R2 Ret |
EAS R3 21 |
PUK R4 24 |
PUK R5 27 |
PUK R6 23 |
HDV R7 22 |
HDV R8 22 |
HDV R9 24 |
BAR R10 15 |
BAR R11 Ret |
BAR R12 23 |
QLD R13 16 |
WIN R14 20 |
ORA R15 24 |
ORA R16 20 |
SAN R17 3 |
BAT R18 7 |
SUR R19 Ret |
SUR R20 26 |
SYM R21 16 |
SYM R22 12 |
SYM R23 9 |
EAS R24 15 |
EAS R25 14 |
EAS R26 20 |
21st | 1149 | ||||||||||||||||
| 2005 | Glenn Seton | ADE R1 9 |
ADE R2 25 |
PUK R3 26 |
PUK R4 13 |
PUK R5 12 |
BAR R6 12 |
BAR R7 15 |
BAR R8 9 |
EAS R9 20 |
EAS R10 27 |
SHA R11 14 |
SHA R12 7 |
SHA R13 24 |
HDV R14 8 |
HDV R15 7 |
HDV R16 5 |
QLD R17 11 |
ORA R18 18 |
ORA R19 13 |
SAN R20 12 |
BAT R21 9 |
SUR R22 23 |
SUR R23 23 |
SUR R24 20 |
SYM R25 22 |
SYM R26 19 |
SYM R27 20 |
PHI R28 29 |
PHI R29 24 |
PHI R30 11 |
15th | 1353 | ||||||||||||
| 2006 | Will Davison | ADE R1 14 |
ADE R2 13 |
PUK R3 18 |
PUK R4 8 |
PUK R5 28 |
BAR R6 16 |
BAR R7 22 |
BAR R8 16 |
WIN R9 14 |
WIN R10 DSQ |
WIN R11 23 |
HDV R12 13 |
HDV R13 Ret |
HDV R14 14 |
QLD R15 19 |
QLD R16 19 |
QLD R17 12 |
ORA R18 26 |
ORA R19 22 |
ORA R20 8 |
SAN R21 4 |
BAT R22 Ret |
SUR R23 14 |
SUR R24 19 |
SUR R25 17 |
SYM R26 9 |
SYM R27 6 |
SYM R28 12 |
BHR R29 Ret |
BHR R30 Ret |
BHR R31 Ret |
PHI R32 6 |
PHI R33 7 |
PHI R34 Ret |
19th | 1943 | ||||||||
| 2007 | ADE R1 Ret |
ADE R2 9 |
BAR R3 6 |
BAR R4 5 |
BAR R5 6 |
PUK R6 11 |
PUK R7 8 |
PUK R8 6 |
WIN R9 Ret |
WIN R10 14 |
WIN R11 9 |
EAS R12 14 |
EAS R13 9 |
EAS R14 10 |
HDV R15 EX |
HDV R16 7 |
HDV R17 7 |
QLD R18 6 |
QLD R19 5 |
QLD R20 4 |
ORA R21 6 |
ORA R22 8 |
ORA R23 16 |
SAN R24 Ret |
BAT R25 3 |
SUR R26 11 |
SUR R27 18 |
SUR R28 11 |
BHR R29 8 |
BHR R30 3 |
BHR R31 5 |
SYM R32 9 |
SYM R33 11 |
SYM R34 14 |
PHI R35 9 |
PHI R36 9 |
PHI R37 8 |
11th | 343 | ||||||
| 2008 | ADE R1 7 |
ADE R2 Ret |
EAS R3 2 |
EAS R4 1 |
EAS R5 6 |
HAM R6 9 |
HAM R7 22 |
HAM R8 Ret |
BAR R9 8 |
BAR R10 5 |
BAR R11 6 |
SAN R12 Ret |
SAN R13 11 |
SAN R14 7 |
HDV R15 8 |
HDV R16 10 |
HDV R17 5 |
QLD R18 6 |
QLD R19 5 |
QLD R20 5 |
WIN R21 2 |
WIN R22 1 |
WIN R23 4 |
PHI Q 2 |
PHI R24 3 |
BAT R25 6 |
SUR R26 7 |
SUR R27 Ret |
SUR R28 R10 |
BHR R29 Ret |
BHR R30 10 |
BHR R31 6 |
SYM R32 4 |
SYM R33 5 |
SYM R34 6 |
ORA R35 10 |
ORA R36 15 |
ORA R37 21 |
5th | 2495 | |||||
| 2009 | James Courtney | ADE R1 20 |
ADE R2 24 |
HAM R3 13 |
HAM R4 2 |
WIN R5 Ret |
WIN R6 6 |
SYM R7 30 |
SYM R8 Ret |
HDV R9 8 |
HDV R10 12 |
TOW R11 Ret |
TOW R12 1 |
SAN R13 2 |
SAN R14 8 |
QLD R15 2 |
QLD R16 8 |
PHI Q 4 |
PHI R17 4 |
BAT R18 24 |
SUR R19 Ret |
SUR R20 16 |
SUR R21 5 |
SUR R22 3 |
PHI R23 9 |
PHI R24 4 |
BAR R25 4 |
BAR R26 10 |
SYD R27 17 |
SYD R28 1 |
7th | 2192 | |||||||||||||
| 2010 | YMC R1 4 |
YMC R2 6 |
BHR R3 6 |
BHR R4 7 |
ADE R5 2 |
ADE R6 2 |
HAM R7 3 |
HAM R8 21 |
QLD R9 1 |
QLD R10 1 |
WIN R11 1 |
WIN R12 1 |
HDV R13 5 |
HDV R14 4 |
TOW R15 5 |
TOW R16 2 |
PHI Q 3 |
PHI R17 12 |
BAT R18 5 |
SUR R19 10 |
SUR R20 4 |
SYM R21 11 |
SYM R22 12 |
SAN R23 4 |
SAN R24 1 |
SYD R25 15 |
SYD R26 14 |
1st | 3055 | ||||||||||||||||
| 2011 | James Moffat | YMC R1 16 |
YMC R2 Ret |
ADE R3 Ret |
ADE R4 22 |
HAM R5 9 |
HAM R6 17 |
BAR R7 18 |
BAR R8 17 |
BAR R9 21 |
WIN R10 19 |
WIN R11 9 |
HID R12 14 |
HID R13 13 |
TOW R14 17 |
TOW R15 15 |
QLD R16 10 |
QLD R17 9 |
QLD R18 4 |
PHI QR 24 |
PHI R19 25 |
BAT R20 25 |
SUR R21 4 |
SUR R22 Ret |
SYM R23 20 |
SYM R24 18 |
SAN R25 Ret |
SAN R26 25 |
SYD R27 8 |
SYD R28 Ret |
23rd | 1306 | |||||||||||||
| 2012 | ADE R1 15 |
ADE R2 Ret |
SYM R3 14 |
SYM R4 19 |
HAM R5 Ret |
HAM R6 18 |
BAR R7 Ret |
BAR R8 24 |
BAR R9 22 |
PHI R10 Ret |
PHI R11 16 |
HID R12 21 |
HID R13 Ret |
TOW R14 13 |
TOW R15 23 |
QLD R16 18 |
QLD R17 19 |
SMP R18 19 |
SMP R19 16 |
SAN QR 11 |
SAN R20 26 |
BAT R21 10 |
SUR R22 Ret |
SUR R23 Ret |
YMC R24 9 |
YMC R25 13 |
YMC R26 6 |
WIN R27 5 |
WIN R28 17 |
SYD R29 8 |
SYD R30 22 |
21st | 1354 | ||||||||||||
| 2013 | Jonny Reid | 12 | ADE R1 Ret |
ADE R2 Ret |
SYM R3 24 |
SYM R4 25 |
SYM R5 20 |
PUK R6 23 |
PUK R7 22 |
PUK R8 18 |
PUK R9 25 |
37th | 449 | ||||||||||||||||||||||||||||||||
| Chaz Mostert | ADE R1 |
ADE R2 |
SYM R3 |
SYM R4 |
SYM R5 |
PUK R6 |
PUK R7 |
PUK R8 |
PUK R9 |
BAR R10 15 |
BAR R11 15 |
BAR R12 10 |
COA R13 13 |
COA R14 19 |
COA R15 13 |
COA R16 15 |
HID R17 7 |
HID R18 17 |
HID R19 17 |
TOW R20 10 |
TOW R21 13 |
QLD R22 23 |
QLD R23 6 |
QLD R24 1 |
WIN R25 16 |
WIN R26 13 |
WIN R27 3 |
SAN QR 5 |
SAN R28 14 |
BAT R29 21 |
SUR R30 9 |
SUR R31 11 |
PHI R32 9 |
PHI R33 4 |
PHI R34 Ret |
SYD R35 21 |
SYD R36 9 |
17th | 1520 | ||||||
| 2014 | Scott Pye | 16 | ADE R1 10 |
ADE R2 20 |
ADE R3 Ret |
SYM R4 10 |
SYM R5 7 |
SYM R6 16 |
WIN R7 14 |
WIN R8 12 |
WIN R9 19 |
PUK R10 18 |
PUK R11 11 |
PUK R12 9 |
PUK R13 13 |
BAR R14 18 |
BAR R15 7 |
BAR R16 12 |
HID R17 15 |
HID R18 15 |
HID R19 14 |
TOW R20 12 |
TOW R21 12 |
TOW R22 8 |
QLD R23 16 |
QLD R24 12 |
QLD R25 4 |
SMP R26 20 |
SMP R27 21 |
SMP R28 Ret |
SAN QR 19 |
SAN R29 5 |
BAT R30 Ret |
SUR R31 DSQ |
SUR R32 DSQ |
PHI R33 DSQ |
PHI R34 DSQ |
PHI R35 DSQ |
SYD R36 Ret |
SYD R37 9 |
SYD R38 21 |
19th | 1407 | ||
| 2016 | Fabian Coulthard | 12 | ADE R1 10 |
ADE R2 14 |
ADE R3 16 |
SYM R4 18 |
SYM R5 8 |
PHI R6 3 |
PHI R7 Ret |
BAR R8 17 |
BAR R9 15 |
WIN R10 17 |
WIN R11 3 |
HID R12 6 |
HID R13 Ret |
TOW R14 8 |
TOW R15 15 |
QLD R16 10 |
QLD R17 10 |
SMP R18 10 |
SMP R19 4 |
SAN QR 11 |
SAN R20 6 |
BAT R21 6 |
SUR R22 Ret |
SUR R23 15 |
PUK R24 11 |
PUK R25 4 |
PUK R26 5 |
PUK R27 8 |
SYD R28 11 |
SYD R29 21 |
12th | 2078 | |||||||||||
| 2017 | ADE R1 2 |
ADE R2 5 |
SYM R3 11 |
SYM R4 1 |
PHI R5 1 |
PHI R6 17 |
BAR R7 2 |
BAR R8 7 |
WIN R9 3 |
WIN R10 3 |
HID R11 1 |
HID R12 4 |
TOW R13 10 |
TOW R14 21 |
QLD R15 6 |
QLD R16 5 |
SMP R17 1 |
SMP R18 2 |
SAN QR 6 |
SAN R19 5 |
BAT R20 3 |
SUR R21 19 |
SUR R22 9 |
PUK R23 Ret |
PUK R24 5 |
NEW R25 2 |
NEW R26 Ret |
3rd | 2812 | ||||||||||||||||
| 2018 | ADE R1 21 |
ADE R2 16 |
MEL R3 3 |
MEL R4 3 |
MEL R5 12 |
MEL R6 6 |
SYM R7 5 |
SYM R8 17 |
PHI R9 12 |
PHI R10 4 |
BAR R11 8 |
BAR R12 16 |
WIN R13 4 |
WIN R14 1 |
HID R15 15 |
HID R16 8 |
TOW R17 5 |
TOW R18 8 |
QLD R19 5 |
QLD R20 5 |
SMP R21 11 |
BEN R22 14 |
BEN R23 14 |
SAN QR 4 |
SAN R24 7 |
BAT R25 9 |
SUR R26 11 |
SUR R27 C |
PUK R28 Ret |
PUK R29 7 |
NEW R30 Ret |
NEW R31 26 |
9th | 2477 | |||||||||||
| 2019 | ADE R1 6 |
ADE R2 20 |
MEL R3 2 |
MEL R4 5 |
MEL R5 5 |
MEL R6 15 |
SYM R7 2 |
SYM R8 2 |
PHI R9 2 |
PHI R10 1 |
BAR R11 1 |
BAR R12 4 |
WIN R13 15 |
WIN R14 2 |
HID R15 7 |
HID R16 3 |
TOW R17 5 |
TOW R18 2 |
QLD R19 10 |
QLD R20 18 |
BEN R21 12 |
BEN R22 10 |
PUK R23 7 |
PUK R24 12 |
BAT R25 21 |
SUR R26 9 |
SUR R27 11 |
SAN QR 6 |
SAN R28 4 |
NEW R29 3 |
NEW R30 2 |
4th | 3058 | ||||||||||||
| 2020 | ADE R1 10 |
ADE R2 9 |
MEL R3 C |
MEL R4 C |
MEL R5 C |
MEL R6 C |
SMP1 R7 10 |
SMP1 R8 15 |
SMP1 R9 Ret |
SMP2 R10 7 |
SMP2 R11 2 |
SMP2 R12 13 |
HID1 R13 6 |
HID1 R14 3 |
HID1 R15 5 |
HID2 R16 10 |
HID2 R17 4 |
HID2 R18 11 |
TOW1 R19 4 |
TOW1 R20 15 |
TOW1 R21 17 |
TOW2 R22 7 |
TOW2 R23 20 |
TOW2 R24 8 |
BEN1 R25 1 |
BEN1 R26 4 |
BEN1 R27 2 |
BEN2 R28 9 |
BEN2 R29 Ret |
BEN2 R30 8 |
BAT R31 4 |
6th | 1800 | ||||||||||||
| 2021 | Anton De Pasquale | 11 | BAT R1 Ret |
BAT R2 4 |
SAN R3 5 |
SAN R4 Ret |
SAN R5 12 |
SYM R6 3 |
SYM R7 13 |
SYM R8 2 |
BEN R9 3 |
BEN R10 1 |
BEN R11 Ret |
HID R12 Ret |
HID R13 6 |
HID R14 12 |
TOW R15 3 |
TOW R16 3 |
TOW R17 8 |
TOW R18 5 |
TOW2 R19 2 |
SYD1 R20 1 |
SYD1 R21 DSQ |
SYD1 R22 1 |
SYD2 R23 12 |
SYD2 R24 1 |
SYD2 R25 2 |
SYD3 R26 1 |
SYD3 R27 1 |
SYD3 R28 9 |
SYD4 R29 4 |
SYD4 R30 C |
BAT R31 Ret |
6th | 2075 | ||||||||||
| 2022 | SMP R1 2 |
SMP R2 3 |
SYM R3 6 |
SYM R4 5 |
SYM R5 3 |
MEL R6 23 |
MEL R7 20 |
MEL R8 4 |
MEL R9 3 |
BAR R10 2 |
BAR R11 2 |
BAR R12 4 |
WIN R13 8 |
WIN R14 10 |
WIN R15 8 |
HID R16 1 |
HID R17 4 |
HID R18 2 |
TOW R19 6 |
TOW R20 2 |
BEN R21 9 |
BEN R22 5 |
BEN R23 7 |
SAN R24 3 |
SAN R25 8 |
SAN R26 24 |
PUK R27 6 |
PUK R28 Ret |
PUK R29 5 |
BAT R30 7 |
SUR R31 6 |
SUR R32 DSQ |
ADE R33 14 |
ADE R34 3 |
4th | 2599 | |||||||||
Car No. 17 results
| Year | Driver | No. | Make | 1 | 2 | 3 | 4 | 5 | 6 | 7 | 8 | 9 | 10 | 11 | 12 | 13 | 14 | 15 | 16 | 17 | 18 | 19 | 20 | 21 | 22 | 23 | 24 | 25 | 26 | 27 | 28 | 29 | 30 | 31 | 32 | 33 | 34 | 35 | 36 | 37 | 38 | 39 | 40 | Position | Pts |
|---|---|---|---|---|---|---|---|---|---|---|---|---|---|---|---|---|---|---|---|---|---|---|---|---|---|---|---|---|---|---|---|---|---|---|---|---|---|---|---|---|---|---|---|---|---|
| 1990 | Dick Johnson | 17 | Ford | AMA R1 3 |
SYM R2 1 |
PHI R3 1 |
WIN R4 5 |
LAK R5 7 |
MAL R6 2 |
BAR R7 Ret |
ORA R8 7 |
3rd | 83 | ||||||||||||||||||||||||||||||||
| 1991 | SAN R1 4 |
SYM R2 5 |
BAR R3 Ret |
LAK R4 9 |
WIN R5 11 |
AMA R6 7 |
MAL R7 8 |
LAK R8 Ret |
ORA R9 11 |
9th | 27 | ||||||||||||||||||||||||||||||||||
| 1992 | AMA R1 5 |
AMA R2 12 |
SAN R3 2 |
SAN R4 15 |
SYM R5 2 |
SYM R6 10 |
WIN R7 8 |
WIN R8 13 |
LAK R9 Ret |
LAK R10 6 |
EAS R11 11 |
EAS R12 15 |
MAL R13 8 |
MAL R14 9 |
BAR R15 2 |
BAR R16 10 |
ORA R17 9 |
ORA R18 10 |
8th | 134 | |||||||||||||||||||||||||
| 1993 | AMA R1 1 |
AMA R2 Ret |
SYM R3 4 |
SYM R4 4 |
PHI R5 3 |
PHI R6 4 |
LAK R7 1 |
LAK R8 2 |
WIN R9 7 |
WIN R10 6 |
EAS R11 DNS |
EAS R12 12 |
MAL R13 4 |
MAL R14 14 |
BAR R15 10 |
BAR R16 8 |
ORA R17 12 |
ORA R18 9 |
5th | 93 | |||||||||||||||||||||||||
| 1994 | AMA R1 4 |
AMA R2 8 |
SAN R3 19 |
SAN R4 10 |
SYM R5 9 |
SYM R6 10 |
PHI R7 6 |
PHI R8 6 |
LAK R9 1 |
LAK R10 Ret |
WIN R11 12 |
WIN R12 13 |
EAS R13 6 |
EAS R14 7 |
MAL R15 Ret |
MAL R16 5 |
BAR R17 4 |
BAR R18 Ret |
ORA R19 3 |
ORA R20 5 |
8th | 117 | |||||||||||||||||||||||
| 1995 | SAN R1 7 |
SAN R2 4 |
SYM R3 Ret |
SYM R4 14 |
BAT R5 1 |
BAT R6 9 |
PHI R7 13 |
PHI R8 5 |
LAK R9 4 |
LAK R10 12 |
WIN R11 6 |
WIN R12 11 |
EAS R13 11 |
EAS R14 9 |
MAL R15 4 |
MAL R16 4 |
BAR R17 6 |
BAR R18 9 |
ORA R19 3 |
ORA R20 Ret |
7th | 136 | |||||||||||||||||||||||
| 1996 | EAS R1 Ret |
EAS R2 5 |
EAS R3 4 |
SAN R4 8 |
SAN R5 7 |
SAN R6 Ret |
BAT R7 6 |
BAT R8 2 |
BAT R9 2 |
SYM R10 Ret |
SYM R11 10 |
SYM R12 7 |
PHI R13 Ret |
PHI R14 3 |
PHI R15 3 |
CAL R16 4 |
CAL R17 12 |
CAL R18 10 |
LAK R19 3 |
LAK R20 9 |
LAK R21 4 |
BAR R22 Ret |
BAR R23 12 |
BAR R24 Ret |
MAL R25 8 |
MAL R26 9 |
MAL R27 4 |
ORA R28 10 |
ORA R29 14 |
ORA R30 7 |
10th | 173 | |||||||||||||
| 1997 | CAL R1 13 |
CAL R2 14 |
CAL R3 11 |
PHI R4 7 |
PHI R5 7 |
PHI R6 6 |
SAN R7 9 |
SAN R8 5 |
SAN R9 9 |
SYM R10 Ret |
SYM R11 10 |
SYM R12 9 |
WIN R13 11 |
WIN R14 7 |
WIN R15 7 |
EAS R16 2 |
EAS R17 4 |
EAS R18 3 |
LAK R19 3 |
LAK R20 2 |
LAK R21 6 |
BAR R22 16 |
BAR R23 DNS |
BAR R24 16 |
MAL R25 6 |
MAL R26 7 |
MAL R27 7 |
ORA R28 10 |
ORA R29 Ret |
ORA R30 7 |
7th | 384 | |||||||||||||
| 1998 | SAN R1 15 |
SAN R2 9 |
SAN R3 6 |
SYM R4 6 |
SYM R5 10 |
SYM R6 9 |
LAK R7 2 |
LAK R8 2 |
LAK R9 2 |
PHI R10 Ret |
PHI R11 14 |
PHI R12 13 |
WIN R13 10 |
WIN R14 7 |
WIN R15 5 |
MAL R16 5 |
MAL R17 2 |
MAL R18 Ret |
BAR R19 4 |
BAR R20 5 |
BAR R21 13 |
CAL R22 17 |
CAL R23 Ret |
CAL R24 C |
HDV R25 15 |
HDV R26 7 |
HDV R27 12 |
ORA R28 24 |
ORA R29 18 |
ORA R30 17 |
10th | 550 | |||||||||||||
| 1999 | EAS R1 16 |
EAS R2 24 |
EAS R3 14 |
ADE R4 10 |
BAR R5 14 |
BAR R6 9 |
BAR R7 29 |
PHI R8 11 |
PHI R9 11 |
PHI R10 10 |
HDV R11 9 |
HDV R12 13 |
HDV R13 13 |
SAN R14 12 |
SAN R15 9 |
SAN R16 8 |
QLD R17 Ret |
QLD R18 14 |
QLD R19 Ret |
CAL R20 |
CAL R21 |
CAL R22 |
SYM R23 Ret |
SYM R24 16 |
SYM R25 9 |
WIN R26 11 |
WIN R27 10 |
WIN R28 10 |
ORA R29 12 |
ORA R30 12 |
ORA R31 Ret |
QLD R32 7 |
BAT R33 4 |
10th | 1160 | ||||||||||
| Steven Johnson | EAS R1 |
EAS R2 |
EAS R3 |
ADE R4 |
BAR R5 |
BAR R6 |
BAR R7 |
PHI R8 |
PHI R9 |
PHI R10 |
HDV R11 |
HDV R12 |
HDV R13 |
SAN R14 |
SAN R15 |
SAN R16 |
QLD R17 |
QLD R18 |
QLD R19 |
CAL R20 10 |
CAL R21 6 |
CAL R22 5 |
SYM R23 |
SYM R24 |
SYM R25 |
WIN R26 |
WIN R27 |
WIN R28 |
ORA R29 |
ORA R30 |
ORA R31 |
QLD R32 |
BAT R33 |
23rd | 576 | ||||||||||
| 2000 | PHI R1 16 |
PHI R2 12 |
BAR R3 9 |
BAR R4 8 |
BAR R5 9 |
ADE R6 6 |
ADE R7 8 |
EAS R8 19 |
EAS R9 16 |
EAS R10 28 |
HDV R11 13 |
HDV R12 13 |
HDV R13 11 |
CAN R14 21 |
CAN R15 3 |
CAN R16 12 |
QLD R17 10 |
QLD R18 12 |
QLD R19 8 |
WIN R20 14 |
WIN R21 12 |
WIN R22 6 |
ORA R23 Ret |
ORA R24 14 |
ORA R25 11 |
CAL R26 15 |
CAL R27 14 |
CAL R28 Ret |
QLD R29 Ret |
SAN R30 11 |
SAN R31 24 |
SAN R32 13 |
BAT R33 4 |
11th | 831 | ||||||||||
| 2001 | PHI R1 7 |
PHI R2 9 |
ADE R3 2 |
ADE R4 3 |
EAS R5 15 |
EAS R6 15 |
HDV R7 21 |
HDV R8 26 |
HDV R9 16 |
CAN R10 1 |
CAN R11 12 |
CAN R12 3 |
BAR R13 9 |
BAR R14 5 |
BAR R15 4 |
CAL R16 1 |
CAL R17 6 |
CAL R18 4 |
ORA R19 5 |
ORA R20 4 |
QLD R21 1 |
WIN R22 8 |
WIN R23 9 |
BAT R24 Ret |
PUK R25 9 |
PUK R26 6 |
PUK R27 6 |
SAN R28 12 |
SAN R29 Ret |
SAN R30 13 |
5th | 2532 | |||||||||||||
| 2002 | ADE R1 8 |
ADE R2 10 |
PHI R3 8 |
PHI R4 10 |
EAS R5 15 |
EAS R6 8 |
EAS R7 24 |
HDV R8 14 |
HDV R9 Ret |
HDV R10 12 |
CAN R11 10 |
CAN R12 14 |
CAN R13 6 |
BAR R14 ? |
BAR R15 23 |
BAR R16 ? |
ORA R17 ? |
ORA R18 ? |
WIN R19 ? |
WIN R20 ? |
QLD R21 13 |
BAT R22 Ret |
SUR R23 ? |
SUR R24 ? |
PUK R25 ? |
PUK R26 ? |
PUK R27 ? |
SAN R28 ? |
SAN R29 ? |
14th | 626 | ||||||||||||||
| 2013 | Tim Blanchard | ADE R1 18 |
ADE R2 15 |
SYM R3 17 |
SYM R4 26 |
SYM R5 22 |
PUK R6 15 |
PUK R7 23 |
PUK R8 Ret |
PUK R9 20 |
BAR R10 21 |
BAR R11 20 |
BAR R12 23 |
COA R13 19 |
COA R14 24 |
COA R15 26 |
COA R16 23 |
HID R17 Ret |
HID R18 24 |
HID R19 15 |
TOW R20 23 |
TOW R21 23 |
QLD R22 16 |
QLD R23 19 |
QLD R24 Ret |
WIN R25 27 |
WIN R26 21 |
WIN R27 9 |
SAN Q 22 |
SAN R28 Ret |
BAT R29 15 |
SUR R30 19 |
SUR R31 16 |
PHI R32 6 |
PHI R33 12 |
PHI R34 16 |
SYD R35 Ret |
SYD R36 Ret |
26th | 1080 | |||||
| 2014 | David Wall | ADE R1 14 |
ADE R2 Ret |
ADE R3 8 |
SYM R4 12 |
SYM R5 20 |
SYM R6 13 |
WIN R7 13 |
WIN R8 5 |
WIN R9 22 |
PUK R10 Ret |
PUK R11 DNS |
PUK R12 DNS |
PUK R13 DNS |
BAR R14 14 |
BAR R15 13 |
BAR R16 7 |
HID R17 18 |
HID R18 16 |
HID R19 18 |
TOW R20 16 |
TOW R21 13 |
TOW R22 20 |
QLD R23 19 |
QLD R24 20 |
QLD R25 12 |
SMP R26 18 |
SMP R27 14 |
SMP R28 12 |
SAN QR 23 |
SAN R29 16 |
BAT R30 Ret |
SUR R31 16 |
SUR R32 15 |
PHI R33 17 |
PHI R34 19 |
PHI R35 Ret |
SYD R36 7 |
SYD R37 Ret |
SYD R38 22 |
21st | 1349 | |||
| 2015 | Marcos Ambrose | ADE R1 16 |
ADE R2 16 |
ADE R3 12 |
SYM R4 |
SYM R5 |
SYM R6 |
BAR R7 |
BAR R8 |
BAR R9 |
WIN R10 |
WIN R11 |
WIN R12 |
HID R13 |
HID R14 |
HID R15 |
TOW R16 |
TOW R17 |
QLD R18 |
QLD R19 |
QLD R20 |
SMP R21 |
SMP R22 |
SMP R23 |
SAN R24 |
BAT R25 |
SUR R26 |
SUR R27 |
PUK R28 |
PUK R29 |
PUK R30 |
PHI R31 |
PHI R32 |
PHI R33 |
SYD R34 |
SYD R35 |
SYD R36 |
43rd | 395 | ||||||
| Scott Pye | ADE R1 |
ADE R2 |
ADE R3 |
SYM R4 18 |
SYM R5 17 |
SYM R6 18 |
BAR R7 22 |
BAR R8 21 |
BAR R9 Ret |
WIN R10 15 |
WIN R11 18 |
WIN R12 8 |
HID R13 6 |
HID R14 4 |
HID R15 16 |
TOW R16 5 |
TOW R17 19 |
QLD R18 Ret |
QLD R19 10 |
QLD R20 15 |
SMP R21 9 |
SMP R22 22 |
SMP R23 17 |
SAN QR 11 |
SAN R24 12 |
BAT R25 Ret |
SUR R26 8 |
SUR R27 21 |
PUK R28 5 |
PUK R29 8 |
PUK R30 3 |
PHI R31 13 |
PHI R32 6 |
PHI R33 14 |
SYD R34 16 |
SYD R35 9 |
SYD R36 9 |
19th | 1589 | ||||||
| 2016 | ADE R1 12 |
ADE R2 7 |
ADE R3 17 |
SYM R4 14 |
SYM R5 14 |
PHI R6 26 |
PHI R7 3 |
BAR R8 24 |
BAR R9 19 |
WIN R10 12 |
WIN R11 7 |
HID R12 5 |
HID R13 Ret |
TOW R14 18 |
TOW R15 7 |
QLD R16 20 |
QLD R17 24 |
SMP R18 Ret |
SMP R19 15 |
SAN QR 21 |
SAN R20 15 |
BAT R21 5 |
SUR R22 18 |
SUR R23 23 |
PUK R24 9 |
PUK R25 11 |
PUK R26 2 |
PUK R27 9 |
SYD R28 14 |
SYD R29 13 |
15th | 1807 | |||||||||||||
| 2017 | Scott McLaughlin | ADE R1 17 |
ADE R2 2 |
SYM R3 14 |
SYM R4 2 |
PHI R5 10 |
PHI R6 14 |
BAR R7 1 |
BAR R8 1 |
WIN R9 1 |
WIN R10 5 |
HID R11 2 |
HID R12 1 |
TOW R13 1 |
TOW R14 2 |
QLD R15 1 |
QLD R16 2 |
SMP R17 21 |
SMP R18 4 |
SAN Q 2 |
SAN R19 2 |
BAT R20 Ret |
SUR R21 12 |
SUR R22 1 |
PUK R23 3 |
PUK R24 2 |
NEW R25 1 |
NEW R26 18 |
2nd | 3021 | |||||||||||||||
| 2018 | ADE R1 3 |
ADE R2 10 |
MEL R3 1 |
MEL R4 2 |
MEL R5 15 |
MEL R6 7 |
SYM R7 9 |
SYM R8 2 |
PHI R9 1 |
PHI R10 1 |
BAR R11 1 |
BAR R12 1 |
WIN R13 5 |
WIN R14 3 |
HID R15 1 |
HID R16 2 |
TOW R17 3 |
TOW R18 3 |
QLD R19 1 |
QLD R20 2 |
SMP R21 3 |
BEN R22 6 |
BEN R23 10 |
SAN QR 3 |
SAN R24 4 |
BAT R25 3 |
SUR R26 5 |
SUR R27 C |
PUK R28 2 |
PUK R29 1 |
NEW R30 1 |
NEW R31 2 |
1st | 3944 | |||||||||||
| 2019 | ADE R1 1 |
ADE R2 1 |
MEL R3 1 |
MEL R4 1 |
MEL R5 DNS |
MEL R6 1 |
SYM R7 1 |
SYM R8 4 |
PHI R9 1 |
PHI R10 2 |
BAR R11 2 |
BAR R12 1 |
WIN R13 1 |
WIN R14 1 |
HID R15 1 |
HID R16 1 |
TOW R17 1 |
TOW R18 11 |
QLD R19 4 |
QLD R20 1 |
BEN R21 1 |
BEN R22 1 |
PUK R23 4 |
PUK R24 1 |
BAT R25 1 |
SUR R26 3 |
SUR R27 DNS |
SAN QR 5 |
SAN R28 9 |
NEW R29 2 |
NEW R30 4 |
1st | 3872 | ||||||||||||
| 2020 | ADE R1 2 |
ADE R2 1 |
MEL R3 C |
MEL R4 C |
MEL R5 C |
MEL R6 C |
SMP1 R7 1 |
SMP1 R8 3 |
SMP1 R9 1 |
SMP2 R10 1 |
SMP2 R11 3 |
SMP2 R12 14 |
HID1 R13 20 |
HID1 R14 1 |
HID1 R15 2 |
HID2 R16 1 |
HID2 R17 1 |
HID2 R18 1 |
TOW1 R19 7 |
TOW1 R20 6 |
TOW1 R21 1 |
TOW2 R22 1 |
TOW2 R23 2 |
TOW2 R24 3 |
BEN1 R25 14 |
BEN1 R26 3 |
BEN1 R27 1 |
BEN2 R28 1 |
BEN2 R29 1 |
BEN2 R30 2 |
BAT R31 5 |
1st | 2576 | ||||||||||||
| 2021 | Will Davison | BAT R1 3 |
BAT R2 7 |
SAN R3 22 |
SAN R4 10 |
SAN R5 5 |
SYM R6 5 |
SYM R7 3 |
SYM R8 3 |
BEN R9 8 |
BEN R10 2 |
BEN R11 3 |
HID R12 14 |
HID R13 2 |
HID R14 2 |
TOW1 R15 9 |
TOW1 R16 4 |
TOW2 R17 11 |
TOW2 R18 4 |
TOW2 R19 3 |
SYD1 R20 7 |
SYD1 R21 2 |
SYD1 R22 5 |
SYD2 R23 3 |
SYD2 R24 4 |
SYD2 R25 7 |
SYD3 R26 7 |
SYD3 R27 5 |
SYD3 R28 12 |
SYD4 R29 5 |
SYD4 R30 C |
BAT R31 10 |
4th | 2389 | |||||||||||
| 2022 | SMP R1 4 |
SMP R2 7 |
SYM R3 2 |
SYM R4 16 |
SYM R5 2 |
MEL R6 16 |
MEL R7 24 |
MEL R8 2 |
MEL R9 2 |
BAR R10 6 |
BAR R11 1 |
BAR R12 3 |
WIN R13 11 |
WIN R14 14 |
WIN R15 10 |
HID R16 2 |
HID R17 2 |
HID R18 4 |
TOW R19 2 |
TOW R20 7 |
BEN R21 2 |
BEN R22 13 |
BEN R23 4 |
SAN R24 1 |
SAN R25 15 |
SAN R26 2 |
PUK R27 1 |
PUK R28 4 |
PUK R29 22 |
BAT R30 Ret |
SUR R31 4 |
SUR R32 3 |
ADE R33 7 |
ADE R34 19 |
5th | 2573 | |||||||||
Super2 drivers
The following is a list of drivers who have driven for the team in the Super2, in order of their first appearance. Drivers who drove for the team on a part-time basis are listed in italics
- Tony Ricciardello (2003)
- Warren Luff (2003)
- Owen Kelly (2004)
- Jose Fernandez (2004)
- Dean Canto (2005)
- Grant Denyer (2005-2006, 2009)
- Will Davison (2005)
- Marcus La Delle (2006)
- Andrew Thompson (2006)
- Luke Youlden (2006)
References
- "MOTORSPORT: New owner for Dick Johnson Racing". Car Sales. Retrieved 28 December 2022.
- "DJR announces new ownership". Supercars Championship. Retrieved 28 December 2022.
- Mark Oastler, XD Falcon, The Weighting Game, Australian Muscle Car, Issue 50, July/August 2010, page 54
- Bathurst 1980 – 'The Rock'.
- When Dick Hit The Rock
- When Dick Hit The Trees
- Dick Johnson & the Ford Sierra RS 500 Cosworth
- Naismith, Barry (April 1989). Bathurst 1988 (1st ed.). Glen Waverley: Garry Sparke & Associates. pp. 74–76 The Cars that Climbed The Mountain. ISBN 0-908-081-677.
- 1988 FINA RAC Tourist Trophy
- 1988 ETCC Silverstone – RAC TT
- Robb Gravett. Archived 27 July 2011 at the Wayback Machine BTCC – The Super Touring Years
- Dick Johnson 1992 Tooheys Top 10 Pole winning lap
- "DJR divorce to reshape V8 Supercars grid". Speedcafe. 15 November 2010. Retrieved 15 May 2014.
- "Charlie Schwerkolt sells his share of DJR". Speedcafe. 3 December 2010. Retrieved 15 May 2014.
- "James Moffat Signs With Jim Beam Racing". Jim Beam Racing. 21 January 2011. Archived from the original on 20 February 2011. Retrieved 21 January 2011.
- "Dick Johnson Racing confirms three-car team". Speedcafe. 1 December 2011. Archived from the original on 7 April 2014. Retrieved 15 May 2014.
- "First Pic: Owen and VIP complete DJR line-up". Speedcafe. 2 February 2012. Archived from the original on 17 May 2014. Retrieved 15 May 2014.
- "Jim Beam to end Dick Johnson Racing Sponsorship". Speedcafe. 5 November 2012. Retrieved 5 November 2012.
- "FPR, Schwerkolt to join forces in 2013". Speedcafe.com. 21 May 2012. Retrieved 15 May 2014.
- "Full steam ahead for LDM's new second entry". Speedcafe. 4 December 2012. Retrieved 15 May 2014.
- "Tim Blanchard confirmed at Dick Johnson Racing". Speedcafe. 15 February 2013. Retrieved 15 May 2014.
- "Jonny Reid secures second Dick Johnson Racing seat". Speedcafe. 25 February 2013. Retrieved 25 February 2013.
- "Wilson security sticks with dick johnson racing for season 2013". Dick Johnson Racing. 8 August 2013. Archived from the original on 12 August 2013. Retrieved 8 August 2013.
- "Young Gun Chaz Mostert to Steer No. 12 Wilson Security Falcon". Dick Johnson Racing. 19 April 2013. Archived from the original on 18 July 2013. Retrieved 19 April 2013.
- "Mostert and DJR win Ipswich finale". SpeedCafe. 28 July 2013. Retrieved 15 May 2014.
- "DJR confirms Scott Pye for 2014". Speedcafe. 4 December 2013. Retrieved 15 May 2014.
- "DJR confirms David Wall and 2014 sponsors". Speedcafe. 16 December 2013. Retrieved 15 May 2014.
- "DJR announces Morris REC purchase". Speedcafe. 4 December 2013. Retrieved 15 May 2014.
- "DJR Penske clarifies ownership, key staff". Speedcafe. 15 September 2014.
- "DJR restructures for single-car Penske assault". Speedcafe. 18 December 2014.
- "DJR Team Penske confirms McLaughlin signing". Speedcafe. 28 June 2016.
- "Shell to become full-time DJR Team Penske backer". Motorsport.com. 3 October 2016.
- Team Penske will not return to Supercars in 2021 Team Penske 23 October 2020
- Penske finalises exit from Supercars, DJR reborn Auto Action 24 October 2020
- "Archived copy". Archived from the original on 18 July 2013. Retrieved 21 January 2013.
{{cite web}}: CS1 maint: archived copy as title (link) - "GoAuto - New Models". Archived from the original on 20 August 2008.
- "David Bowden's Australian touring-car collection". Wheels Magazine. motoring.com.au. June 2007. Retrieved 22 July 2013.