This article was co-authored by Ashleigh Grounds. Ashleigh Grounds is a Makeup Artist and Hair Stylist based in Austin, Texas. Ashleigh has over 11 years of cosmetology experience. She studied cosmetology in Dallas, Texas and completed a two-year hair salon apprenticeship in Kuala Lumpur, Malaysia with Toni & Guy Hair Salon. She is accredited by the International Board of Cosmetology, is a certified Babe Hair Extension Professional, and is a certified Brazilian Blow Out Professional. Ashleigh was voted the best Hair Stylist in Austin for 2012 by RAW Artists and was voted in the top 20 salons for 2020 in Austin by Expertise. Ashleigh's work has been featured in Talentmagazines, BlogTalkRadio, KXAN, and Studio 512.
wikiHow marks an article as reader-approved once it receives enough positive feedback. This article has 24 testimonials from our readers, earning it our reader-approved status.
This article has been viewed 3,031,330 times.
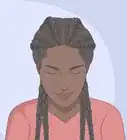
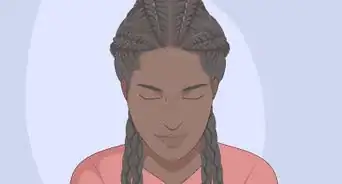
Braiding hair is a great way to keep your hair out of the way. It can also look very fashionable and chic. You can create a variety of styles using simple braiding techniques, and there are lovely ways to make your braid look great. Once you master braiding, you can move on to more intricate braids, such as the French braid and fishtail braid.
Steps
Creating a Traditional Braid
-
1Detangle hair with a brush or wide-toothed comb. Braiding goes a lot faster when your hair is knot-free. The comb should be able to pull easily through the length of the hair.
- If you're working with thick or layered hair, use a bit of water or leave-in conditioner to dampen the hair first. This will make it easier to handle.
- You can braid hair when it is damp or dry. If your hair is damp, it will have a very smooth, tight appearance while dry hair will give a messier look. Let your hair dry for at least 20 minutes before you braid it, however, as wet hair is fragile and easily breaks.
- If braiding your hair dry, it is best to do it a few days after washing so that it is not so clean and slick. Slightly oily hair will hold a braid better than clean hair, and you'll have fewer flyaways.
-
2Start with a secure base (optional). If you tie hair into a ponytail or half ponytail with a hair tie, your braid will be easier to handle and turn out a little neater. Once you get the hang of it, try to start braiding loose hair at the nape of the neck.Advertisement
-
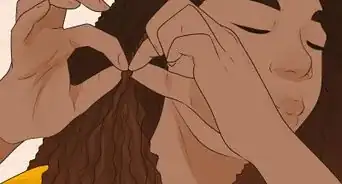
3Divide the hair into three even sections. These will be the three strands of your braid, so try to make them as even as possible.[1]
- Grab the right section with your right hand and the left section with your left hand, letting the middle section hang free (for now).
- In your right and left hands, hold the strands so that you're grasping them against your palm with your middle, ring and little fingers, keeping your index fingers and thumbs free.
-
4Cross the left section over the middle section.[2] If your strands started out as A B C, they should now be ordered as B A C.
- With the index finger and thumb of your left hand, grab the middle section of hair.
- Using the index finger and thumb of your right hand, grab the left section of hair that's grasped against your left palm.
- The original left-hand section is now the middle section.
-
5Cross the right section over the middle section. Your strands that are now ordered B A C will become B C A.
- In your left hand, shift the strand that's between your index finger and thumb so that your other fingers are holding it secure against your palm.
- Use your left index finger and thumb to grab the section of hair that's being held against your right palm (but not the one being held by the thumb and index finger).
- The original right-hand section is now the middle section.
- Typically, step 4 and step 5 in this braiding technique are called a "sequence" or "stitch."
-
6Continue braiding in this manner. Keep using the "free" index finger and thumb of one hand to grab the "back" section of hair (held by the other three fingers against the palm) from the other hand.
- Tighten the braid as you go, and keep the tension even for all 3 sections. It's best to gently pull down on the braid as you weave. Any time a strand changes hands, tug gently on the hair so that the plait moves upward, tightening it.
- Repeat until you run out of space to braid, leaving about 1–3 inches (2.5–7.6 cm) of unbraided hair at the end.
-
7Secure the braid. Use a non-rubber elastic to tie off the end of the braid. You might have to wrap it around the hair several times.
- Avoid rubber bands. These can damage the hair and be difficult to remove at the end of the day.
- Whenever possible, use a ponytail holder that is the same colour as your hair or that is translucent, so that it blends in with your braid. This can make a braid look more natural, and get people to concentrate on the braid itself, rather than on the holder.
-
8Set the braid with hairspray (optional). Hairspray or spray gel can help your braid from developing flyaways as the day goes on. Hold your hairspray about 12 inches (30 cm) away from your head and lightly mist the entire length of your braid.
- If you decide to use hairspray, make sure to use it before adding any hair ornaments.
- Use a shine serum along your braid to give it some extra glow. Rub a bit between your hands and then run along the length of the braid.
- To protect your braids at night, you can use a nourishing oil.
-
9Add embellishment to your braid (optional). Tie a colorful ribbon in a bow at the end of your braid for extra flair.
- You can use tulle, grosgrain, or ric rac, all of which can be found in a variety of colors at your local fabric store.
- Use a cute hair pin or brooch to pin near the base of your braid, or to hold back your bangs.
-
10Play with traditional braids to create other styles. Traditional braids are easy to incorporate into other styles. You can braid a tiny accent braid that hangs loose, or you can pin your accent braid to create a headband.[3] You can also dress up a ponytail by braiding it into a traditional braid.
- You can braid all or part of your hair, so experiment to see which styles you like!


Doing French Braids
-
1Comb out any knots. French braiding can be particularly tricky if your hair is tangled, so take a few minutes to remove knots with a brush or wide-toothed comb.
- When you're combing your hair, work in small sections, and start at the bottom and work your way up. If you start at your scalp, your hair will be more likely to break if you come across a tangle.[4]
-
2Part out your starter section. If you're creating a traditional French braid, separate out the section of hair closest to your forehead and temples.[5] This will give you the classic, timeless look that makes French braid one of the most popular braid styles.[6]
- You don't have to start a French braid at the top of your head. It's the easiest way to learn, but theoretically you could start a French braid anywhere. Just make sure you're including the hair above your ears in your starter section if you decide to move down the head.
- You can create multiple French braids on your hair using several parts. If you have short hair, it may be easier to make two medium braids rather than one large one.
-
3Separate your starter section into three equal sections. These three strands will make up the beginning of the braid.[7]
- The real trick to French braiding is keeping your three sections evenly sized as you braid. Give yourself a solid head start by making sure your strands are equal to begin with.
- Make sure the strands start from the same row of hair, rather than staggered areas. Keeping the three strands close together will also be helpful.
-
4Hold the three strands in your hands. Grasping the strands correctly will help you braid neatly and quickly. Though you might find another way that's more comfortable for you, here's a basic beginning grip:
- Grasp the left strand in your left hand.
- Grasp the center strand between the thumb and index finger of your right hand.
- Grasp the right strand between your right palm and the last three fingers of your right hand.
-
5Move the right strand to the center. Here's how to shift the right strand without completely losing your hold on the braid: [8]
- With the last three fingers of your left hand, grip the left strand between your fingers and your palm. This should free up your left thumb and index finger.
- With your left thumb and index finger, reach over the center strand and grab the right strand. You should now have two strands in your left hand and one in your right hand.
-
6Move the left strand to the center. This will be the same process as the previous step, mirrored.
- With the last three fingers of your right hand, grip the right strand between your fingers and your palm. This should free up your right thumb and index finger.
- With your right thumb and index finger, reach over the center strand and grab the left strand. You should now have two strands in your right hand and one in your left hand.
-
7Add hair to the right strand. Up until now, you've done a regular braid. This is where the "French" part of the process comes in. It might take you a few tries to get it right, but it's easier once you're comfortable with the grip.
- Let go of the center strand, and allow it to hang between the left and right strands. You should be able to tell it apart from the rest of your hair — it'll be slightly elevated above the hair that hasn't been braided yet.
- Grip the left strand between the last three fingers of your left hand and your left palm and grab the right strand with your left thumb and index finger. Your right hand should now be free.
- Using your right hand, pull up a small section of unbraided hair from the right side of your head. Slide your thumb against your scalp just below the section, gathering a small section of hair. Grab this new section with your left thumb and index finger to add it to the right strand of the braid.
- Pick up the center strand of the braid again. Grab it with your right hand, and move it to the right, making it your new right strand. The section you added hair to, between your left thumb and index finger, is the new center strand.
-
8Add hair to the left strand. This process will be just like the previous step, but using opposite sides: [9]
- Let go of the center strand. Again, it will hang between the left and right strands.
- Grip the right strand between the last three fingers of your right hand and your right palm.
- Grab the left strand with your right thumb and index finger. Your left hand should now be free.
- Using your left hand, pull up a small section of unbraided hair from the left side of your head. Slide your thumb along your scalp in the same manner you did on the other side of your head, gathering the same amount of hair to add to the left section. Grab the new section with your right thumb and index finger to add it to the left section of the braid.
- Pick up the center strand of the braid again. Grab it with your left hand, and move it to the left, making it your new left strand. The section you added hair to, between your right thumb and index finger, is the new center strand.
-
9Continue braiding in this pattern. You will run out of new hair to add into the braid when you reach the nape of your neck, at which point you can finish with a regular braid. To keep the braid looking as neat as possible, create parallel lines on each side of your head as you gather sections of hair. This helps keep your sections about the same size as you finish your braid.
-
10Do a basic braid on the rest of the hair. Continue doing a regular three-strand braid with the hair that's still loose.
-
11Secure the braid. Use a hair tie the same color as your hair, or one that is translucent so that it blends in. Avoid rubber bands, which can damage your hair and be difficult to remove.
-
12Set the braid with hairspray (optional). Hairspray or spray gel can help your French braid from developing flyaways as the day goes on. Hold the product about 12 inches (30 cm) away from your hair, then lightly spritz the length of your braid.
- If you're going to add extra embellishment to your hair, hairspray it first. This will prevent flaky residue from getting on your barrettes or ribbons.
- Using shine serum will help to keep your hair looking smooth and soft, if it has the tendency to be rough and dry looking.
-
13Add embellishment to your braid (optional). For some extra flair, tie a colorful ribbon in a bow at the end of your braid.
- You can use tulle, grosgrain, or ric rac, all of which can be found in a variety of colors at your local fabric store.
- Adding a pretty brooch or multiple hair pins along the braid is a great way to add a bit of glam to your look.


Making a Fishtail Braid
-
1Separate your hair into two even sections. A fishtail braid looks like it's made of several small strands, but surprisingly there are only two primary sections.[10]
- For a neat braid, use a fine-toothed comb to make a straight part down the middle of your head, from forehead to nape.
- For a more tousled, Katniss Everdeen-inspired look, just part your hair with your hands and separate into two sections that seem somewhat even.
- You can fishtail your hair when it is either wet or dry.
-
2Pull a small strand of hair from the left section into the right section. Once you get this grip down, you'll be able to do it for the whole braid.
- Hold the right section of hair in your right hand.
- Drop the left section and let it hang loose. Because you're only working with two sections, you don't need to worry about it mixing with another part of the braid.
- Using your left hand, pull up a small strand of hair from the leftmost side of the left section. That is, from the side of the left section of hair that's closest to your ear.
- Grab the small strand of hair from the left section with your right hand, incorporating it into the right section of the braid.
- Hold the left section of hair in your left hand again. As you pick it back up, you can run your fingers through the section to smooth out any knots and tighten up the braid.
-
3Pull a small strand of hair from the right section into the left section. This is just like the previous step, but mirrored.
- For a more intricate-looking braid, pull up smaller strands of hair. For a quicker braid, grab larger sections.
- Hold the left section of hair in your left hand.
- Drop the right section and let it hang loose. Again, because you're only working with two primary sections, there's no need to worry about mixing strands.
- Using your right hand, pull up a small strand of hair from the rightmost side of the right section (or the part closest to your ear).
- Grab the small strand of hair from the right section with your left hand, incorporating it into the left section of the braid.
- Hold the right section of hair in your right hand again. As you pick it back up, you can run your fingers through the section to smooth out any knots and tighten up the braid.
-
4Repeat this pattern till you run out of hair. Keep alternating sides and adding strands until you get to the end of your locks. Try to keep the small strands that you pull into the main sections as evenly sized as possible.
-
5Tie off the braid with a hair elastic. Take care not to tangle any hair in the elastic. Choose 1 that is wrapped in fabric to minimize the risk of damaging your hair.

Doing a Five-Strand Braid
-
1Separate the hair into five equal sections. A five-strand braid looks a little more intricate and elegant than a standard three-strand braid, and it's easy to do once you get the process down.
- When you're first learning, consider pulling your hair into a ponytail and starting the braid there, so you're working with a stable base.
- It's easiest to braid a five-strand braid when your hair is wet or greasy from going a few days of being unwashed. This will help to keep the sections together, and prevent fly-aways from getting tangled up in other strands.
-
2Hold the strands with both hands. It's easiest if you hold the two leftmost strands in your left hand, and the two rightmost strands in your right hand, allowing the center strand to hang loose.
- Numbering the strands can help you keep them straight. They should look like 1 2 3 4 5.
-
3Move the leftmost strand to the center. Move it over strand 2, and under strand 3, so that it's now in the center.
- You should now have 2 3 1 4 5.
- You are essentially weaving your hair, moving the strands from the right to the left, and the left to the right.
-
4Weave the rightmost strand to the center. Move it over strand 4 and under strand 1, so that 5 is now in the center.
- You should now have 2 3 5 1 4.
-
5Continue weaving your hair until you run out. Keep alternating outer strands and moving them to the center.
-
6Tie off the braid. Use a ribbon or non-rubber hair elastic to secure the end of the braid. Take care not to tangle your hair as you tie it off, and choose an elastic that is wrapped in fabric.


Playing with Other Styles
-
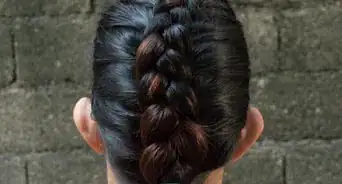
1Learn how to Dutch braid. This is the reverse of a French braid, where instead of braiding strands over each other you braid them under. It is very simple to do, and instead of the braid sitting under your hair (as with a French braid), it sits as a 3-D section above your hair.
- This look is also called an "outside braid," and it pops a little more than a traditional French braid.[11]
-
2Try a waterfall braid. This beautiful style is created by letting strands of hair hang loose from a French braid, similar to the look of a waterfall. [12] When you feel comfortable with your skills in French braiding, take the next step to try a waterfall braid.
-
3Create a braided headband. This is a small, thin braid that goes from ear-to-ear across your forehead, like a headband. It uses the process of French or Dutch braiding to turn your bangs into a statement piece.
-
4Make a braided braid. This is a regular three-strand braid, but each section is pre-braided to create a very intricate, large braid. This style is great with a bohemian headband or pin, or to give the impression of a lot of work when you didn't do much at all!
-
5Try a rope braid. This is a pretty braid that looks like a spiraling rope strand, Although it can be a little difficult to master, it is great for leaving down or twirling up into a bun.


Community Q&A
-
QuestionWhat is a cornrow braid?
 Laura MartinLaura Martin is a Licensed Cosmetologist in Georgia. She has been a hair stylist since 2007 and a cosmetology teacher since 2013.
Licensed CosmetologistA cornrow is a very tight, thin French braid that sits very close to the scalp. Cornrows are often done as a base for other styles. -
QuestionWhat is a boxer braid?Laura MartinLaura Martin is a Licensed Cosmetologist in Georgia. She has been a hair stylist since 2007 and a cosmetology teacher since 2013.
Licensed CosmetologistBoxer braids are sleek inverted French braids. They are popular with female athletes. -
QuestionHow do you do a reverse French braid?Laura MartinLaura Martin is a Licensed Cosmetologist in Georgia. She has been a hair stylist since 2007 and a cosmetology teacher since 2013.
Licensed CosmetologistA reverse French braid is done by following the steps as you would for a classic French braid but instead of crossing the outer strands over the center you cross them under. This creates sleeker roots and more textured dimensional braid.
Things You'll Need
- A brush or comb
- A hair tie
- Hairspray or gel
- Ribbon, barrettes, or other ornaments (optional)
References
- ↑ https://youtu.be/p4VaL-AG7cI?t=23
- ↑ https://youtu.be/p4VaL-AG7cI?t=26
- ↑ https://lovehairstyles.com/how-to-braid-your-own-hair-tutorials-tricks/
- ↑ Ashleigh Grounds. Makeup Artist & Hair Stylist. Expert Interview. 22 April 2020.
- ↑ https://youtu.be/p4VaL-AG7cI?t=4162
- ↑ Ashleigh Grounds. Makeup Artist & Hair Stylist. Expert Interview. 22 April 2020.
- ↑ https://lovehairstyles.com/how-to-braid-your-own-hair-tutorials-tricks/
- ↑ https://youtu.be/p4VaL-AG7cI?t=4162
- ↑ https://lovehairstyles.com/how-to-braid-your-own-hair-tutorials-tricks/
- ↑ https://youtu.be/p4VaL-AG7cI?t=3005
- ↑ Ashleigh Grounds. Makeup Artist & Hair Stylist. Expert Interview. 22 April 2020.
- ↑ https://lovehairstyles.com/how-to-braid-your-own-hair-tutorials-tricks/
About This Article

To make a traditional three-strand braid, first detangle your hair using a brush or a wide-tooth comb. You can braid your hair while it’s dry, but it helps to dampen it first if you want a tighter, smoother-looking braid. Dry hair will also braid more easily if it’s been a couple of days since you last washed it. To make your hair easier to handle, tie it into a ponytail at the nape of your neck. Then, divide the ponytail into 3 even sections. Grab the right section with your right hand and the left section with your left hand, while letting the middle strand hang free. Hold the left and right strands with your middle, ring, and little fingers so that your index fingers and thumbs are free to do the braiding. To make it easier to keep track of the sections, think of them as sections A, B, and C, going from left to right. Cross the left section, A, over the middle section, B. Use your thumb and index finger on your right hand to pull the section over from your left hand. Your strands should now be in the order B, A, C. Next, cross the right section over the middle section, so that your sections are ordered B, C, A. Keep repeating this pattern, alternating crossing the left and right sections over the middle, until your hair is almost completely braided. Leave 1 to 3 inches (2.5-7.6 cm) of unbraided hair at the end. Tie off the loose end with an elastic hair band to keep your braid from unraveling. If you want to keep your braid smooth and neat, set it with a bit of hairspray. Skip the hairspray if you prefer a casual, messy look. You can also add a colorful ribbon or other decorative hair tie to the end or base of your braid for a bit of extra flair. To learn more from our Cosmetologist co-author, such as how to do a French or fishtail braid, keep reading!