This article was co-authored by Ndeye Anta Niang. Ndeye Anta Niang is a Hair Stylist, Master Braider, and Founder of AntaBraids, a traveling braiding service based in New York City. Ndeye has over 20 years of experience in African hair including braiding box braids, Senegalese twists, crochet braids, faux dread locs, goddess locs, kinky twists, and lakhass braids. Ndeye was the first female of her tribe in Africa to move to America and is now sharing her knowledge of African braids passed on from generation to generation.
wikiHow marks an article as reader-approved once it receives enough positive feedback. This article has 25 testimonials from our readers, earning it our reader-approved status.
This article has been viewed 1,514,787 times.
A braid can add a fun accent to your hair and is great for when you have little time to devote to styling your hair. It takes practice to get a smooth and uniform braid. There are many different types of braids you can try. Take some time to learn how to braid your own hair using three common braided hair styles.
If you're looking for African-American hair care, you can also braid African-American hair.
Things You Should Know
- Create a traditional braid by dividing your hair into 3 even sections. Cross these sections over one another in a pattern to extend your braid.
- Make a French braid by incorporating extra pieces of hair into the 3 sections of your braid as you go.
- Split your hair into 2 sections to create a fishtail braid.
Steps
Creating a Traditional Braid
-
1Brush your hair. This helps your braid stay smooth and neat.[1]
- Use any kind of brush or comb, brushes are better to smooth out your hair.
- Brushing your hair before you start braiding will prevent knots from forming in your hair as your braid.
- Don't start braiding your hair when it is wet. It will expand as it dries and may break in your braid.
- Avoid using lots of hair product when you start this process, but you can try a dry shampoo to help with texture if you need it. You can also mist on a little water or use a leave-in conditioner to help tame flyaways.
- Try using dry shampoo if you are having problems holding on to your hair. Clean, dry hair may be too slick to stay in place while performing the steps. The dry shampoo adds texture that helps you hold on to the strands.[2]
- Wash, deep condition, and dry your hair beforehand to help the braid stay in longer.[3]
-
2Decide where you want your braid to fall. Before you can start your braid, you need to decide where you want your braid. The placement of your braid on your head can transform your hairstyle for many outfits and occasions. It can be convenient, casual, or elegant depending on where you place your braid.
- Pull your hair to either side to make a side braid. Brush all of your hair to the side you choose to ensure there will be no bumps. This creates a more elegant, put together look that can accent an evening out or day at the office.
- Starting with a side braid can be beneficial if you are a beginner. It is easier to see and control what you are doing with a side braid.
- You can braid down the back in a low, unsecured ponytail. This gives a more elegant classic braid and is more relaxed and unstructured.
- You can also start by making a ponytail in the middle or on top of your head. This will add stability to a back braid but is a more casual look.
Advertisement -
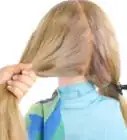
3Divide your hair into three sections.[4] Collect and hold your hair in your hands. [5]
- You will have one section of hair on the left, one in the center and one on the right.
- Hold the section of hair on the left between your left thumb and forefinger.
- Hold the section of hair on the right between your right thumb and forefinger.
- Let the center section hang loose for now.
-
4Begin your braid. Start braiding by crossing the right section of hair over the center section.[6]
- Take the right section of hair, once you have crossed it over the center section, between your left forefinger and middle finger to secure it.
- Grab the center section of hair with between the thumb and forefinger of your left hand.
- Pull on the sections of hair in both hands to tighten the braid. This will ensure that the braid will be even with no gaps.
- If you have longer hair, run your fingers down the section of hair to ensure it does not get tangled as you go.
-
5Continue braiding the remainder of your hair. You should now rotate your left wrist to cross the left section of hair over the new center section of hair. [7]
- Grab the left section of hair between your right forefinger and middle finger after you cross it over the center section.
- Secure the center section of hair between your thumb and forefinger of your left hand.
- Pull the sections of hair in both hands tightly to ensure that the tension on the braid is even as you go.
-
6Repeat the previous two steps. Do this until you reach the bottom of your sections of hair.[8]
- Cross of the right section over the new center, then the left over the new center until the braid moves down the length of your hair.
- Make sure to continue pulling your hair snug as you follow the braid.
- If your braid gets too long while braiding down your back, pull your hair over your shoulder and continue the steps with the hair in front of you.
- Tie with a hair tie at the bottom. Make sure the hair tie is tight. If it is too loose sections of your braid will come out.


Creating a French Braid
-
1Brush your hair thoroughly. This will make the braid smooth and neat. This will also cut down on tangling as you braid.
- It will be difficult to pull your hair into sections for a braid if it is tangled.
- Smoother hair is easier to braid and this will prevent a messy looking style.
- Remember to avoid braiding wet hair or using too much product. If you are having trouble with your hair slipping out of the braid, you can apply a dry shampoo though.
-
2Section off an area of hair at the front of the scalp on the top of your head.[9] Use a hair pick or comb to pick up the section of hair at the top of your head.
- The French braid is more complicated than the traditional braid because the braid starts at the top of your head, then incrementally adds hair from the rest of your head as you work your way down the braid.
- This first section should extend from your temples to the top of your head.
- You can also separate this section of hair by pulling your hair back along the side of your head from your temples to the back, using your thumbs.
- Brush this section of hair back from your face to smooth it out.
-
3Divide the section at the front of your head for braiding. Split the hair into three sections, holding the hair high on your head.
- Hold one section in one hand and two in the other, keeping them separated by your index finger.
- It is often helpful to hold two sections in your left hand and one in your right hand.
- Make sure your hold is firm on the three sections.
-
4Begin your braid. Cross the right section over the center section to start.
- Cross the left section over the section that is now in the center, as if you were doing a traditional braid.
- This is the start of your braid. It should begin high on the crown of your head and look like a traditional braid.
- Pull the sections tight to make sure the tension on the braid is even and that it is not too loose.
-
5Continue your braid on the right side. You will do this by taking small sections of hair and adding them to the right section of your divided hair.
- Pick up a small section of hair from the right side of your head, immediately below the braided section.
- Add the new hair to the section of hair that you are holding in your right hand. Then cross this right section over the center section of hair.
- Pull the section tight at the end of each cross over to ensure that the braid stays neatly defined with even tension.
-
6Continue your braid on the left side. This will follow the same method you used on the right side.
- Pick up a small section of hair from the left side of your head, just below the braid. This section should be parallel to and the same size as the section you picked up on your right side.
- Add it to the hair that you are holding in your left hand.
- Cross it over the center section of hair.
-
7Repeat this process, alternating between left and right sides. Continue to pick up extra hair before crossing the sections into your braid.
- This incorporates the hair not already in the braid, creating a cohesive braid.
- Make sure you take even strands on each side of your head. This will ensure that your braid will be even and straight in the back.
- The braid should follow the center of your head, from the front hair line to the nape of the neck.
- If you have longer hair, run your fingers down each the section of hair to ensure that tangling does not occur as you go.
-
8Braid your remaining hair. You will use a traditional braid once all the hair down to the nape of your neck is incorporated into the three sections you started with.
- When you have no more hair to braid, tie the end with a hair tie.
- If you have long hair, you will need to bring your braid over your shoulder to complete it.
- Try variations of this braid. You can do pigtail french braids by splitting your hair into 2 sections with a hair pick and braiding them individually.
- You can also braid from your part down the side of your head. This is called a french lace braid.
-
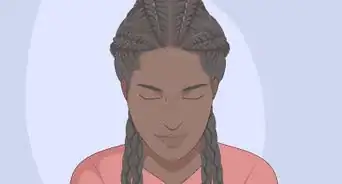
9Finished.


Creating a Fishtail Braid
-
1Brush your hair thoroughly. This removes tangles and makes braiding easier. [10]
- This type of braid is much easier to do on longer hair. If you don't have longer hair, you can use hair extensions to make this braid easier.
- Make sure there are no tangles or knots in your hair before you start the braid.
- Use a regular hair brush or comb to do this step.
- It is much simpler to do a side fishtail braid when you are first learning. The multi-layered construction makes it difficult to do behind your back when you are not familiar with the process.
-
2Part your hair into two sections. Use a hair pick or comb to part your hair down the middle, dividing it into 2 large sections at the base of your skull.[11]
- Make sure your sections are even so your braid will be as well.
- If you want, you can brush out each of these sections to ensure that the hair is smooth and well divided.
- This is different from traditional and french braids, which use 3 sections of hair.
-
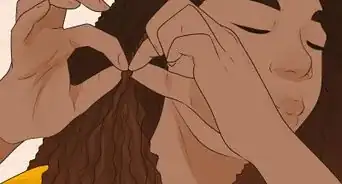
3Begin your braid. You will pull small sections of hair, about 1/2 inch in thickness from the outside of each section of hair for this style of braid.[12]
- Pull a small amount of hair from the front, outside of the right section of your hair.
- Use your index finger to separate this smaller section of hair from the larger one on the right.
- Cross this smaller section of hair over the right section of hair and tuck it behind the left section of hair.
-
4Do the same for the left side. You will need to hold both left sections with your left hand and both right sections with your right hand.[13]
- After you merge each small, outside piece, you will go back down to two strands.
- To get the best results, try not to rush this braid. Instead, work slowly and be careful not to drop the smaller strands of hair as you braid.
- This varies from the other braids because you work with two stable pieces while creating the third strand each time instead of having three stable strands throughout the steps.[14]
- For a more intricate braid, use smaller strands of hair.
-
5Continue braiding your hair following the last step. Alternate sides as you go along.[15]
- Cross the small, outside right section that is closer to your face into the center.
- Merge this piece of hair with the large section in your left hand.
- Cross the small, outside left section into the center.
- Merge this small left section into the larger right section.
- Make sure to pull the strands tight. This will ensure a tight, neat braid.
- Repeat this process until all of your hair is braided.
-
6Secure the braid at the end with a hair elastic. You can use small clear elastics or a thicker colored style if you want.[16]
- Once you've finished the braid, give it a textured look by gently stretching out the braided sections to make them appear thicker.[17]
- Be careful as you do this as you might risk loosening parts of the braid, making them prone to falling out.
- For a messier braid, gently run your fingers along the braids and pull small strands out to create a flyaway look. [18]

Community Q&A
Did you know you can get expert answers for this article?
Unlock expert answers by supporting wikiHow
-
QuestionHow do you do French braids on yourself?
 Laura MartinLaura Martin is a Licensed Cosmetologist in Georgia. She has been a hair stylist since 2007 and a cosmetology teacher since 2013.
Licensed CosmetologistFrench braiding your own hair can be tricky. The method is the same as when you do it on someone else, but you'll be working where you can't see, so you have to go by feel. Keep your hands close to the scalp to prevent bumps in the finished look.
Support wikiHow by unlocking this expert answer.
-
QuestionIs it good for your hair to braid it?Laura MartinLaura Martin is a Licensed Cosmetologist in Georgia. She has been a hair stylist since 2007 and a cosmetology teacher since 2013.
Licensed CosmetologistBraiding doesn't have any direct benefits for the hair, but it is a good way to create a stylish look without heat. Braiding can also protect your hair from exposure to the elements.Support wikiHow by unlocking this expert answer.
-
QuestionHow do you make a fishtail braid in your hair?Laura MartinLaura Martin is a Licensed Cosmetologist in Georgia. She has been a hair stylist since 2007 and a cosmetology teacher since 2013.
Licensed CosmetologistA fishtail braid is made by splitting the hair in half then peeling off small sections from each side and adding them to the opposite side. This looks best if the sections are taken from the outside edges.Support wikiHow by unlocking this expert answer.

References
- ↑ http://www.womenshealthmag.com/beauty/how-to-braid-your-own-hair
- ↑ http://www.womenshealthmag.com/beauty/how-to-braid-your-own-hair
- ↑ Ndeye Anta Niang. Hair Stylist & Master Braider. Expert Interview. 10 January 2020.
- ↑ Ndeye Anta Niang. Hair Stylist & Master Braider. Expert Interview. 10 January 2020.
- ↑ https://www.youtube.com/watch?v=0hieusbylb8
- ↑ https://www.youtube.com/watch?v=0hieusbylb8
- ↑ https://www.youtube.com/watch?v=0hieusbylb8
- ↑ https://www.youtube.com/watch?v=0hieusbylb8
- ↑ Ndeye Anta Niang. Hair Stylist & Master Braider. Expert Interview. 10 January 2020.
- ↑ https://www.youtube.com/watch?v=cCdXiKsdLMs
- ↑ https://www.youtube.com/watch?v=cCdXiKsdLMs
- ↑ https://www.youtube.com/watch?v=cCdXiKsdLMs
- ↑ https://www.youtube.com/watch?v=cCdXiKsdLMs
- ↑ Ndeye Anta Niang. Hair Stylist & Master Braider. Expert Interview. 10 January 2020.
- ↑ https://www.youtube.com/watch?v=cCdXiKsdLMs
- ↑ https://www.youtube.com/watch?v=cCdXiKsdLMs
- ↑ http://www.hairromance.com/2013/09/hairstyle-tutorial-how-to-do-a-fishtail-braid.html
- ↑ http://www.hairromance.com/2013/09/hairstyle-tutorial-how-to-do-a-fishtail-braid.html
- ↑ http://www.womenshealthmag.com/beauty/how-to-braid-your-own-hair
- ↑ http://www.cosmopolitan.com/style-beauty/beauty/advice/a6514/life-changing-hair-hacks/
- ↑ http://www.womenshealthmag.com/beauty/how-to-braid-your-own-hair
- ↑ http://www.womenshealthmag.com/beauty/how-to-braid-your-own-hair
About This Article

To braid your own hair, start by taking a section of hair from the crown of your head and dividing it into three sections. Begin braiding by crossing the right section over the center, then the left section over the center. Before you cross the right section over the center the next time, pick up a little more hair from the right side of your head. Repeat this step, alternating sides, until you’ve added all your hair into the braid. Then secure the end of the braid with a hair tie. To learn more from our Cosmetologist co-author, like how to make a French or fishtail braid, keep reading!