This article was co-authored by wikiHow Staff. Our trained team of editors and researchers validate articles for accuracy and comprehensiveness. wikiHow's Content Management Team carefully monitors the work from our editorial staff to ensure that each article is backed by trusted research and meets our high quality standards.
The wikiHow Tech Team also followed the article's instructions and verified that they work.
This article has been viewed 415,989 times.
Learn more...
This wikiHow teaches you how to create an iCloud account by signing up for an Apple ID on an iPhone or iPad, a Mac, or via iCloud.com. When you sign up for an Apple ID, your free iCloud account is created for you; all you need to do is sign in.
Steps
Using an iPhone or iPad
-
1Open your device's Settings. It's a gray app that contains an image of gears (⚙️) and is typically found on your home screen.
-
2Tap Sign in to your (device). It's at the top of the menu.[1]
- If you're running an older version of iOS, instead tap iCloud and then tap Create a new Apple ID.
Advertisement -
3Tap Don't have an Apple ID or forgot it? below the password field.
-
4Tap Create Apple ID. It's at the top of the pop-up menu.
-
5Enter your birth date. Swipe up or down on the month, day, and year sections to enter a valid birth date and then tap Next in the top-right corner.
-
6Enter your First and Last name. Then tap Next.
-
7Enter a current email address or create a new iCloud email address. This email address will become the Apple ID you'll use to sign in to iCloud.
- Then tap Next.
-
8Enter a valid password. Then tap Next.
-
9Enter your phone number. Select whether you want to verify your phone number with a Text Message or a Phone Call. Then tap Next.
-
10Enter the Verification Code. Then tap Next.
-
11Tap Agree. It's in the bottom-right of the Terms and Conditions page. Then tap Agree on the pop-up menu.
-
12Enter your device's passcode. This is the unlock code you established for your device when you set it up.
- The screen will display the message "Signing into iCloud" as it accesses your data.
-
13Merge your data. If you have data on your phone such as calendars, reminders, contacts, and notes that you'd like merged with your new iCloud account, tap Merge; if not, tap Don't Merge.
- You will then be signed into your newly created iCloud account. You can now set up iCloud on your iPhone or iPad with your new iCloud account.


Using a Mac
-
1Click on the Apple menu. It's the icon in the upper-left of your screen.
-
2Click on System Preferences. It's in the second section of the drop-down menu.
-
3Click on iCloud. It's on the left side of the window.
-
4Click on Create Apple ID…. It's below the "Apple ID" field in the dialog box.
-
5Enter your birth date. Use the drop-down menus in the dialog box to do so.
-
6Click on Next. It's in the lower-right corner of the dialog box.
-
7Enter your first and last name. Do so in the fields at the top of the dialog box.
-
8Enter an email address. This email address will become the Apple ID you use to sign in to iCloud.
- If you'd like an @iCloud.com email address, click on Get a free iCloud email address... beneath the password field.
-
9Enter a password and confirm it. Do so in the fields near the bottom of the dialog box.
- Your password must have at least 8 characters (including a number and an uppercase and lowercase letter) with no spaces. It also shouldn't have three consecutive characters (222), be your Apple ID, or a previous password you've used in the last year.
-
10Click on Next. It's in the lower-right corner of the dialog box.
-
11Create three security questions. Use the three drop-down menus in the dialog box to select the security questions, then type the answers in the fields beneath the drop down menus.
- Choose questions that you'll remember the answers for.
- Answers are case-sensitive.
-
12Click on Next. It's in the lower-right corner of the dialog box.
-
13Check the box next to "I have read and agree…." It's in the lower-left part of the dialog box.
-
14Click on Agree. It's in the lower-right corner of the dialog box.
-
15Check your email. Check for a message that was sent to the email address you entered for your Apple ID.
-
16Open the email message from Apple. The subject line will likely be "Verify your Apple ID."
-
17Click on Verify now >. It's a link in the body of the email message.
-
18Enter your password. Type the password you created for your Apple ID in the "Password" field in the browser window.
-
19Click on Continue. It's near the bottom-center of the browser window.
- You should see an "Email address verified" message on your screen.
- Follow onscreen prompts to configure iCloud on your Mac.
-
20Go to the iCloud website. Do so from any browser.
-
21Enter your Apple ID and password.
-
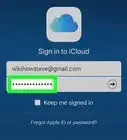
22Click on ➲. It's on the right side of the password field. You can now use your iCloud account.


Using iCloud.com
-
1Go to www.icloud.com. Do so from any browser, including computers running Windows or Chromebooks.
-
2Click on Create yours now.. It's below the Apple ID and Password fields and to the right of "Don't have an Apple ID?"
-
3Enter an email address. This email address will become the Apple ID you use to sign in to iCloud.
-
4Enter a password and confirm it. Do so in the fields near the center of the dialog box.
- Your password must have at least 8 characters (including a number and an uppercase and lowercase letter) with no spaces. It also shouldn't have three consecutive characters (222), be your Apple ID, or a previous password you've used in the last year.
-
5Enter your first and last name. Do so in the fields near the middle of the dialog box.
-
6Enter your birth date. Do so in the field near the middle of the dialog box.
-
7Scroll down and create three security questions. Use the three drop-down menus in the dialog box to select the security questions, then type the answers in the fields beneath the drop down menus.
- Choose questions that you'll remember the answers for.
- Answers are case-sensitive.
-
8Scroll down and select your country. Do so in the drop-down menu.
-
9Scroll down and check or uncheck the Apple notifications boxes. Checking the boxes means you'll receive occasional email updates and announcements from Apple.
-
10Scroll down and enter the jumbled characters. Do so in the field at the bottom of the dialog box to prove you're not a bot.
-
11Click on Continue. It's in the lower-right corner of the dialog box.
-
12Check your email. Check for a message that was sent to the email address you entered for your Apple ID.
-
13Open the email message from Apple. The subject line will likely be "Verify your Apple ID."
-
14Enter the code. Type the six-digit code in the email message into the boxes on your browser screen.
-
15Click on Continue. It's in the lower-right corner of the dialog box.
-
16Check the box next to "I have read and agree…." It's near the bottom of the dialog box.
-
17Click on Agree. It's in the lower-right corner of the dialog box.
-
18Go to the iCloud website. Do so from any browser.
-
19Enter your Apple ID and password.
-
20Click on ➲. It's on the right side of the password field. You can now use your iCloud account.


Community Q&A
-
QuestionHow old does one have to be to open an iCloud account?
 Moana WaialikiCommunity Answer13 years old is the minimum age Apple stipulates.
 -
QuestionWhat's the difference between and Apple ID and an iCloud account?
 Community AnswerYour Apple ID is a comprehensive account that covers all Apple products, including iCloud. When you create an Apple ID, you are automatically creating an associated iCloud account as well. Your Apple ID allows you to access your iCloud account on any compatible devices.
 -
QuestionCan I create an iCloud account (Apple ID) in Windows?Community AnswerYes, you can use the Apple ID website to create a new Apple ID and iCloud account from any computer or device.


References
About This Article

1. Open Settings.
2. Tap Sign in to your device.
3. Tap Don't have an Apple ID or forget it?
4. Tap Create Apple ID.
5. Follow the on-screen instructions.