This article was co-authored by wikiHow Staff. Our trained team of editors and researchers validate articles for accuracy and comprehensiveness. wikiHow's Content Management Team carefully monitors the work from our editorial staff to ensure that each article is backed by trusted research and meets our high quality standards.
There are 8 references cited in this article, which can be found at the bottom of the page.
This article has been viewed 9,952 times.
Learn more...
Prickly pears are the delicious, brightly colored fruit of the nopales cactus. Their juice is subtly sweet, like raspberries.[1] The downside to prickly pears, as their name suggests, is that they’re covered in tiny, prickly barbs called glochids.[2] Don’t be daunted, though! With a few simple techniques, it’s easy to remove the needles, cut open the prickly pear, and savor its wonderful fruit and juice.
Steps
Peeling a Prickly Pear
-
1Wear gloves when you handle a prickly pear. Avoid getting poked by those sharp glochids. These tiny thorns can be practically invisible and will easily stick in your skin for the rest of the day.[3]
- Choose thick, leather gloves if you have them. The thicker the glove, the better for your skin’s protection.[4]
-
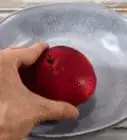
2Pick the pear up with a fork and hold it under running water. Use the fork to keep the prickly pear in the stream of water and rotate it. The water’s force will knock off most of the glochids.
- Don’t prick the pear with the fork multiple times. You’ll break up too much of the fruit inside and make it harder to peel after.
- Empty your sink before washing off the prickly pear so that the needles don’t fall on any dishes.[5]
Advertisement -
3Put the pear down and cut off about 1⁄2 inch (1.3 cm) from each end. Place the fruit on a plate or cutting board. Hold it steady with either the fork or your gloved hand. Use a paring knife to slice off the ends.[6]
- There’s an indentation in the bottom of prickly pears. Be sure to cut all of it off when you slice that end.[7]
- Whenever you cut any food with a knife, make sure to curl your fingers inward on the hand that’s holding the food steady. This way, if the knife slips while you’re slicing, you’ll graze your knuckles instead of chopping into the tips of your fingers.
-
4Make a vertical slit in the pear skin no more than 1⁄4 inch (0.64 cm) deep. Use your paring knife to slice into the pear’s skin lengthwise. Slit the whole length of the fruit. Avoid cutting into the inner fruit.[8]
-
5Peel the skin away from the fruit. Insert the tip of the paring knife into the vertical slit. Lift the skin off the inner fruit. Then use your gloved hands to gently pull the skin off the fruit. It usually comes away in one piece.


Burning Away the Glochids
-
1Sear your pear over charcoal. Set the chimney of a charcoal grill on the grill grate. Ignite it, and then hold the pear with tongs over the open flame for a minute or two. Rotate the tongs occasionally to get all sides of the pear.[11]
-
2Use a kitchen blowtorch if you have one to burn away the thorns. Put the pears on a metal baking sheet. Light the torch. Once the flame has turned blue, sear the spines off by passing the torch flame over the skin of the fruit.
- The spines will burn off long before the skin of the fruit starts to singe.
-
3Hold your pear over an open flame if you don’t have a torch or charcoal. Light a fire in your fireplace, if you have one, or simply light a candle. Use metal tongs to pass the pear through the open flame.[12]
-
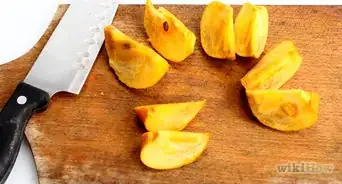
4Peel the pear. With the spines removed, use a paring knife to cut about 1⁄2 inch (1.3 cm) off each end of the fruit. Then make a vertical incision with the knife the whole length of the pear, about 1⁄4 inch (0.64 cm) deep or less. Starting at the incision, use the knife or your hands to gently peel the skin away from the inner fruit. Eat the pear whole or try juicing it.[13]
- Experiment with using prickly pear juice in different ways. You can drink it plain or mix it into refreshing beverages, like lemonade, ginger ale, or other juices. You can also use prickly pear juice to make salad dressings, marmalades, jellies, and conserves.[14]


Juicing the Pear Without Cutting or Peeling
-
1Wash the fruit in cool water. Fill your sink with water and put the fruit in. Swish the pear around in the water using a large spoon.
- Make sure that the sink is empty of all dishes first so that glochids don't wash off onto them. Rinse out the sink after washing the pears in it.
-
2Put the pear into a blender or food processor. Place the entire, unpeeled pear in. Blend the fruit on a 'mix' or 'puree' setting until it forms a thick liquid.
- Blending time will depend on how many pears you put in at once, but it shouldn't take longer than a minute.
-
3Strain the blended pear. Pour the contents of the blender through a fine mesh strainer, or a colander lined with cloth into a waiting bowl. Press a spoon against the seeds and skin trapped in the strainer to get all the juice out. Let the strained juice settle.
- A clean, old T-shirt or pillow case lining your colander often works better than cheesecloth for straining prickly pear.
-
4Pour the juice from the bowl into a glass or other receptacle. Pour the juice slowly and gently to leave most of the settled sediment behind in the bottom of the bowl. Drink the juice right away or put it in the fridge or the freezer for later.
- To freeze the prickly pear juice, pour it into ice cube trays. Place these in airtight freezer bags and put in the freezer.
- Prickly pear juice can be refrigerated for up to a month or frozen for up to a year.[15]
- Depending on their size, 6 to 12 prickly pears will yield about 1 cup (240 mL) of juice.[16]


References
- ↑ https://cookingontheweekends.com/how-to-cut-a-cactus-pear-a-photographic-guide
- ↑ https://www.desertusa.com/lil/prickly-pear-sweets.html
- ↑ https://cookingontheweekends.com/how-to-cut-a-cactus-pear-a-photographic-guide/
- ↑ https://www.simplyrecipes.com/recipes/how_to_cut_and_prepare_prickly_pears/
- ↑ http://www.cucicucicoo.com/2014/08/how-to-peel-prickly-pears-cactus-fruit/
- ↑ https://cookingontheweekends.com/how-to-cut-a-cactus-pear-a-photographic-guide/
- ↑ http://www.cucicucicoo.com/2014/08/how-to-peel-prickly-pears-cactus-fruit/
- ↑ https://cookingontheweekends.com/how-to-cut-a-cactus-pear-a-photographic-guide/
- ↑ https://cookingontheweekends.com/how-to-cut-a-cactus-pear-a-photographic-guide/
- ↑ http://www.cucicucicoo.com/2014/08/how-to-peel-prickly-pears-cactus-fruit/
- ↑ http://www.thesurvivalgardener.com/removing-spines-cactus-pads/
- ↑ https://www.motherearthnews.com/real-food/how-to-eat-cactus-zmaz84zloeck
- ↑ https://cookingontheweekends.com/how-to-cut-a-cactus-pear-a-photographic-guide/
- ↑ https://www.desertusa.com/lil/prickly-pear-sweets.html
- ↑ http://www.rootedfood.com/musings/2014/12/11/prickly-pear-harvest
- ↑ https://www.simplyrecipes.com/recipes/how_to_cut_and_prepare_prickly_pears/
About This Article