This article was co-authored by wikiHow staff writer, Nicole Levine, MFA. Nicole Levine is a Technology Writer and Editor for wikiHow. She has more than 20 years of experience creating technical documentation and leading support teams at major web hosting and software companies. Nicole also holds an MFA in Creative Writing from Portland State University and teaches composition, fiction-writing, and zine-making at various institutions.
The wikiHow Tech Team also followed the article's instructions and verified that they work.
This article has been viewed 373,761 times.
Learn more...
If you're setting up a Windows PC for your home or small business, you may want to keep tabs on which websites your employees or kids visit. However, when you're using Microsoft Edge, it's possible for any user to delete their browsing history to cover their tracks. Want to make sure nobody can do that? This wikiHow teaches you how to disable the feature that allows Microsoft Edge users to delete their browsing and download history.
Steps
Using the Registry Editor (All Windows 10 and 8.1 Versions)
-
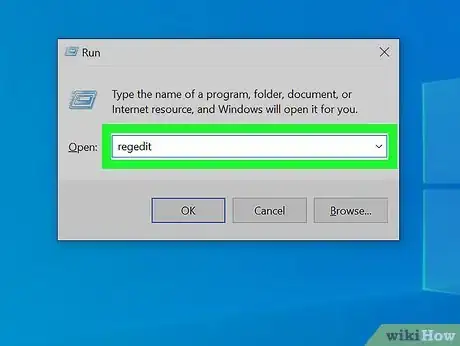
1Press ⊞ Win+R. This opens the Run dialog window.
- This method may seem complicated, but it's really the most straightforward way to accomplish this task on a Windows 10 (or 8.1) Home Edition PC. You can also use this on other versions of Windows 8 and 10, but if you have a Professional or Enterprise edition, check out the Using the Group Policy Editor method.
-
2Type regedit and click OK. This opens the registry editor.Advertisement
-
3Use the tree on the left to navigate. Expand it to HKEY_LOCAL_MACHINE\SOFTWARE\Policies\Microsoft.
- If you want to disable history deleting for just a specific user instead of all users, log into that user's account and select the HKEY_CURRENT_USER key instead of HKEY_LOCAL_MACHINE.
-
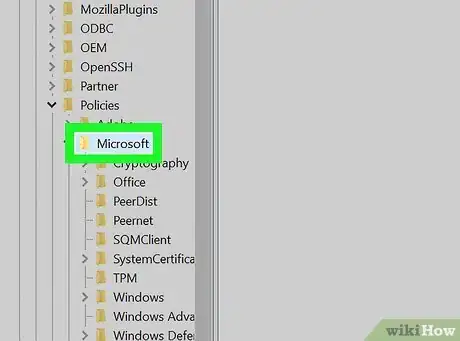
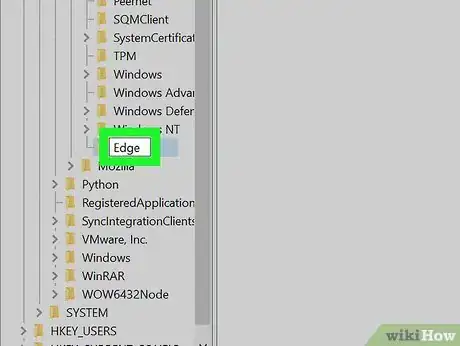
4Create a new key called Edge. Although you'll already see a key in here called "MicrosoftEdge," you actually need to create another one. Here's how:
- Right-click the Microsoft folder in the left panel. A menu will expand.
- Select New > Key.
- Type Edge and press Enter.
-
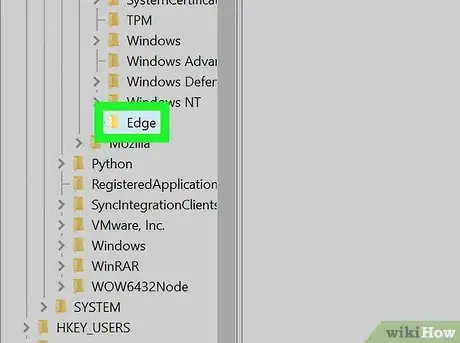
5Click the new Edge key. This selects the key.
-
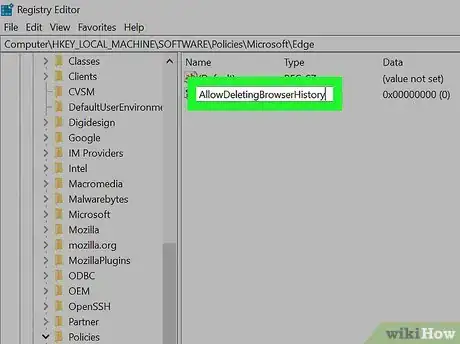
6Create a DWORD inside the key called "AllowDeletingBrowserHistory." Here's how:
- Right-click the blank area in the right panel.
- On the menu, select New > DWORD (32-bit Value).[1]
- Type AllowDeletingBrowserHistory and press the Enter key.
- Double-click AllowDeletingBrowserHistory to open the editor.
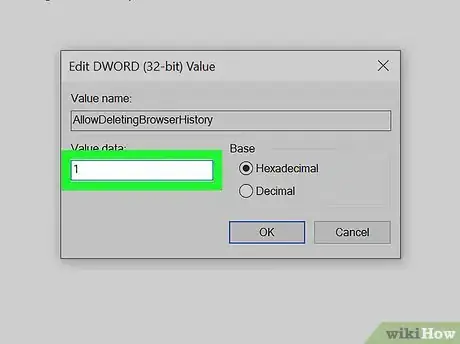
- If you don't see a zero under "Value data," enter one now and click OK.
-
7Open Microsoft Edge. If Edge was already open, close all open windows and then restart it so the changes will take effect. Now that you've edited the registry, the option to delete the user's browser history will no longer be available. Here's how you can test this:
- Click the three dots at the top-right corner of Edge and select Settings.
- Click the Privacy, search, and services tab in the left panel.
- On the right panel, scroll down to "Clear browsing data" and click the Choose what to clear button.
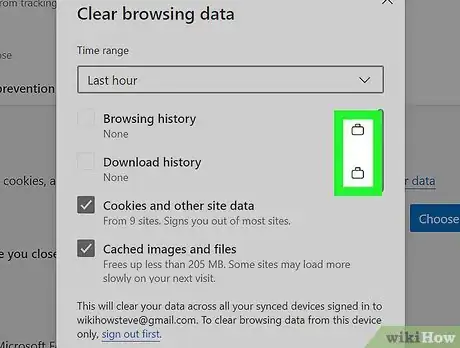
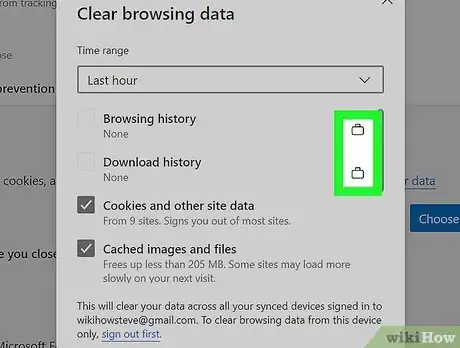
- You will now see padlock icons next to "Browser history" and "Download history." Additionally, you can't place checkmarks in the boxes that mark these items for deletion. As long as your registry changes remain, the history cannot be deleted.
-
8Re-allow deleting the browsing history. If you share the computer with others, you may want to re-enable deletion of your browsing history at some point. Fortunately, now that you've created a registry key, it'll be easy to toggle between allowing and denying deletion. Here's how:
- Re-open the registry editor and navigate to HKEY_LOCAL_MACHINE\SOFTWARE\Policies\Microsoft\Edge.
- Double-click the AllowDeletingBrowserHistory entry in the right panel.
- Replace the "0" with a "1" and click OK.
- Restart Edge.
Using the Group Policy Editor (Windows Pro and Enterprise Editions)
-
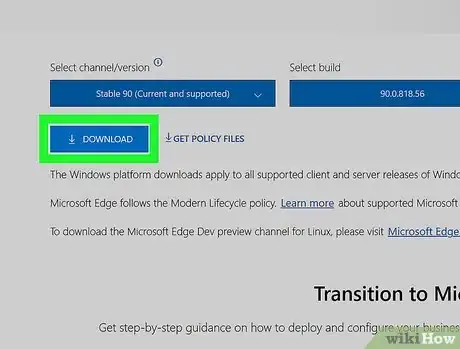
1Download the latest administrative templates for your version of Edge. Here's how:
- Go to https://www.microsoft.com/en-us/edge/business/download.[2]
- Select your version, build, and platform.
- Click the Get Policy Files link.
- Save the ".cab" file to your computer.
- Also, if you don't have 7-Zip installed, you'll need it to decompress the CAB. Go to https://www.7-zip.org and click the Download link for your operating system, double-click the downloaded file, and then follow the on-screen instructions to install.
-
2Decompress the files. To do this:
- Double-click the CAB file—it will open in 7-Zip.
- Click the Extract button in the toolbar.
- Choose a location to extract the file inside to and click OK.
- Press Windows key + E to open File Explorer.
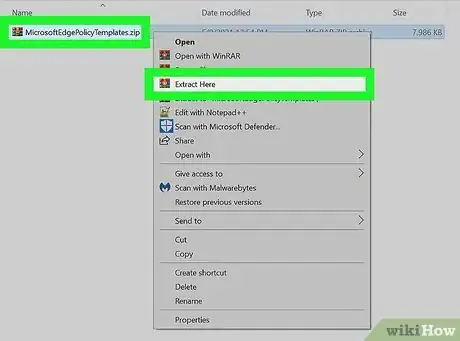
- Go to the newly-compressed file, which is called MicrosoftEdgePolicyTemplates.Zip. It's actually another compressed file—however, this time it's a ZIP file that you can unpack without worrying about 7-Zip.
- Right-click MicrosoftEdgePolicyTemplates.zip and click Extract All.
- Click Next to extract the files, which creates a new folder inside the current folder called MicrosoftEdgePolicyTemplates.
-
3Press ⊞ Win+E. This opens a second File Explorer window. You should now see both File Explorer windows on the screen.
-
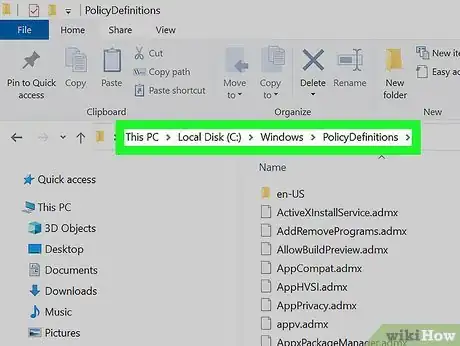
4Go to the PolicyDefinitions folder in the new File Explorer window. The location is C:\Windows\PolicyDefinitions.
- To avoid confusion, we'll call the first window you opened "MicrosoftEdgePolicyTemplates," as that's what you'll see in the title bar. We'll call the second one "PolicyDefinitions."
-
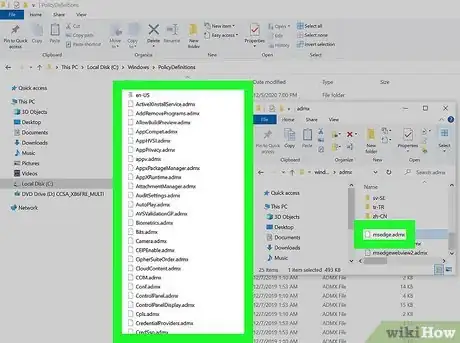
5Copy the required policy files from MicrosoftEdgePolicyTemplates to PolicyDefintions. Here's how:
- In the File Explorer window that's open to MicrosoftEdgePolicyTemplates, double-click windows, and then double-click admx.
- Drag the file called msedge.admx at the bottom of the window over to the C:\Windows\PolicyDefinitions window. Allow the file to be overwritten if prompted.
- Double-click the folder called en-US in both open File Explorer windows.
- Drag the file called msedge.adml from the MicrosoftEdgePolicyTemplates window to C:\Windows\PolicyDefintions\en-US. Allow the file to be overwritten if prompted.
- Now you can close all of these pesky File Explorer windows.
-
6Open the group policy editor. To do so, press the Windows key + R, type gpedit.msc, and then click OK.
-
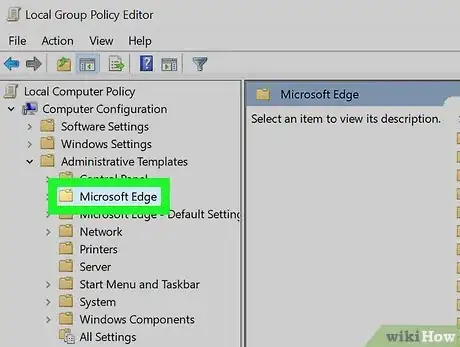
7Navigate using the directory tree in the left frame. Expand the folders to open the following location: Computer Configuration\Administrative Templates\Microsoft Edge.
- If you want to disable history deleting for just a specific user instead of all users, log into that user's account and select the User Configuration folder instead of Computer Configuration.
-
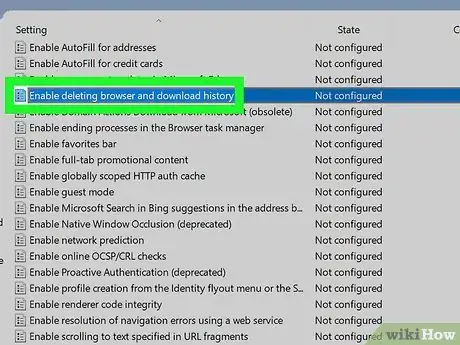
8Double-click Enable deleting browser and download history. It's in the right panel.
- If you don't see this option, you may need to restart your computer for your previous changes to take effect.
-
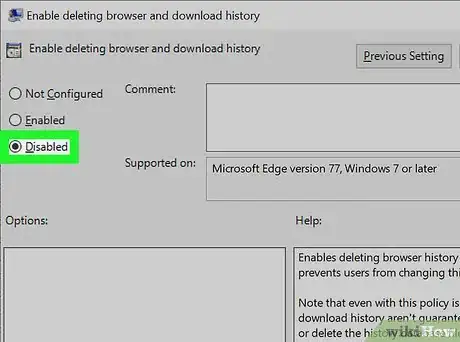
9Select "Disabled" and click OK. This effectively prevents users from disabling the browser history.
- You can re-enable this feature at any time by selecting Enabled on this window.
-
10Open Microsoft Edge. If Edge was already open, close all open windows and then restart it so the changes will take effect. Now that you've edited the registry, the option to delete the user's browser history will no longer be available. Here's how you can test this:
- Click the three dots at the top-right corner of Edge and select Settings.
- Click the Privacy, search, and services tab in the left panel.
- On the right panel, scroll down to "Clear browsing data" and click the Choose what to clear button.
- You will now see padlock icons next to "Browser history" and "Download history." Additionally, you can't place checkmarks in the boxes that mark these items for deletion. As long as your registry changes remain, the history cannot be deleted.
Community Q&A
-
QuestionHow do I disable my browser from storing my history on a mobile device?
 Pickle RickCommunity AnswerIt depends on if you are using Apple or Android. If you are using and Android OS, you must login to your Google account and look at your privacy/security settings. You can from there disable that feature, or you can just download another internet viewer from the Google apps store. I believe you can do the same for Apple. There are also many privacy options for the Apple OS under settings.
 -
QuestionDoes this work for Google Chrome too?
 Community AnswerOn Google Chrome, look for three dots in the upper right hand corner. Click on that, and go to History. Open it and click "Clear Browsing History".
References
About This Article
1. Open the Registry Editor.
2. Go to HKEY_LOCAL_MACHINE\SOFTWARE\Policies\Microsoft.
3. Create a new key called Edge.
4. Create a new DWORD inside the key called AllowDeletingBrowserHistory.
5. Double-click the DWORD and type a zero (0) in the "Value data" box.
6. Click OK.
7. Restart Edge.







-Step-21.webp)


