This article was co-authored by wikiHow staff writer, Eric McClure. Eric McClure is an editing fellow at wikiHow where he has been editing, researching, and creating content since 2019. A former educator and poet, his work has appeared in Carcinogenic Poetry, Shot Glass Journal, Prairie Margins, and The Rusty Nail. His digital chapbook, The Internet, was also published in TL;DR Magazine. He was the winner of the Paul Carroll award for outstanding achievement in creative writing in 2014, and he was a featured reader at the Poetry Foundation’s Open Door Reading Series in 2015. Eric holds a BA in English from the University of Illinois at Chicago, and an MEd in secondary education from DePaul University.
This article has been viewed 64,568 times.
Learn more...
Liquid stacking is the process of pouring fluids with different densities on top of one another to create an array of separated ingredients in a bottle. Making a liquid stack is a simple process, but can produce some beautiful and awe-inspiring results. To stack liquids, you simply have to gather the proper ingredients, find the appropriate tools and use a steady hand to carefully pour your ingredients.
Steps
Measuring and Pouring Your Liquids
-
1Find an empty 12 ounce (350 ml) bottle with a bottle cap. Find a clean, clear bottle that can hold 12 ounces (350 ml). As long as it has a resealable cap, you can use it. You can use a larger bottle if you want, but you’ll have to adjust the ingredients so that the ratio between the bottle and the liquids inside it remains the same.[1]
Tip: Each ingredient should be 1/6 the size of the bottle. You need a little room at the top so that you can turn the bottle over and see the liquids separate again.
-
2Dye 1⁄4 cup (59 ml) of water and 1⁄4 cup (59 ml) of rubbing alcohol with food coloring. Use 2 separate mixing cups and pour your rubbing alcohol into 1 cup and your water into the other. Add 1 drop of food coloring to each cup and mix them with a teaspoon. You can use any colors you’d like, but avoid using the same color as your dish soap with your water, since the water will be next to it in the bottle.[2]
- You won’t be able to see the layer between the dish soap and the water if you dye your water to be the same color as the dish soap.
Advertisement -
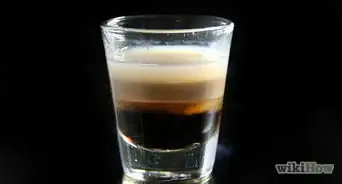
3Pour 1⁄4 cup (59 ml) of dark corn syrup into the bottom of your bottle. Measure out your dark corn syrup and use a funnel to pour it slowly into your bottle. Try to avoid letting the corn syrup touch the sides of your bottle, as the residue may make stacking the next set of ingredients more difficult. Wait 3-4 minutes to let the corn syrup settle.[3]
- You may have to wait longer for it to settle if you hit the sides of the bottle while you were pouring it.
-
4Wash your funnel with warm water and dry it. You don’t want any dish soap mixing with the corn syrup, or you could risk mixing your bottom layers together. To prevent mixing, wash your funnel under warm water and scrub it with a clean sponge. Dry it with a paper towel or dish rag before using it again.
- Wash and dry your funnel after each use.
-
5Tilt your bottle and pour 1⁄4 cup (59 ml) of dishwashing liquid into the container. Measure your dishwashing soap out. Place your funnel into the mouth of your bottle and tilt it towards you so that the funnel is aimed at the side of the container, just above the corn syrup. Pour your dish soap slowly and carefully. Avoid pouring it directly into your corn syrup. Wait 2-3 minutes to let the dish soap settle.[4]
- You need the dish soap to hit the side of the bottle first because you want to maintain the viscosity at the surface of the corn syrup. If you hit it directly, it may not stack.
- You can tell the dish soap is settled when the bubbles stop moving.
-
6Add 1⁄4 cup (59 ml) of water carefully on top of the dish soap. Wash your funnel and dry it with paper towels again to remove the dish soap residue. After your dish soap has settled in the bottle, tilt it slowly towards you and use your funnel or the measuring cup to slowly pour your water down the side of the bottle. Wait 30-45 seconds to let the water settle.[5]
- Take your time when pouring the water. It’s a lot thinner than the dish soap so it will pour more quickly.
Warning: As you add your upper layers, you’ll have to pour each liquid more cautiously than the last. The upper layers of your liquid stack are less dense than the ones at the bottom, and more prone to mixing if you pour them quickly.
-
7Drop 1⁄4 cup (59 ml) of vegetable oil in with a baster. Use a baster to soak up your vegetable oil. Hold the point of the baster 2–3 inches (5.1–7.6 cm) above the top of the water. Slowly squirt the vegetable oil on the side of the bottle and let it pool above the water. Continue to squirt the vegetable oil out until your baster is empty. Let it settle for 30-45 seconds.
- Once your bottle gets filled more than halfway, it’s hard to tilt it without spilling your layers. If you have a bigger bottle, feel free to continue tilting it. Otherwise, use the baster.
-
8Finish your liquid stack with a 1⁄4 cup (59 ml) layer of rubbing alcohol. Wash your baster thoroughly with warm water and soap before filling it with your rubbing alcohol. Carefully place it on the side of the bottle, 1–2 inches (2.5–5.1 cm) above your layer of vegetable oil. Slowly squirt it out and let it settle for 30-45 seconds.
- Put the cap on your bottle and close it.
- You will have 5 layers of liquid that are all different colors beautifully separated in your bottle!
-
9Flip the bottle upside down to watch the liquids resort themselves. With the bottle cap tightly secured on top of your bottle, turn the bottle slowly in your hand to flip it upside down. You will be able to watch the different liquids resort themselves in the original order that you poured them. Flip the bottle as a cool trick to show your friends, or as a part of a demonstration on density.[6]
- This will only work if you do it slowly, and you can only do it once or twice before the layers mix past the point where they’re separated.
- Your liquid stack won’t stay together forever, so don’t do this with the intention of making a decorative item for your home.


Trying Variations on the Project
-
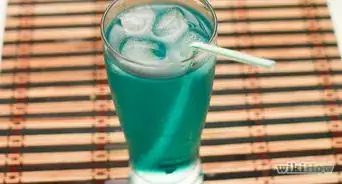
1Do a simple version of the experiment with oil and water. You can perform a rudimentary version of this experiment by using only water and vegetable oil to demonstrate the fundamental principles of density and viscosity. To stack oil and water, fill a bottle or clear bucket halfway with water. Fill the rest with oil. The 2 liquids will separate on their own.[7]
- If you’re simply trying to demonstrate what density and viscosity are, you don’t need the full 5 layers. Use oil and water to simply get your point across.
-
2Repeat the process using more layers of liquid to make a bigger stack. You can make a 7-layer version of a liquid stack by using 1⁄5 cup (47 ml) of each ingredient and adding 2 additional layers. Start with honey instead of using corn syrup and end with lamp oil on top of your rubbing alcohol.[8]
- In the 5-layer version of the project, you can use honey as a replacement for corn syrup if you don’t have any laying around.
-
3Skip the food coloring for a more subtle effect. Try doing the experiment without adding your food coloring to the water and rubbing alcohol. This will create 2 totally transparent layers, which will let light pass through and make your colorful sections stand out more dramatically.


Community Q&A
-
QuestionWhat can cause liquids not to mix when the bottle is turned upside down?
 Community AnswerIf a liquid is less dense than another layer, it will float.
 -
QuestionWill liquids mix if shaken a little?Community AnswerNot really, it will however mix if you shake it thoroughly.
-
QuestionDoes it matter what color the soap is?Community AnswerNo. If you want it to look appealing, you should use different contrasting colors.
Things You’ll Need
- Measuring cup
- 2 Mixing cups
- Empty bottle
- Funnel (optional)
- Baster
- Corn syrup
- Dish washing soap
- Water
- Oil
- Rubbing alcohol
- Food coloring


-Step-13.webp)


References
- ↑ http://www.scifun.org/HomeExpts/layeredliquids.htm
- ↑ https://www.scientificamerican.com/article/stacking-liquids/
- ↑ http://www.scifun.org/HomeExpts/layeredliquids.htm
- ↑ http://www.scifun.org/HomeExpts/layeredliquids.htm
- ↑ http://scifun.chem.wisc.edu/HomeExpts/layeredliquids.htm
- ↑ https://youtu.be/hSorsJ-lRYk?t=76
- ↑ https://www.scientificamerican.com/article/stacking-liquids/
- ↑ https://extension.purdue.edu/4h/Documents/Volunteer%20Resources/Science%20Made%20Easy/7Layer%20Density%20Column.pdf
- ↑ https://youtu.be/4EMUsPJtCoc?t=224
About This Article