This article was co-authored by Gregory Patrick. Gregory Patrick is a knitter who runs the popular blog Madman Knitting. He is also the author of the book "Mad Man Knitting or The Waiter and the Fly". He has been knitting and writing about knitting for over 10 years.
There are 8 references cited in this article, which can be found at the bottom of the page.
wikiHow marks an article as reader-approved once it receives enough positive feedback. This article has 59 testimonials from our readers, earning it our reader-approved status.
This article has been viewed 3,477,680 times.
Knitting is a fun and useful hobby! You can create warm scarves, cozy blankets, cute sweaters, durable washcloths and more if you know how to knit. It’s also a relaxing hobby that you can use to unwind at the end of a busy day. To get started, practice casting on, knitting in rows, and binding off.
Steps
Casting On
-
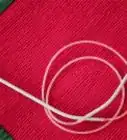
1Choose a ball of yarn and a pair of knitting needles. Visit your local craft supply store or check out an online store to find a ball of yarn and a pair of knitting needles. Yarn comes in a wide range of textures, weights, and colors, so choose a yarn that appeals to you. Then, check the label on the yarn for a knitting needle size recommendation.[1]
- For example, if you opt for a medium-weight yarn, then you will need a pair of US size 7, 8, or 9 (4.5, 5.0. or 5.5 mm) needles.
- You can knit with straight needles or circular needles. Circular needles are helpful for holding a large number of stitches, such as for a blanket, and you can also knit in the round with circular needles.[2]
- Knitting needles are made from a variety of materials, including aluminum, plastic, and bamboo. The material is more a matter of personal preference than anything else.
Tip: You may want to follow a beginner’s pattern when you are ready to knit your first project. Try making a dishcloth or a beanie for a quick and easy knitting project.
-
2Make a slipknot for your first cast on stitch. Loop the yarn around your index and middle finger 2 times. Then, pull the first loop over the second loop. Tug on the tail of the yarn to tighten the knot around the base of the loop. Then, slip the loop onto a knitting needle and tug the tail more to secure the knot.[3]
- The slipknot counts as your first cast on stitch, so make sure to include it if you are counting stitches.
Advertisement -
3Hold the needle with the slipknot on it in your right hand. Position the slipknot about 0.5 in (1.3 cm) from the tip. Grip the needle at this point with your right index finger and thumb. Wrap your other 3 fingers loosely around the body of the needle to make it easier to control.[4]
- You will be working additional cast on stitches onto this needle.
-
4Loop the working yarn over the left-hand needle from front to back. Hold the left-hand needle in the same way as the right-hand needle. Grip the needle near the tip with your index finger and thumb and cradle the rest of the needle loosely with your other 3 fingers. Use your right index finger and thumb to drape the yarn over the tip of the left-hand needle.[5]
- This will form an open loop.
-
5Insert the right-hand needle into the loop going from front to back. Hold the yarn taut around the left-hand needle with your left index finger and thumb. Then, push the right-hand needle into the loop going from the front of the work (closest to you) to the back (furthest from you).[6]
- This may seem awkward at first, but it will get easier the more you do this stitch.
-
6Loop the yarn over the end of the right-hand needle and pull it through. Use your left index finger to throw the working yarn up and over the right-hand needle. This will form a second loop that is only over the end of the right-hand needle. Use the right-hand needle to pull the yarn through the loop that is on the left-hand needle.[7]
- Make sure to keep the yarn taut as you pull the new loop through.
-
7Repeat the sequence to create more cast on stitches. Continue to repeat the same process to cast on additional stitches. If you are following a pattern, check it to see how many stitches you need to cast on. If you just want to make a practice swatch, then cast on a total of 12 stitches.[8] [9]
- Remember to include the slipknot in your total cast on stitch count.
- If you want to work in the stockinette stitch, then you will need to purl the next row and alternate between knitting and purling rows for the rest of your project.[10]


Working the Basic Knit Stitch
-
1Transfer the needle with the cast on stitches to your left hand. Always start a new row by transferring your knitting needles to the opposite hands. The needle in your left hand should have all of the stitches on it and the needle in your right hand should be empty.[11]
- Use the same grip as you used to cast on your stitches.
-
2Insert the end of the right-hand needle into the first stitch. Push the tip of the needle through by about 0.5 in (1.3 cm). Insert the tip in going from the front to the back of the stitch.[12]
- Make sure that the working yarn is hanging behind your work when you do this.
-
3Loop the yarn over the end of the right-hand needle. Wrap the yarn over the end of the needle going from the front to the back. Use your left index finger to hold the yarn taut and keep it in a loop around the needle.[13]
-
4Pull the yarn through the first cast on stitch and let the old stitch slip off. Use the right-hand needle to pull the loop you just made through the stitch on the left-hand needle. After you do this, let the old stitch slip off the end of the left-hand needle as the new stitch replaces it on the right-hand needle.[14]
- Be careful not to let the new stitch slip off!
-
5Repeat to the end of the row. Follow the same sequence to knit more stitches. Keep knitting until you reach the end of the row and the left-hand needle is empty.[15]
Tip: Use a row counter or a row counting app. This will make it easier to keep track of how many rows you have knit.
-
6Turn your work around and knit the next row using the same technique. Switch the needles. Hold the needle with all of the stitches on it in your left hand again and hold the empty needle in your right hand. Then, continue knitting in the same way as you knit the last row.[16]
- Keep knitting until you are happy with the length of your project or until your pattern says to stop.
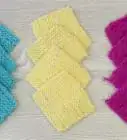
- If you are making a practice swatch, then knit a total of 12 rows.


Binding Off
-
1Knit the first 2 stitches as you normally would. When you are ready to bind off the last row of stitches, knit the first 2 stitches in the row as usual.[17]
- Use the same grip you used to knit the previous rows.
-
2Insert the left-hand needle into the first stitch on the right-hand needle. Next, push the left hand needle into the first stitch (second stitch from the tip) of the right-hand needle.[18]
- Make sure the working yarn is behind your work.
-
3Bring the first stitch up and over the second stitch. Use the left-hand needle to lift the stitch up and over the first stitch on the end of the right-hand needle. This will leave you with 1 stitch on the right-hand needle.[19]
-
4Knit 1 stitch as usual. Knit another stitch in the same way that you knit the first 2 stitches. Insert the right-hand needle through the stitch on the left-hand needle going from front to back, yarn over, and pull through. Let the old stitch slip off as the new stitch replaces it.[20]
- This will leave you with 2 stitches on the right-hand needle again.
-
5Lift the new first stitch up and over the stitch you just knit. Use the left-hand needle to lift the first stitch on the right-hand needle up and over the second stitch just like you did the first time.[21]
-
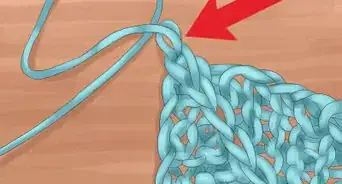
6Repeat the sequence to the end of the row to finish binding off. Continue to knit 1 and lift 1 up and over that stitch until you have 1 loop left on the right-hand needle. Pull this stitch to widen it and then cut the yarn about 6 in (15 cm) from the base of the stitch. Tug the end of the yarn to secure the stitch.[22]
Tip: If desired, you can also weave in the loose ends at the beginning and end of the project using a yarn needle. These are available in craft supply stores and you use them just like you would use a sewing needle. Thread the yarn through the eye of the needle and sew through the stitches on the edge of the project to hide the loose ends.
Trying Other Knit Stitches
-
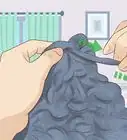
1Learn how to purl to do many other types of stitches. The purl stitch is basically the opposite of the knit stitch. Instead of knitting from front to back with the working yarn behind your work, purling is when you knit from back to front with the yarn in front of your work. Many patterns call for purl stitches, so it is a useful stitch to learn.[23]
- Purl is usually represented by a “P” in patterns followed by the number you need to purl, such as P1, P2, P3, etc.
-
2Work an increase or decrease to change the number of stitches. If you need to add or remove stitches from a row or round in your work, you will need to use increase or decrease stitches. An increase is when you knit through the same stitch 2 times to add a stitch. A decrease is when you knit through 2 stitches at once to remove a stitch.[24]
- If you are using a pattern, make sure to follow the instructions for increasing and decreasing carefully. These stitches are important for ensuring you get the desired results.
-
3Try a decorative stitch for a more intricate look. There are many different types of knit stitches you can try. Find a stitch that interests you and try it out! Some stitches you might try include:


Community Q&A
-
QuestionWhy do my stitches get so tight after about 5 stitches?
 Community AnswerMaybe you pull too much on the thread when you're about to knit a stitch. The thread needs to slip a little through your fingers every time you knit a stitch so that it doesn't tighten too much (be careful not to lose your grip on it though). This lets you choose how tight you want your stitches by pulling on the thread more or less.
 -
QuestionDo I need to get a different type of needle depending on yarn thickness?Community AnswerIn general, yes; you will need a thicker needle for thicker yarns, and a thinner needle for thinner yarns. It also depends on what kind of look you are going for. If you want a looser weave, you'd want thinner yarn and thicker needles. If you want something very dense, you'd want thicker yarn and thinner needles.
-
QuestionI add stiches without even realizing, how do I do it?
 Eye of the ligerCommunity AnswerSometimes, as a beginner to knitting, you accidentally pick up loops or stitches from previous rows without realizing it, and accidentally incorporate those into your work. To fix this: 1. Slow down. Knitting can seem really complicated at first, so just make sure you're concentrated and know exactly what you're doing. 2. If a stitch looks odd, like just a loose loop rather than a noose, try slipping it off the needle. If nothing unravels, that was one of the accidental additions, so you're good to take it off. 3. Count constantly to make sure you have the right number of stitches. You'll be able to catch and fix your mistakes earlier, rather than having to destroy half your work.
Things You’ll Need
- Yarn
- Knitting needles
- Scissors


References
- ↑ https://www.nytimes.com/2018/07/11/smarter-living/how-to-start-knitting.html
- ↑ Gregory Patrick. Knitting Specialist. Expert Interview. 10 January 2019.
- ↑ https://www.craftyarncouncil.com/instructions_kn.php3
- ↑ https://www.craftyarncouncil.com/instructions_kn.php3
- ↑ https://www.craftyarncouncil.com/instructions_kn.php3
- ↑ https://www.craftyarncouncil.com/instructions_kn.php3
- ↑ https://www.craftyarncouncil.com/instructions_kn.php3
- ↑ Gregory Patrick. Knitting Specialist. Expert Interview. 10 January 2019.
- ↑ https://www.craftyarncouncil.com/instructions_kn.php3
- ↑ https://newstitchaday.com/knitting-101-how-to-knit-the-stockinette-stitch-for-beginners/
- ↑ https://www.craftyarncouncil.com/instructions_kn.php3
- ↑ https://www.youtube.com/watch?time_continue=19&v=pukNXVAMZmo
- ↑ https://www.craftyarncouncil.com/instructions_kn.php3
- ↑ https://www.craftyarncouncil.com/instructions_kn.php3
- ↑ https://www.craftyarncouncil.com/instructions_kn.php3
- ↑ https://www.craftyarncouncil.com/instructions_kn.php3
- ↑ https://www.craftyarncouncil.com/instructions_kn.php3
- ↑ https://www.craftyarncouncil.com/instructions_kn.php3
- ↑ https://www.craftyarncouncil.com/instructions_kn.php3
- ↑ https://www.craftyarncouncil.com/instructions_kn.php3
- ↑ https://www.craftyarncouncil.com/instructions_kn.php3
- ↑ https://newstitchaday.com/knitting-101-the-basic-knit-bind-off-for-beginners/
- ↑ https://www.craftyarncouncil.com/mar06_purl.html
- ↑ https://www.youtube.com/watch?v=H3rl_Js4EN8&feature=youtu.be&t=16
About This Article

To knit, start by making a slip knot on one of your knitting needles, which will be your first stitch. Then, cast on your knitting needle to make your next stitch. After you cast on once, you can cast on as many times as you'd like, depending on how many stitches you want. When you're finished casting on, insert your second knitting needle into the stitch that's closest to the point on your first needle. Next, wrap the yarn you're working with around your second needle so it's resting in between both needles. From there, poke the second needle through the loop around the first needle. Now, pull the stitch off of the first needle and onto the second needle. Repeat the process for all of the stitches you made on the first needle until they're all on the second needle. Keep transferring the stitches back and forth between the needles until you're satisfied with your piece. Finally, when you're finished, cast off and snip the excess yarn with scissors.