This article was co-authored by wikiHow Staff. Our trained team of editors and researchers validate articles for accuracy and comprehensiveness. wikiHow's Content Management Team carefully monitors the work from our editorial staff to ensure that each article is backed by trusted research and meets our high quality standards.
wikiHow marks an article as reader-approved once it receives enough positive feedback. In this case, 95% of readers who voted found the article helpful, earning it our reader-approved status.
This article has been viewed 67,053 times.
Learn more...
Aromatherapy can help people cope with high stress, reduce tension, and elevate your mood. Scented candles are an ideal tool for practicing aromatherapy because they're easy to use and provide soft ambient lighting in addition to their fragrance. If you can't find the right scent, you may want to try making your own aromatherapy candles. All you need is some wax, wicks, and a few essential oils to create custom scented candles that can help you unwind at the end of a long, stressful day.
Steps
Melting the Wax
-
1Measure out the wax flakes. The amount of wax that you’ll need for the candles depends on the size of the jars you’re using and how many candles you plan to make. For four 8-ounce (227 g) candles, you’ll need approximately 6 cups (1419 g) of wax flakes.[1]
- You can use whatever type of wax you like for the candles, but soy wax tends to absorb fragrance better than beeswax or other waxes.
-
2Place the wax in a pot and melt on the stove. Once you’ve measured out the necessary wax for the candles, place the flakes in a medium size pot on the stove. Turn the burner to medium-low, and allow the wax to melt completely, which should take 3 to 5 minutes.[2]
- Wax can ignite fairly easily, so watch the pot closely as the wax melts.
- Be sure to stir the wax with a wooden spoon or chop stick, while it’s heating to break up clumps and ensure that it melts evenly.
- If you find that it’s taking longer than 5 minutes or so for the wax to melt, turn the heat up to medium.
Advertisement -
3Allow it the wax to cool briefly. After the wax has melted completely, remove the pan from the burner. The wax will be too hot to scent right away, so allow it to cool for 2 to 3 minutes.[3]
- The wax will cool more quickly if you transfer it from the pan to a cool bowl or other container.


Preparing the Jars and Scenting the Wax
-
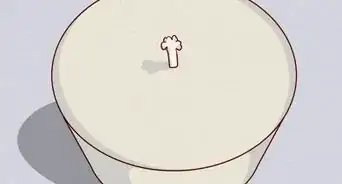
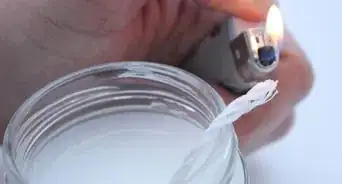
1Secure the wicks to the bottom of the jar. While you’re waiting for the wax to cool, it’s a good idea to get the wicks ready in the jars. Place a small dab of glue from a hot glue gun on the bottom of the wick, and drop it down into the center of the jar. Allow the glue to set for several minutes before pouring the hot wax into the jar.[4]
- If you don’t have a hot glue gun, you can also dab the bottom of the wicks with a small amount of melted wax, drop it down into the jar, and allow it to set for several minutes. Wax usually isn’t as secure as hot glue, though, because it may melt again when you pour the hot wax in.
-
2Keep the wicks in place with a chopstick or pen. While securing the wick to the bottom of the jar helps keep it in place, the length of the wick may fall into the hot wax when you pour it into the container. To keep that from happening, tape the end of the wick to a chopstick or pen. When the wick is taped to it, rest the chopstick or pen across the top of the jar.[5]
-
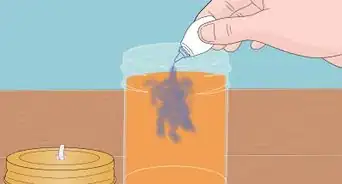
3Mix the essential oil(s) of your choice into the wax. Once the wax has cooled for a couple of minutes, it’s time to add essential oil(s) to it to create an aromatherapy effect. The amount of essential oil depends on how potent the oil(s) you’re using are and how strongly scented you want your candles to be, but 80 to 100 drops is a good number to start with. Stir the oil(s) into the wax well to ensure that it’s well combined.
- If you want extremely fragrant candles, you may want to add more than 100 drops. Experiment to see what the right amount is.
- You can use a single oil or mix two or more types of essential oils to create custom scents for your candles.
- You can also purchase fragrance oils designed specifically for making candles. They come in a wide variety of scents, including specialty fragrances, such as Christmas Cookie or Fresh Cut Grass.


Filling the Jars
-
1Funnel the wax into the jars. The hot wax can sometimes splash up the sides of the jar when you pour it in. To avoid a mess, place a small funnel in jar, and pour the wax through it into the jar. Fill each jar in the same way.
- Depending on the size of the jars and how much you fill them, you may have some wax left over. To dispose of it, wait for it to solidify and then scrape it out of the pot or bowl. Never pour hot wax down the sink -- you’ll wind up clogging your pipes.
-
2Allow the candles to solidify. Once all of the jars are filled with wax, you have to wait for the wax to cool completely before you can light the candles. As the wax cools, it will solidify, which should take approximately 1 hour.[6]
- You can tell that the candles are finished cooling when the wax becomes fully opaque.
-
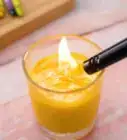
3Trim the wicks and enjoy the candles. When the candles are completely cool, remove the end of the wick from the chop stick or pen and use a pair of scissors to trim it to your desired length. In most cases, a ½-inch (1.27-cm) wick is sufficient. Light the candle and enjoy the scent that you’ve created.[7]
- In addition to making candles for yourself, these homemade aromatherapy candles make ideal handmade gifts. You can customize the scent for each recipient for a lovely, personalized present.


Community Q&A
-
QuestionWhat dye should be used to color the wax?
 Community AnswerBe sure to use dyes that designed specifically for use in candles. Other dyes may be flammable so they're dangerous to use in candles.
 -
QuestionI tried to make aromatic candles with soy wax, but I tried several techniques without getting any significant aroma when I lit the candles. What should I do?Community AnswerIf you've used good quality essential oils, you likely just didn't add enough to the wax. Try using about 100 drops of the oils, and see if that works. If your candles still aren't strongly scented, add even more oil.
-
QuestionWhere can you get essential oils?
 Community AnswerThere are a variety of online stores that sell essential oils, but you can also purchase them at health food stores, craft stores, and other shops that offer aromatherapy supplies.
Warnings
- Be careful when handling the melted wax. Hot wax can cause serious burns if it comes into contact with your skin.⧼thumbs_response⧽
Things You'll Need
- 4 8-ounce (227 g) mason jars or other glass containers
- 6 cups (1419 g) wax chips
- A medium size pot
- A wooden spoon
- 4 wicks
- A hot glue gun
- 4 chopsticks or pens
- Essential oil(s) in your choice of scents
- A small funnel
- Scissors


References
- ↑ http://www.thehealthymaven.com/2015/11/homemade-aromatherapy-candles.html
- ↑ http://www.thehealthymaven.com/2015/11/homemade-aromatherapy-candles.html
- ↑ http://www.thehealthymaven.com/2015/11/homemade-aromatherapy-candles.html
- ↑ http://www.livingwellspendingless.com/2013/11/18/diy-cinnamon-candle-gift-handmade-holidays/
- ↑ http://www.thehealthymaven.com/2015/11/homemade-aromatherapy-candles.html
- ↑ http://www.thehealthymaven.com/2015/11/homemade-aromatherapy-candles.html
- ↑ http://www.livingwellspendingless.com/2013/11/18/diy-cinnamon-candle-gift-handmade-holidays/
About This Article

To make aromatherapy candles, start by melting 6 cups of wax flakes on the stove over medium-low heat. Then, allow the wax to cool for 3 minutes before stirring in 100 drops of any essential oils you like. While the wax cools, dab a small amount of glue from a glue gun on the bottom of a candle wick and attach it to the bottom of a jar. Next, wrap the top of the wick around a chopstick and rest the chopstick across the top of the jar. Finally, pour the wax mixture into the jar, let it cool for 1 hour, and trim the wick to half an inch before burning the candle. For tips on how to mix different essential oils into the wax for your own unique blend, read on.