X
wikiHow is a “wiki,” similar to Wikipedia, which means that many of our articles are co-written by multiple authors. To create this article, volunteer authors worked to edit and improve it over time.
This article has been viewed 21,614 times.
Learn more...
Cakes baked in aluminum cans are the perfect size for one person to enjoy. By decorating and packaging these cute cakes in the same can, you can easily turn them into simple gifts or fun treats for you and your loved ones to enjoy.
Ingredients
Makes 1 cake
- 1 egg white
- 2 Tbsp (30 ml) sugar
- 2 Tbsp (30 ml) butter, melted
- 1 tsp (5 ml) vanilla extract
- 1/4 cup (60 ml) all-purpose flour
- 1/4 tsp (1.25 ml) baking powder
- Pinch of salt
- 1-1/2 Tbsp (22.5 ml) milk
- Sprinkles and candy decorations (optional)
- Squeezable cupcake icing
Steps
Part 1
Part 1 of 3:
Part One: Preparing the Can
-
1Remove the bottom from an aluminum can. Select a 15-oz (443 ml) aluminum can with a pop-top lid. Open this can at the bottom, leaving the pop-top in place.[1]
- Make sure that the aluminum can is safe for baking. Avoid cans lined with a BPA coating since this may become toxic when exposed to intense heat.
- Use a manual safety can opener for best results. You must make sure that the can opener does not leave a sharp edge around the base of the can.
- Save the bottom lid of the can. You'll need it later.
-
2Empty and clean the can. Empty out the contents of the can and remove the paper label. Thoroughly clean and dry the entire can. Clean the bottom you removed from the can, as well.
- Try to get all of the paper and glue off the exterior of the can.
- In most cases, scrubbing the can with soap and hot water will be enough to clean it, but some cans may need to be soaked for several minutes of the previous contents stained the interior.
- Rinse the can well to remove all traces of soap and dry it completely before continuing.
Advertisement -
3Coat the can with cooking spray. Spray the inside of the can with nonstick cooking spray, completely covering the interior side and bottom.
- The cooking spray should help the finished cake slide out of the can. If you want to take extra precautions, you can also flour the inside of the can and place a small round of parchment paper at the bottom.


Advertisement
Part 2
Part 2 of 3:
Part Two: Baking the Cake
-
1Preheat the oven to 350 degrees Fahrenheit (177 degrees Celsius). Consider placing the prepared can on top of a small baking sheet in case any of the batter overflows during the baking process.
-
2Combine the egg white and sugar. Place the egg white and sugar in a medium mixing bowl. Whisk well until combined.
- The resulting mixture should look grainy and slightly foamy.
-
3Mix in the vanilla and butter. Pour the vanilla extract and melted butter into the egg white mixture. Use a mixing spoon and stir until combined.
-
4Add the remaining dry ingredients. Add the flour, baking powder, and salt into the contents of the mixing bowl. Stir until the mixture appears evenly combined.
- To help minimize the risk of lumps forming in the batter, consider sifting the flour into the mixing bowl instead of dumping it straight in. Gently fold these dry ingredients into the wet ones instead of haphazardly stirring them in.
-
5Stir in the milk. Pour the milk into the batter and mix well until smooth and thoroughly combined.
- You may need to scrape the sides of the mixing bowl with a spatula as you stir to ensure that the batter ingredients are evenly blended.
-
6Pour the batter into the can. Pour the batter into your prepared can. It should only fill roughly half of the can.
- You can fill the can slightly above the halfway point, but if you've filled it three-quarters high, you've added too much to the can. The batter will expand as it bakes, and if you've filled the can with too much batter, the excess will likely overflow and make a mess.
-
7Bake for 20 minutes. Place the filled can in your preheated oven and back for 20 to 25 minutes, or until the cake appears golden brown and a skewer inserted through the center comes out clean.
- Due to the depth of the cake, you'll need to use a skewer or knife to check for doneness instead of a toothpick. Make sure that the tip of the instrument reaches the bottom of the can.
-
8Cool completely. Remove the can from the oven and place it on a wire cooling rack. Allow the cake to cool completely before continuing.
- If you do not allow the cake too cool off, it will be more likely to stick to the sides. You could have trouble getting the cake out of the can, and some of the cake may break apart and stick to the can as you slide the rest of it out.


Advertisement
Part 3
Part 3 of 3:
Part Three: Decorating the Cake
-
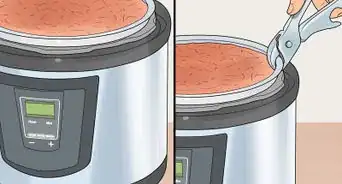
1Slide the cake out of the can. Once the cake has cooled completely, invert the can and let the cake slide out onto a plate or clean counter.
- If the cake doesn't slide out of the can on its own, you may need to loosen it with a knife. Slide the knife in between the cake and the interior side of the can, then run it around the edge to separate it from the side.
- As you tip the can upside-down, gently tap on the sides and bottom. The force of the taps may help loosen any remaining stuck portions, allowing the cake to separate and slide out.
-
2Slice the cake into layers. Use a bread knife to carefully slice off the rounded top of the cake. Divide the rest of the cake into two to four even, horizontal layers.[2]
- Keep the layers as flat and even as possible when cutting them. If you plan to package the cake back in its can, sticking with only two layers might be the easiest option.
- This step is only optional. If you don't want to create a miniature layer cake, you can leave the cake as one whole piece and work with it that way.
- You won't be using the rounded top you removed, which means that you can use it to taste-test the cake.
-
3Clean the can again. Wash out any bits of burnt cake using soap and hot water. Rinse and dry the can completely before continuing.
-
4Place sprinkles in the bottom of the can. If desired, you can spread a flat layer of sprinkles and other edible cake decorations in the bottom of your clean can.
- If you choose to use candy decorations, make sure that you place them upside-down in the bottom of the can. When it comes time to enjoy the cake, the can will be opened from the other side, so anything placed in the bottom of the can will be viewed as the top of the cake.
-
5Squeeze frosting into the can. Squeeze or pipe prepared cake frosting into the bottom of the can, completely covering the sprinkles and other decorations.
- Any prepared frosting will work for this project. You can buy special cupcake frosting that comes in a squeeze can, or you could simply spoon any commercial or homemade frosting of your choice into a pastry bag for the same effect.
-
6Slide the first layer back into the can. Carefully slide the first cut layer of cake back into the can, pressing gently so that it sticks to the layer of frosting spread across the bottom.
- If you cannot reach all the way inside the can with your hands, you may need to use a spoon or similar utensil to gently push the cake layer inside.
-
7Alternate the remaining layers with additional frosting. Squeeze or pipe enough frosting into the can to cover the surface of the first layer, then slide your next layer in over that. Repeat until you have inserted all layers of your cake.
- It might be easiest to pipe the frosting onto each layer in rings. Use the tip of the piping instrument to help smooth and spread the frosting over the entire layer.
- Gently press each layer of cake onto the preceding layer of frosting so that the layers stick together.
- Use a thin layer of frosting in between each layer. If you use too much frosting, you may not be able to fit the entire cake back into the can.
-
8Tape the bottom back on. Place the bottom lid of the can back on and tape it securely in place using clear packing tape.
- Use enough tape to create a secure, airtight seal.
- Avoid using glue to reattach the lid. The glue could seep inside of the cake and mix into the cake, so it is a less safe option than tape.
-
9Decorate the outside of the can as desired. You can print your own label for the can or decorate the outside with stickers, washi tape, and other adornments.
- Before decorating, you'll need to stand the can right-side up again so that the pop-top faces up. The taped portion should now lie at the bottom of the can.
-
10Enjoy. To eat the cake, open the pop-top and remove the lid. Eat the cake directly out of the can using a fork.
- Since the seal is likely imperfect, you should open and enjoy the cake within a few days to prevent it from going stale or getting moldy.
-
11Finished.


Advertisement
Things You'll Need
- Pop-top aluminum can
- Safety can opener
- Dish soap
- Water
- Dish washcloth
- Clean paper towels
- Nonstick cooking spray
- Parchment paper
- Baking sheet
- Medium mixing bowl
- Whisk
- Mixing spoon
- Skewer
- Wire cooling rack
- Butter knife
- Bread knife
- Pastry bag
- Clear packing tape
- Decorations (construction paper, stickers, washi tape, etc.)
- Fork


References
About This Article
Advertisement