wikiHow is a “wiki,” similar to Wikipedia, which means that many of our articles are co-written by multiple authors. To create this article, volunteer authors worked to edit and improve it over time.
This article has been viewed 15,814 times.
Learn more...
Do you have a ton of documents all over your office that need organizing? Is the desktop on your computer overflowing with unorganized files? Folders are handy tools that can keep your papers and electronic documents contained and organized, so that you can eliminate clutter and easily find the right thing when you need it. Make your own folders, whether they are made of paper or in digital form.
Steps
Making a Folder Out of Paper
-
1Get a piece of paper that is approximately 17 inches tall and 18 inches wide. You should be able to find one at your local art supply store.
- If you have a piece of paper that is larger than 17 by 18 inches, simply cut it down to size.
- Construction paper works well for making a folder. You can also use a stronger type of paper, such as a thin cardboard or poster board, if you would like the folder to be more durable.
- If you don't have any paper that big, you can simply tape pieces of paper together to make one that is the right size.
-
2Fold your piece of paper to create a pocket. Place one of the short sides closest to you and the longer sides running up away from you. Fold the bottom 6 inches up and make a crease along the fold. Make sure to fold it so that the longer sides are folded but the shorter sides stay the same length.Advertisement
-
3Fold the short sides of the paper in half and then crease it. Be sure to fold the paper right down the middle.
- Fold the paper so that the previous fold is concealed inside. This will make the pockets on the inside, instead of the outside.
-
4Staple or glue the edges to finish the pockets. You will only need to attach together the outside edges that have two layers of paper, where the long sides were folded up, and the center crease, where there are two layers of paper due to the pocket flap. This will finish the pockets on the inside of your folder.
- Remember to to do this step on both flaps of the folder.
-
5Decorate the cover as you please. Personalize it with decorative flair or simply write a description of what you will keep in it, so that you know without having to look inside it every time.
-
6Put documents inside your new folder! Now your important papers are safe and sound in your very own homemade folder.


Making a Folder on the Desktop of Your Computer
-
1Turn on your computer and navigate to the desktop, otherwise known as the main screen. You should see your background image and the variety of files you have on your desktop.
- On an Apple computer the application "Finder" will be running when you are on your desktop.[1] An icon for it should be located in your tool bar but it should be the default application going when you turn on your computer.
-
2Right click your mouse or trackpad. This will pop up a list of actions you can choose from.[2]
- Once you right click you can release your fingers. The list of options should remain visible until you click another time, either to pick one of the options or to get rid of the list, in which case you would simply click anywhere else on the screen.
-
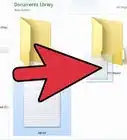
3Choose "New Folder" or "New" from the list of options, whichever is present. This will create a new folder on the desktop of your computer.
- If the list includes "New," you may have to make a second choice from another list that pops up. If that is the case, the second list that pops up should have an option to create a "Folder."[3] Click on this option.
-
4Name your new folder. Once you have created this new folder you can name it anything you like. Right click on the folder icon and a list should come up. On this list should be the option to "rename" your folder.[4] Click on that option and you will be allowed to input a new name with your keyboard.
-
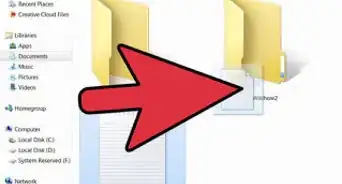
5Move files into your new folder. Move your files by simply clicking and then dragging any file icon, while holding your finger down and not lifting it. To put a file into your folder just drag the file until it hovers over the folder and then lift your finger, letting go of the click. The computer should put your file into the folder you created.


References
About This Article
To make a desktop folder on your Windows computer, start by navigating to your desktop or the home screen. Next, right click your mouse, and select “New folder” or “New” from the menu. Then, right click on the new folder and select “Rename” to give your folder any name you like. Once your folder is ready, drag your files and add them to your folder. For tips on how to make a paper folder, read on!