This article was co-authored by wikiHow staff writer, Amy Bobinger. Amy Bobinger has been a writer and editor at wikiHow since 2017. She especially enjoys writing articles that help people overcome interpersonal hurdles but frequently covers a variety of subjects, including health and wellness, spirituality, gardening, and more. Amy graduated with a B.A. in English Lit from Mississippi College in 2011 and now lives in her hometown with her husband and two young sons.
There are 13 references cited in this article, which can be found at the bottom of the page.
The wikiHow Video Team also followed the article's instructions and verified that they work.
This article has been viewed 11,197 times.
Learn more...
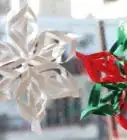
Bows are the perfect addition to a beautifully wrapped gift or an adorable craft, but buying pre-made bows can get pricy, and it can sometimes be hard to find the exact color you need. Luckily, learning how to make crepe paper decorations is super easy. Crepe paper is typically sold in either sheets or streamers, but both options are inexpensive and come in a huge variety of colors.
Steps
Making a Bow from Crepe Streamers
-
1Unroll about 8 in (20 cm) from the crepe paper roll. Start by unrolling the crepe paper until you have a single layer that's about 8 in (20 cm) long. If you're making a lot of bows and you want them to be precisely the same size, you can measure the length with a ruler. However, you can just eyeball the size if you prefer.[1]
- Learning how to make a gift bow out of streamers is a fun project that kids and adults can enjoy together. Try making bows in a variety of colors, then use them as decor for a bow-tie themed party, or make your own bows to top your holiday presents!
-
2Fold the strip of crepe paper in half. Take the loose end of the crepe streamer and fold it back until it touches the roll. Now, you should have a double layer of crepe that's about 4 in (10 cm) long.[2]
- Feel free to adjust the size so the bow is exactly as wide as you'd like!
Advertisement -
3Continue folding the paper around itself 5-6 times. Continue unrolling the streamer, wrapping it over the double layer you just made, then under. Do this several times until you have a total of 5 or 6 layers. [3]
- This will help stabilize the bow so it will be able to support itself and hold its shape.
- If you're making a larger bow, you may need more layers of crepe.
-
4Cut the paper bow off of the roll. Once you're finished wrapping the crepe paper into the body of your bow, use your scissors to snip the crepe off of the roll. Try to cut the paper so it's just a little shorter than the edge of the bow so it won't show when you're finished.[4]
-
5Pinch the center of the folded paper to make a bow shape. Pick up the folded layers of crepe and hold them horizontally in front of you. Then, gently squeeze the paper vertically in the center. As you do this, you'll see your bow starting to take shape![5]
- The shape won't hold completely when you let go of the bow, but you'll still be able to see where you had it pinched.
- If you prefer a more precise design, you can accordion-fold the paper 3 times instead of pinching it. Fold the top and bottom quarters of the bow toward you, and fold the center of the bow away from you to complete the shape.
-
6Cut a 5–6 in (13–15 cm) piece of crepe paper and fold it in thirds. Set the bow you just made aside, then unroll a piece of streamer that's about 5–6 in (13–15 cm) long. Cut it free of the roll, then fold the top third down and the bottom third up to create a long, narrow strip.[6]
-
7Wrap the thinner strip around the center of the bow. Place the end of the thin crepe paper strip at the back of your bow, right in the middle. Then, wrap the strip around the center of the bow about 3-4 times.[9]
-
8Trim any excess and secure the center strip with tape. Bring the end of the center strip around to the back of the bow, then use your scissors to cut off any excess. Finally, use a piece of tape to attach the end of the strip to the rest of the center piece to finish your bow![10]
- If you'd prefer, you can use glue or glue dots instead of tape.
- To make your bow look fluffier, pull the corners outwards after you secure the center piece.[11]

Creating a Bow from Crepe Sheets
-
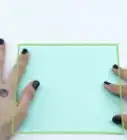
1Cut 6 6 in × 7 in (15 cm × 18 cm) pieces of crepe paper. Take your sheets of crepe paper and measure out a rectangle that's about 6 in (15 cm) tall and 7 in (18 cm) wide. Mark the lines with a pen or pencil, then carefully cut out the rectangle.[12]
- Try stacking or folding your crepe sheets together so you only have to cut once!
- To make a two-toned bow, cut 3 sheets of 1 color and 3 of another. For instance, you might use red and green if you're making bows for the holidays.
-
2Stack 2 crepe rectangles together. Set the rest of the paper aside for now and carefully line up the edges of 2 of your crepe sheets. Arrange them so the longer sides are on the top and bottom, and the shorter edges are along the sides.[13]
- If you're making a two-toned bow, stack one sheet of each color.
Did You Know? You can make a tissue paper bow using this same approach. The only difference is that tissue paper is thinner, so you may want to use 3 or 4 stacks of paper instead of 2.
-
3Roll the bottom half of the 2 sheets over a bamboo skewer. Take a wooden skewer and lay it so it's parallel with the very bottom edge of the stacked crepe sheets. Then, carefully roll the bottom of the paper over the skewer. Keep rolling until the bottom half of the rectangle is wrapped around the skewer.[14]
- Roll the paper tightly, but take care not to tear it, since crepe paper is fragile.
-
4Roll the top half of the sheets over a second skewer. Without unwrapping the first skewer, take a second skewer and place it along the top edge of your paper. Then, roll the paper downward until the second skewer is lined up tightly against the first.[15]
- It might help to rest your scissors or another object on top of the first skewer so it doesn't move.
-
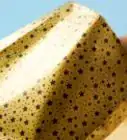
5Scrunch the paper slightly, then slide it off the skewers. Push the ends of your crepe paper along the skewers toward the center to loosen the paper and crinkle it slightly. Then, slip both of the skewers out of the rolls without unrolling the paper.[16]
- When you're finished, set this aside. If you rolled it tightly, it should hold its shape.
-
6Roll 2 more sets of 2 sheets each. Stack 2 more of the sheets together, then roll the tops and bottoms on the bamboo skewers. Slide them off of the sticks, then set them aside and do the same thing for the 2 remaining sheets. When you're finished, you should have a total of 3 rolls.[17]
- If you are making a two-toned bow, make sure you keep the same color on the bottom and the same color on the top each time.
-
7Unfold one of the rolls slightly and create a canoe shape. Take one of your paper rolls and unroll each end about halfway. Then, shape the paper so it's narrow at the ends and rounded through the center, similar to the shape of a canoe or kayak.[18]
- Don't unroll the paper all the way—you want the rolled edges to show in your finished bow. If the paper does come unrolled, try wrapping it around your skewers again.
-
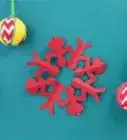
8Bend the canoe shape backward to make a bow loop, then staple it. With the rolled edges of the boat shape facing you, fold the 2 narrow ends away from you until they're touching each other. Then, staple the ends together.[19]
- You can also use a glue dot to secure the ends, if you'd prefer. However, tape isn't a good option, as it may make the finished bow too bulky.
-
9Repeat this for the second roll of paper, then staple the loops together. Take one of the 2 remaining crepe rolls and shape it in the same way, forming a canoe shape first, then stapling the ends together. When you're finished, place the stapled ends of your 2 loops together, then staple those pieces to create your bow shape.[20]
- Try to make your second piece match the first piece as closely as possible, since these will be the 2 loops of your bow.
Variation: If you want to make a bow with tails, start with 4 rolled pieces of paper. After you attach the first 2 loops, fluff out the ends of a third piece and bend it into a V shape, then staple it to the back of the bow. Wrap the fourth piece around the center of the bow, as described below.
-
10Wrap the 3rd roll around the center of your bow and staple it. Take your third crepe roll and place the end on the back side of your bow in the center. Then, wrap the bow all the way around the center 1-2 times. Trim off any excess, then staple the end of this piece at the back of the bow.[21]
- This center piece will cover the seams where the 2 loops are joined.


Things You'll Need
Streamer Bow
- Crepe paper streamers
- Scissors
- Clear tape
- Ruler (optional)
Paper Sheet Bow
- Crepe paper sheets
- Ruler
- Pen or pencil
- Scissors
- 2 bamboo skewers
- Stapler
- Staples
References
- ↑ https://hellosplendid.com/2013/03/diy-crepe-paper-bow-ties.html
- ↑ https://hellosplendid.com/2013/03/diy-crepe-paper-bow-ties.html
- ↑ https://hellosplendid.com/2013/03/diy-crepe-paper-bow-ties.html
- ↑ https://hellosplendid.com/2013/03/diy-crepe-paper-bow-ties.html
- ↑ https://hellosplendid.com/2013/03/diy-crepe-paper-bow-ties.html
- ↑ https://hellosplendid.com/2013/03/diy-crepe-paper-bow-ties.html
- ↑ https://joostlangeveldorigami.nl/diagramscrepepaperbow.html
- ↑ https://www.100directions.com/quick-easy-diy-tissue-paper-bow/
- ↑ https://hellosplendid.com/2013/03/diy-crepe-paper-bow-ties.html
- ↑ https://hellosplendid.com/2013/03/diy-crepe-paper-bow-ties.html
- ↑ https://joostlangeveldorigami.nl/diagramscrepepaperbow.html
- ↑ https://youtu.be/DL9dQ7_idjY?t=90
- ↑ https://youtu.be/DL9dQ7_idjY?t=112
- ↑ https://youtu.be/_f5vRipqwP8?t=125
- ↑ https://youtu.be/_f5vRipqwP8?t=156
- ↑ https://youtu.be/_f5vRipqwP8?t=159
- ↑ https://youtu.be/DL9dQ7_idjY?t=118
- ↑ https://youtu.be/DL9dQ7_idjY?t=186
- ↑ https://youtu.be/DL9dQ7_idjY?t=223
- ↑ https://youtu.be/_f5vRipqwP8?t=201
- ↑ https://youtu.be/_f5vRipqwP8?t=281
About This Article