This article was co-authored by Joy Cho. Joy Cho is the Founder and Creative Director of the lifestyle brand and design studio, Oh Joy!, founded in 2005 and based in Los Angeles, California. She has authored six books and consulted for creative businesses around the world. Joy has lectured on business, leadership, and entrepreneurship at conferences and companies such as AltSummit, Pinterest, Target, and Hallmark, while her home and studio have been featured in magazines such as House Beautiful, Parents, and Domino. She has also been named one of Time's 30 Most Influential People on the Internet multiple times and has the most followed account on Pinterest with more than 14 million followers.
This article has been viewed 40,574 times.
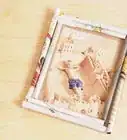
Decoupage is the process of gluing paper cutouts to a surface. Usually it is finished with a varnish or lacquer afterward. Decoupage can spruce up mirror or picture frames that you have already, or it can be a great gift or party favor. Many people choose to upcycle old magazines, newspapers or napkins that they have already, but you can also choose to cover the whole frame in a single piece of patterned paper.
Steps
Preparing Your Frame
-
1Get a picture frame. You can find these at craft stores. You can also find cheap picture frames at dollar stores. If you are making party favors or gifts, packs of small picture frames can be found at big box stores.
- Decoupage glue does not work on all plastic, so get a wood frame to be safe.
- You can decoupage on ornate, molded frames as well.[1] This may take some more time, but the results are stunning.
-
2Get decoupage glue and acrylic primer or paint. These can be found in craft stores in the paint section. You do not need to buy expensive paint, any cheap white paint will do. [2]
- Mod Podge is the most famous decoupage glue, so mention the name to a store clerk if you are having trouble finding the glue.
Advertisement -
3Prime your frame. Cover your frame with acrylic primer or acrylic paint. You should only need one coat, enough to cover the wood, but not to completely drown out all the wood grain.
- You can use a regular flat bristle brush for this.


Using a Single Piece of Paper
-
1Trace your frame onto wrapping paper. Trace the whole frame (including the window!) onto the back of wrapping paper or other patterned paper. [3] Cut the paper out along your traced lines. You should have a reproduction of the outside of your frame made in wrapping paper.
- You can also simply cut around your frame; however, this can look sloppy unless you have a very steady hand.
-
2Moisten your paper using a spray bottle. If you are using thick wrapping paper, you can brush water on lightly. [4]
-
3Apply glue. Paint the glue in a thick, even layer on the frame. Then lay the paper on, starting from a corner and moving outward to prevent bubbles from appearing.
- After your initial application of glue dries, seal the paper with another application of decoupage glue. Use a foam brush to avoid brush strokes, and let it dry.
-
4Sand the edges of the frame. [5] This is a good idea if you cover the entire picture frame with a pattern. Sanding the edges of the paper away shows off the wooden frame, and gets rid of any sharp edges or cut lines that make the frame look less professional.
- Use a low-grit sandpaper. You won’t need to sand too much; you’re only sanding through paper and glue.
Using Small Pieces of Paper
-
1Rip up napkins, newspaper, or magazine images. [6] You can cut out images from magazines, but keep in mind that carefully ripped pieces actually flatten out better with decoupage glue. This may give your frame a more finished, professional look.
- Some people like to upcycle pretty party napkins. Decoupage will work best with 2-ply napkins. Trace around designs that you like with a wet artist’s brush, and use the wet lines as perforations to tear out your pieces.
- Keep in mind that you will have to glue these pieces later. Don’t make your cutouts so intricate that they will tear when they are being glued.
-
2Apply the decoupage glue. Apply the glue to the back of the paper, and then stick the paper to the frame. If you are using very delicate paper, apply glue to the frame, and then apply the paper to the glue.
- If you are applying the paper to a frame with molding, you can go over the top of the pieces with a wet artists’ brush and use a stippling motion to better accentuate the molding.[7]
-
3Seal the piece. Use a foam brush to apply glue to the top of the paper. [8] Foam brushes do not leave brush marks, so they are ideal. You can find these at any craft store or home improvement store.
- You can also use a wide brush if you apply the glue in light coats.
Community Q&A
-
QuestionHow do you cover a picture frame with paper?
 Joy ChoJoy Cho is the Founder and Creative Director of the lifestyle brand and design studio, Oh Joy!, founded in 2005 and based in Los Angeles, California. She has authored six books and consulted for creative businesses around the world. Joy has lectured on business, leadership, and entrepreneurship at conferences and companies such as AltSummit, Pinterest, Target, and Hallmark, while her home and studio have been featured in magazines such as House Beautiful, Parents, and Domino. She has also been named one of Time's 30 Most Influential People on the Internet multiple times and has the most followed account on Pinterest with more than 14 million followers.
Designer & Style Expert, Oh Joy!Pick a paper that’s not too thick. Try thinner tissue paper or wrapping paper instead. Start by painting the frame with glue and then apply the paper so that it folds over the edge cleanly and crisply. Trim the edges on the backside and always follow the edges of the frame. -
QuestionI want to decoupage all different pictures of my grandson printed by Shutterfly. Is this the right quality to use the decoupage on top, or will I ruin the pictures?
 T. ChinsenTop AnswererIf the pictures are printed on regular paper, it will be fairly easy to decoupage the images without ruining them. If they are printed on photo paper, you will need to use a sealant specifically for that type of paper. There will be damage like wrinkling of the image, poor adhesion, movement, as well as image damage if the wrong sealant is used. Ask in the craft store in the glue department for the correct sealant. Let them know what surface is being used and what is being decoupaged.
Things You'll Need
- Old magazines, wrapping paper, or tissue paper
- Wood picture or mirror frame
- Mod Podge or other decoupage glue
- Foam and bristle brushes
- Scissors
- Newspaper


References
- ↑ http://www.goodtoknow.co.uk/craft/542500/how-to-make-a-decoupage-mirror
- ↑ http://www.homemadegiftguru.com/simple-decoupage-frame.html
- ↑ http://www.katrinaleechambers.com/diy-decoupage-photo-frames/
- ↑ http://www.homemadegiftguru.com/simple-decoupage-frame.html
- ↑ http://modpodgerocksblog.com/2015/09/decoupage-wood-diy-photo-frame.html
- ↑ https://www.youtube.com/watch?v=r9EJtXxMeug&feature=youtu.be&t=53s
- ↑ http://www.goodtoknow.co.uk/craft/542500/how-to-make-a-decoupage-mirror
- ↑ http://www.katrinaleechambers.com/diy-decoupage-photo-frames/
About This Article