X
wikiHow is a “wiki,” similar to Wikipedia, which means that many of our articles are co-written by multiple authors. To create this article, 22 people, some anonymous, worked to edit and improve it over time.
This article has been viewed 8,154 times.
Learn more...
Have you ever wondered how Robin Hood used so many arrows and never seemed to run out? His secret? He made them himself! With this article, you can too.
Steps
Part 1
Part 1 of 3:
Preparing the Shaft
-
1Sand the entire shaft using fine grade sandpaper. Ensure it is completely smooth and free from splinters. This will also allow the fletching to stick more easily to the shaft, and give you an opportunity to fully inspect the wood for any nicks or damage.
-
2Varnish the shaft if you plan on leaving the arrows outside. This will protect them from weathering, but if you intend to leave them inside, this is unnecessary.

Advertisement
Part 2
Part 2 of 3:
Forming the Ends
-
1Sharpen one end of the shaft using the tip side of the sharpener. The tip end is longer than the nock end.
-
2Apply superglue to the sharpened end of the shaft and inside the glue-on point. Points can come in all different shapes and sizes. Make sure you are using the correct points for the type of archery you will be doing.
-
3Press the glue-on point onto the tip and hold for approximately 30 seconds. The glue will run over the sides of the point. Remove any excess glue using a paper towel.
-
4Sharpen the other end of the shaft using the nock side of the sharpener.
-
5Apply superglue to the sharpened nock end of the shaft and inside the glue-on nock.
-
6Press the glue-on nock onto the end and hold for approximately 30 seconds. Once again, the glue will run over the sides and you can remove excess with a paper towel.


Advertisement
Part 3
Part 3 of 3:
Adding the Fletching
-
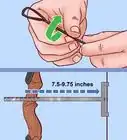
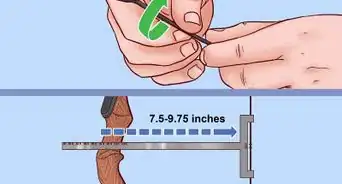
1Insert the shaft into the jig. The nock of the shaft should fit comfortably into the jig. It should not be loose or wobbly, but should press against the back part. Make sure it is placed on a flat, stable surface before using.
-
2Measure and cut tape according to the length of the fletching that will be used. Each fletching should be the same length, with only slight variation. To save on tape, measure and cut each piece according to each fletching.
-
3Place the fletching into the fletching bracket on the jig. Before using the jig, do a few practice tests to make sure the fletching will be where you want it on the shaft. It can be adjusted by using the nobs on the bottom portion.
-
4Apply tape to the very edge of the fletching. Rub the protected side of the tape on the fletching to ensure proper contact. The tape is very brittle but very sticky. Because it is double-sided, it can be difficult to handle.
-
5Remove the protected side of the tape. This should be done carefully, so you do not also pull out the fletching when you remove the protection.
-
6Press the fletching bracket and the shaft together. Using magnets, the bracket will latch on to the jig. Carefully move the bracket to exactly where you want the fletching on the shaft.
-
7Turn the dial on the jig to attach the next fletching. The dial is located on the bottom of the jig and will stop at the correct interval depending on the type of jig it is.
-
8Repeat until all pieces of the fletching have been attached.
-
9Remove shaft from the jib. Press thumb against each fetching strip to ensure good contact.


Advertisement
Things You'll Need
- Wooden shaft
- Superglue
- Glue-on point
- Glue-on nock
- Pre-cut fletching (feathers)
- Tip/nock sharpener
- Scissors
- Sandpaper
- Feather fletching tape (double-sided tape)
- Fletching jig (to attach fletching to shafts)
- Varnish (optional: some archers will use varnish on the wood in case they leave arrows outside)


About This Article
Advertisement