This article was co-authored by wikiHow Staff. Our trained team of editors and researchers validate articles for accuracy and comprehensiveness. wikiHow's Content Management Team carefully monitors the work from our editorial staff to ensure that each article is backed by trusted research and meets our high quality standards.
The wikiHow Video Team also followed the article's instructions and verified that they work.
This article has been viewed 14,279 times.
Learn more...
Peruvian knitting is a way of holding your knitting needles and working yarn. This technique is known for its speed, so it is a great knitting technique to learn if you want to work faster. You can use the same stitches that you normally would in knitting, you will just be holding the needle and yarn a bit differently. It helps to have some proficiency in knitting before you try Peruvian knitting, but you can learn the positioning and knitting technique easily even if you only know how to do the basics in knitting.
Steps
Positioning the Needle and Yarn
-
1Cast on the desired number of stitches. You can continue to cast on normally when using the Peruvian knitting technique. Before you get your needle and yarn into position, cast on the desired number of stitches for your project. If you are just practicing, then you might only cast on 10 stitches.[1]
-
2Hold your right hand needle like a pencil. The way that you position your hands during Peruvian knitting looks very different from other knitting styles. The most notable difference is how you hold your right hand needle. You will need to hold the needle like a pencil so that the pointed end of the needle is resting between your index finger and middle finger and your thumb is keeping the other end of the needle in place.
- The point of the needle should extend about one inch (2.5 cm) beyond the tip of your index and middle finger.
- Your grip on the needle should be firm, but comfortable. Again, it should feel similar to holding a pencil.
Advertisement -
3Hold the other needle normally. You can hold the left hand needle the same way that you would normally when you are knitting. Grip the needle with your hand so that your knuckles are on the top side of your stitches. Your hand should be positioned a couple of inches (5 cm) from the tip of the needle.
- Make sure that your hand is positioned so that there are a few stitches exposed near the end of the needle. This will ensure that you can easily access them with the other needle.
- Keep in mind that you will need to reposition this hand regularly to expose new stitches.
-
4Wrap the working yarn around your right pinkie finger. In Peruvian knitting, your pinkie finger creates the tension in the yarn. This is part of what makes Peruvian knitting faster than other knitting styles. Take the working yarn—the strand extending from your last cast on stitch—and wrap it around your pinkie finger twice so that it is secure.
- Do not wrap the yarn too tight around your pinkie finger or you will not be able to work fluidly.
- When you wrap the yarn around your pinkie finger, make sure that you leave a few inches of yarn between your pinkie finger and the last cast on stitch. You will need this slack to create new stitches.
-
5Weave the working yarn behind your middle finger. Your middle finger does most of the work in Peruvian knitting. You will use it to throw the yarn over your needle for each new stitch. To position the yarn over your middle finger, weave the working yarn up from your pinkie finger, and behind your middle finger. Then, let the rest of the working yarn—extending from the last cast on stitch—to hang over the front of your fingers (inside and facing you).


Using the Peruvian Technique
-
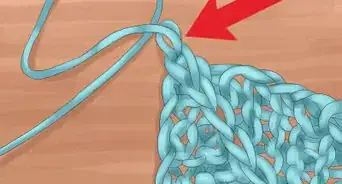
1Insert the right needle through the first cast on stitch. To get started, you will be inserting the right needle into the first stitch from front to back as you normally would in knitting. The needle will need to go through the stitch and poke out the other side so that you can loop the working yarn over the tip.[2]
-
2Throw the yarn over the needle using your middle finger. Next, use your middle finger to throw the working yarn over the tip of your right hand needle. This should be one fluid motion, so try practicing the movement a few times to get it down.[3]
-
3Pull the yarn through and slide the old loop off the old stitch. After you have looped the working yarn over your needle, you can pull this loop through your old stitch and then allow the old stitch to slide off the needle. The new stitch will replace it on your right hand needle.[4]
- This completes one knit stitch. Start over to continue working the rest of your row.
Things You’ll Need
- Yarn
- Knitting needles (You can use any size that is appropriate for the type of yarn you are using. Check the yarn label to find a recommendation.)


References
About This Article