This article was medically reviewed by Luba Lee, FNP-BC, MS. Luba Lee, FNP-BC is a Board-Certified Family Nurse Practitioner (FNP) and educator in Tennessee with over a decade of clinical experience. Luba has certifications in Pediatric Advanced Life Support (PALS), Emergency Medicine, Advanced Cardiac Life Support (ACLS), Team Building, and Critical Care Nursing. She received her Master of Science in Nursing (MSN) from the University of Tennessee in 2006.
There are 9 references cited in this article, which can be found at the bottom of the page.
wikiHow marks an article as reader-approved once it receives enough positive feedback. In this case, 89% of readers who voted found the article helpful, earning it our reader-approved status.
This article has been viewed 867,384 times.
Have you ever written an essay and gotten a dead hand after a while? Although this might seem like a minor nuisance, the wrong posture and grip can actually cause some nasty problems in the long-term. To make writing as comfortable as possible and avoid hand pain, you should take some time to learn the best writing techniques and tips to soothe pains.
Steps
Practicing Good Writing Technique
-
1Choose a pen or pencil that is comfortable. In general, look for a wider barrel (larger diameter) with a padded grip.
- Make sure the pen writes smoothly, without skipping or dragging along the page.
- Avoid buying pens that rattle or leave behind blotches of ink.
- Light pens are easier to balance, making them more ideal for writing for longer periods of time. For pencils, try heavier grades of lead like 2B, which allow for lighter grips.
-
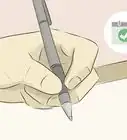
2Grasp the pen loosely. Do not clench your fingers around the pen or grip it too tightly. You don't need to strangle it—just pull it against the page. Imagine you're writing with a quill. Remember: people wrote for hours using quills, and they definitely weren't holding them tightly.[1]
- Hold the pen from the back, leaving more space at the side of it with the writing tip.[2]
- Fountain pens are ideal for most writers, as they don't require a lot of pressure against the page.
- Avoid ballpoint pens if you're not comfortable with them, as their design requires you to apply more pressure against the page. They also tend to be made cheaply.
Advertisement -
3Write slowly when you start using new grips. If you've been using improper grip and are just beginning to get used to a new one, always start slow. It's going to take a while for your muscle memory to start developing, so work your way up to faster speeds only when you have your positioning right and your writing is neat.
- Don't get discouraged and switch to improper writing techniques, even if you're faster at them.
-
4Press the pen gently against the page. Get a good pen so you don't have to press hard, then pull the pen lightly and evenly against the paper. If you prefer to use a pencil, try the next softest lead.
- Try a gel or rollerball pen. If you write often for long periods of time, these are great investments. Some gel and liquid inks may also flow smoothly enough to help discourage you from clenching and pressing.
-
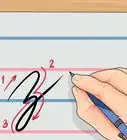
5Write with your arm, not your fingers. Writing is not drawing! Keep your hand and wrist still, and move your whole arm using the elbow and shoulder (like you are writing on a whiteboard). Avoid using your finger muscles—this might seem counterintuitive, but your fingers should only be used to support your pen or pencil.[3]
- The most common grip is between your first and middle fingers, using your thumb to hold the pen or pencil in place. Another grip is placing your middle and index finger on top, using your thumb to hold the pen or pencil in place.
- Calligraphers (who are very practiced writers) hold their writing instruments with their thumb and forefinger, resting the pen gently on top of their forefingers' knuckle.
-
6Look at your hand position and evaluate it. You may not have paid much attention to how to hold a pen since you were in early elementary school, but pay attention now.
- Is your hand position neutral? Try to hold your wrist straight and don't turn or bend it as you write.
- Are you reaching or straining in any way to reach the page or the desk? Move the desk, chair, and paper until you are comfortable.
- Is the rest of your work space comfortable? Are the chair and desk at the right heights for you? Can you see and reach the page without straining or crouching? Are other items you need (such as the stapler or telephone) within easy reach?
- Is your wrist, arm, and elbow supported, at least when you are not actively writing?
-
7Practice good posture. Sit up straight with your shoulders back, your chest out, and avoid leaning over the desk. If you lean over your work, your neck, shoulders, and arms will tire out much faster.
- For longer writing sessions, vary your posture. Lean one way and the other in your chair, and try to lean back every now and then.
- Always make sure you can breathe properly—slouching can lead to reduced oxygen levels because the position causes you to breath from the top of your lungs instead of the bottom, which isn't as effective due to less gravity.[4]


Taking Regular Breaks
-
1Take breaks to put less strain on your body. Leave yourself extra time for writing. Unless this is the big, final test and you have no choice, stand up every hour (or less) and walk around for a minute or two. Relax your hands, arms, and wrists during this time.
- Take walks outside if you have the time.
-
2Set down the pen any time you're not writing. For instance, if you pause for a few moments to compose your next thought, set the pen down, relax your hand, recline in your chair, and even stand up and walk around a bit.
- Take the time to do some quick hand and finger exercises.
-
3Limit total daily writing time. If you've been writing for several hours, come back later or even the next day. Try and spread out the total writing time across as many days as possible. This is tough when it comes to school and work, but you should do it whenever you get the chance.
- If you have a lot to write, try writing in several smaller sessions rather than one long one.
-
4Engage in a different activity the next day. If a test, writing assignment, or some important thought kept you writing extensively yesterday, use today to get some exercise. Take a stroll outside and get enough outside time to relieve stress.
- Decreasing stress by getting outside and doing other activities is especially important for creative writing and preventing writer's block.


Stretching Your Hands
-
1Lift your wrist as high as it will go with fingers dangling. Image that you're hanging a cloth ribbon on a clothesline above your head. Lift your fingers, drop your wrist, and slowly lower your wrist. Be sure to lower your wrist as far as it will go. Imagine that you are smoothing out the ribbon. Afterwards, slowly raise your hand again, as if you have a balloon attached to your wrist.
- Repeat the process from the beginning with your opposite arm about 5 to 100 times.
-
2Perform hand/finger tendon glides regularly. This exercise begins with extending your fingers straight. Then, make a fist, and extend your fingers straight again.
- Do this repeatedly, but each time you make a fist, alternate between the 3 choices: a straight fist, full fist, and hook fist.[5]
-
3Conduct simple hand exercises with your writing hand. For example, grab the pen or pencil and twist it between your fingers. You can also open and close your hand, and gently stretch your fingers by moving them away from each other and then back together again.
- Regularly exercising your writing hand is important to prevent cramps.
-
4Reach out a hand with your fingers facing up and palm forward. A simple way to remember this first movement is pretending you're signaling a stop sign. Afterwards, use your left hand to gently pull your fingers toward you, bending your right hand back. Hold this position for around 15 seconds.[6]
- Repeat this exercise with both hands.
-
5Extend one of your hands in front of you and point your fingers down. Your palm should be facing your chest, and your fingers straight downwards. Take your opposing hand and gently press your fingers toward you. Hold this position for around 15 seconds.
- You can also do this exercise with your palm facing away from you and your fingers pointed up. In this case, you still press your fingers toward you.
-
6Squeeze a stress ball to exercise your wrists and fingers. A stress ball is an easy way to stretch your fingers and wrists, while also strengthening them. This can help with stamina and reduce the likelihood of experiencing pain from writing.
- Most big-box stores and popular online suppliers sell stress balls
-
7Interlace each of your fingers and stretch outward. Make sure your palms are facing away from you when you stretch your arms out in the opposite direction. Then, while holding your arms outward, reach them toward the ceiling, keeping your shoulders lengthened in line with your back.
- Hold this position for around 10 to 15 seconds.
- This exercise stretches your fingers, hands, and forearms, and also improves circulation.


Exploring Medical Options
-
1Talk to your doctor if you experience frequent pain. If you're experiencing pain that doesn't respond to measures you can take yourself, talk to a doctor. If most of your writing is for school or work, ask whether accommodations or arrangements can be made. Your doctor can make recommendations and help you implement them to make your work more manageable.
- Some solutions include a workspace more suited to your size or work habits (e.g. a chair and table of a more suitable height, a slanted or elevated work surface), a different selection of writing implements, and a different means of writing (such as dictation or typing in lieu of writing longhand).
- Doctors can also refer you to an expert for an ergonomic evaluation and suggestions about your workspace and work habits.
-
2Splint your finger if arthritis flares up. Keeping on a splint for 2 to 3 weeks can help reduce inflammation during arthritis flare-ups. Measure the size of your finger to determine the size of splint to purchase and tape it to your finger using medical tape. Make sure the injured finger is properly supported and kept in a straight position.[7]
- You can also create a homemade splint using 2 straight, narrow objects (like two pieces of cardboard) by taping one to the top of your finger and one to the bottom.
- If your fingers are tingling or numb, seek medical attention. These are signs that you're not getting enough oxygen and blood flow to the injured area.
-
3Apply a splint to your wrist to reduce inflammation. If you start to experience wrist pain, purchase a wrist splint to hold it in a neutral position and ease inflammation. You can also create a makeshift splint at home by gently wrapping your wrist with padding, such as clothing, and then securing a rigid object to the top or bottom.[8]
- Local pharmacies and online suppliers sell many kinds of splints.
- Wear your splint for 2 to 3 weeks at nighttime. Symptoms are typically the worst at night because your hand bends more when you're sleeping.
- Splints don't always work, but don't have side effects like medication-based treatments.
-
4Purchase nonsteroidal anti-inflammatory drugs (NSAIDs). NSAIDs curb hand pain by blocking the enzymes that drive inflammation. Use topical NSAIDs like Voltaren if you can—some experts believe that they pose less health risks than oral NSAIDs like Advil and Motrin.
- NSAIDs are not effective for carpal tunnel syndrome.
- Using NSAIDs for long-term treatment of pain has been linked to stomach bleeding, ulcers, and increased risk of heart attacks.
- Anti-cholinergic drugs like Artane and Cogentin are more suitable for writer's cramp (or hand dystonia).[9]
-
5Ask your doctor about corticosteroid injections to reduce inflammation. These injections go right into the affected joints to ease inflammation. They can provide relief lasting for up to a year, although some people report diminishing returns as injection number goes up.[10]
- Steroid injections are typically used to treat tendonitis, arthritis trigger fingers, carpal tunnel syndrome, tennis elbow, and rotator cuff tendonitis.
- Side effects of corticosteroid injections include a "flare," which is pain felt 1 or 2 days following the injection, as well as increased blood sugar, skin thinning, skin lightening, tendon weakening, and in rare cases, allergic reactions.


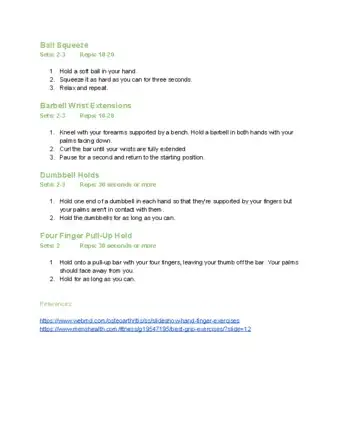
Sample Stretches and Exercises

Expert Q&A
Did you know you can get premium answers for this article?
Unlock premium answers by supporting wikiHow
-
QuestionHow can I write fast without pain?
 Luba Lee, FNP-BC, MSLuba Lee, FNP-BC is a Board-Certified Family Nurse Practitioner (FNP) and educator in Tennessee with over a decade of clinical experience. Luba has certifications in Pediatric Advanced Life Support (PALS), Emergency Medicine, Advanced Cardiac Life Support (ACLS), Team Building, and Critical Care Nursing. She received her Master of Science in Nursing (MSN) from the University of Tennessee in 2006.
Board-Certified Family Nurse PractitionerIt might be difficult to write fast and avoid pain completely. Having a smooth and easy to write pen, taking regular breaks, shaking your wrists off, and gradually building your writing strength may be the only way to build speed and avoid pain
Support wikiHow by unlocking this expert answer.
-
QuestionWhen I loosen my grip, my handwriting gets sloppy, and I get in trouble. How can I keep my good handwriting while loosening my grip?Luba Lee, FNP-BC, MSLuba Lee, FNP-BC is a Board-Certified Family Nurse Practitioner (FNP) and educator in Tennessee with over a decade of clinical experience. Luba has certifications in Pediatric Advanced Life Support (PALS), Emergency Medicine, Advanced Cardiac Life Support (ACLS), Team Building, and Critical Care Nursing. She received her Master of Science in Nursing (MSN) from the University of Tennessee in 2006.
Board-Certified Family Nurse PractitionerYou may want to look into getting a comfortable, light-weight pen that writes with little effort from your hand. Gel pens seem to work best as they write smoothly without dragging, requiring minimal pressure from your hand which helps to deliver crisp, clean lines every time.Support wikiHow by unlocking this expert answer.
Warnings
- This article focuses on hand pain from writing, but other close work that uses fine motor skills can cause hand pain, as well. If you do needlework or other fine work, you may be adding to the effects.⧼thumbs_response⧽
- Extended writing and other close activities can also cause strain to the back, neck, arms, and eyes, especially if your workspace is arranged poorly. If you experience pain elsewhere when writing, don't ignore it.⧼thumbs_response⧽
- Continuous pain can lead to hand problems if you continue to write. If your pain is severe or does not stop, ask a doctor to help you decide on the proper preventative measures.⧼thumbs_response⧽
-Step-15-Version-3.webp)


References
- ↑ https://www.youtube.com/watch?v=XRHxqfNSQ54
- ↑ https://www.youtube.com/watch?v=At2X5l7ncLU
- ↑ https://www.youtube.com/watch?v=ZQbfGwZXGa0
- ↑ https://www.nbcnews.com/health/body-odd/straighten-slouching-makes-you-sad-study-shows-flna1C6854908
- ↑ https://www.health.harvard.edu/pain/top-5-ways-to-reduce-crippling-hand-pain
- ↑ https://www.ohcow.on.ca/elbow-and-wrist-exercises.html
- ↑ https://www.health.harvard.edu/pain/top-5-ways-to-reduce-crippling-hand-pain
- ↑ https://www.ncbi.nlm.nih.gov/pubmedhealth/PMH0072780/
- ↑ http://www.dystoniacanada.org/about-dystonia/focal-dystonias/writer%E2%80%99s-cramp
About This Article

To prevent hand and wrist pain from excessive writing, take regular breaks for a few minutes every hour or so and try not to use your hands and wrists during this time. You can also exercise your hands and wrists by reaching your hand out with your fingers facing upward and using your opposite hand to gently bend the fingers backward for 15 seconds. To reduce cramps, stretch your fingers by moving them away from each other and back again. For more pain reduction tips from our Medical reviewer, like how to prevent hand and wrist pain by using proper writing technique and posture, keep reading!

-Step-15-Version-3.webp)