This article was medically reviewed by Shari Forschen, NP, MA. Shari Forschen is a Registered Nurse at Sanford Health in North Dakota. She received her Family Nurse Practitioner Master's from the University of North Dakota and has been a nurse since 2003.
There are 11 references cited in this article, which can be found at the bottom of the page.
wikiHow marks an article as reader-approved once it receives enough positive feedback. This article received 11 testimonials and 81% of readers who voted found it helpful, earning it our reader-approved status.
This article has been viewed 733,852 times.
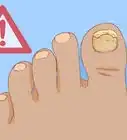
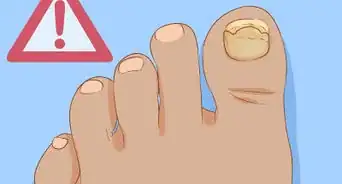
Having a dead toenail can cause a lot of pain and can make you reluctant to wear sandals or show your toes. A dead toenail can have various causes, among them injury (such as being jammed repetitively into the front of your running shoes) and toenail fungus.[1] Even if your toenail is dead and has completely stopped growing, you can remove the toenail and treat the underlying infection.[2] By removing a nail, you can help prevent infection and help the nail heal from an injury.[3] With the proper treatment, your toe will be back to normal in six to 12 months.[4] In order to completely be sure of the condition of the toenail, it is best to have advise of medical professional before attempting removal.
Things You Should Know
- Poke through the nail with a hot, sterilized pin to pierce the blister. Let it drain and soak your foot in warm, soapy water 3 times daily until it heals.
- Clip off as much of the dead nail as possible. Over time, pull off pieces of the nail that detach from the skin underneath (it won’t hurt if it’s fully detached).
- Apply antibiotic cream daily and keep the toe clean and bandaged until it heals (allowing some time for it to “breathe” without a dressing).
Steps
Taking Care of the Blister
-
1Note the presence of a blister. Dead toenails are often created when blisters (often blood blisters) develop beneath the nail. The blister causes the skin underneath the nail to die, and once that skin dies, the nail separates and lifts away from the toe.[5]
- If your toenail has died for another reason, including a fungal infection, there will likely be no blister to drain. Skip directly to the "Removing the Toenail" section of this article and follow the same removal and aftercare procedure. In the case of a fungal infection, visit your doctor, who can prescribe a suitable antifungal cream.
- Do not attempt to drain a blister underneath your nail if you suffer from diabetes, have peripheral arterial disease, or have any problems with your immune system.[6] These scenarios can result in long term hard to treat infection and wounds not healing appropriately due to decreased immune system and lack of blood flow for healing. In this case, you must consult your physician.
-
2Clean the toe. You should thoroughly wash the toe and nail area with soap and water. Wash your hands with soap and water, as well. It is critical that you make your toe and hands as sterile as possible before attempting to pierce your blister or remove you toenail. If there is bacteria present, you are placing yourself at risk of infection.Advertisement
-
3Sterilize and heat the tip of a pin or straightened paperclip. Wipe a clean, sharp pin, needle, or end of a paperclip with rubbing alcohol in order to sterilize it. Heat the tip of the sharp object of your choosing in a flame until it is visibly red-hot.
- To best avoid infection, this process should be done with supervision by medical professional. Any time you attempt a medical procedure at home — even the simplest procedure — you put yourself at risk for infection or making a painful or dangerous mistake. Consider visiting your doctor or an urgent care clinic to remove your toenail instead of doing it yourself.
- Note that a blunt metal paper clip can be used instead of a pin if you feel uneasy about piercing the blister with a sharp point. If you have never tried to drain a blister, using a paperclip might be a safer option; however, have a sterilized pin on hand as you may need it to pierce the blister.
- Only heat the tip of the pin. The rest of the pin will become warm, but only the tip should become red-hot. Be careful not to burn your fingers while handling it.
-
4Melt through your nail with the tip of the pin. Position the heated tip of the pin over the nail, just above the blister. Hold it still and allow the heat to melt a hole through the nail.
- If you can access your blister by inserting the pin under the tip of your nail, you will not have to worry about melting through your nail. You can then just drain the nail by piercing the blister with the tip of the hot pin.
- Since there are no nerves in a nail, using a hot pin to melt it should not cause any pain. You should avoid applying pressure when melting your nail, as you want to be careful not to burn the skin underneath.[9]
- Depending on the thickness of your nail, you may need to reheat the pin several times and repeat the melting at the same spot on your nail each time.
-
5Pierce the blister. After creating a hole in the nail, use the tip of the pin to puncture the blister. Allow the fluid to drain out.
- In order to minimize any pain or discomfort, you may want to allow the pin to cool slightly to a tolerable temperature before using it to pierce the blister.
- If possible, try to pierce the blister at a point somewhere around the blister's outer edge. Leave as much of the overlying skin alone as possible. Never pick at the skin with your hands, as this is a gateway for infection.
-
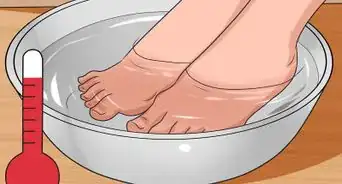
6Care for the wound. Immediately after draining the blister, soak the toe in warm and slightly soapy water for approximately 10 minutes. After that, continue to soak the toe in soapy water for 10 minutes, three times a day, until the blister fully heals. After you soak, apply an antibiotic ointment or blister ointment and bandage the toe using clean gauze and a bandage.[10] This will help prevent infection.
- Depending on the size and severity of your blister you might need to drain your blister multiple times until all the fluid is completely gone. Try to drain any remaining fluid from the blister from the same hole you previously created in your nail.


Part Two: Removing the Toenail
-
1Wash the area around your toe. Before attempting to remove part or all of the toenail, clean the toe with warm, soapy water. Dry it well before continuing. Cleaning your foot, toe, and nail area as well as possible before any toenail removal will help to prevent infection. In addition to your foot, clean your hands to lessen the chance of transmitting bacteria.
-
2Trim as much of the upper portion as possible. Clip the portion of your nail that is resting on dead skin away. This makes it more difficult for dirt and bacteria to become lodged beneath the dead nail.[11] Removing the nail will also help the skin beneath the nail to heal faster.
- To minimize the risk of infection, you may want to sterilize the clippers with rubbing alcohol before use. Sharp nail clippers are also better to use than blunt nail clippers since the latter may tear the nail as you attempt to remove it.
-
3Test the nail before trimming it. If the nail has already started dying, you should be able to pull a portion away from your skin without difficulty. The portion you can pry away without feeling any pain is the part that you will want to clip off.
-
4Wrap the toe. After removing the top portion of the nail, wrap the toe with a nonstick gauze bandage, adhesive bandages. Your newly exposed skin will probably be raw and tender, so wrapping your toe will help to minimize the discomfort that you may feel. You may also want to apply antibiotic ointment to the skin to encourage healing and reduce the risk of any infection.
-
5Wait before removing the rest of the nail. While every situation is unique, you should generally wait a few days before removing the rest of the nail (it may be best to wait between two to five days).[12] The nail will slowly die and become much less painful to remove after a few days of waiting.
- While waiting for the bottom part of your nail to die so that you can remove it, you will want to keep the nail area as clean as possible. This can mean gently washing it with soap and water, using antibiotic ointment, and keeping it loosely dressed with a gauze bandage.
-
6Pull away the rest of the nail. Once the rest of the nail has died, grab the last piece and remove it in one motion, pulling from left to right.[13] Once you start pulling away the nail, you will recognize if it is ready to be removed. If you feel pain, stop pulling.
- You may see some bleeding if your nail is still connected at the corner of your cuticle; however, this pain should not be severe.


Part Three: Providing Aftercare
-
1Keep the area cleaned and dressed. Once you remove the remainder of the nail and expose the raw skin, it will be important to clean the toe with warm water and some gentle soap. In addition, you should try to apply an antibiotic ointment and loosely bandage the toe.[14] Remember that this is a wound, and you must treat it gently until a new layer of skin grows.
-
2Give your skin time to “breathe.” While it is important to keep your toe clean and protected, it is also good to expose the raw skin to air to give it time to heal. While you are watching TV with your feet up is a good time to remove the bandage and expose your toe to the air. However, if you are going to be walking around city streets or through a park (particularly with open-toed shoes on), you will want to keep your toe bandaged.
- Change the bandage each time you clean the wound. You should also change it any time the bandage gets dirty or wet.
-
3Treat the exposed skin. Apply an antibiotic ointment or cream to the wound at least once a day to help stave off infection. Continue until new skin grows over it. An over-the-counter cream will suffice in most situations, but you may need a prescription cream prescribed by your doctor if you get an infection.
-
4Stay off your feet. Rest your foot as much as possible for the first few days after removing the nail, especially since it will probably be quite painful at this point. Once the pain and swelling go down, you can gradually ease yourself back into your normal routine, including exercise. However, you should not push yourself to do something that causes pain.
- If possible, keep your foot elevated when you sit or lie down. Prop it up so that it's above the level or your heart. This can help minimize any swelling and pain you may experience.[15]
- While the nail is growing, avoid wearing narrow or tight shoes that may cause trauma to the nail[16] Wear closed toe shoes as much as possible to further protect the nail bed as it recovers, especially when you are doing physical activities outside.
-
5Know when to contact your doctor. Symptoms such as severe pain can be a sign of infection. Other common signs of infection include swelling, warmth around the toe, drainage of pus from the toe, red streaks extending out from the wound, or fever. Don’t wait until the infection becomes serious- contact your doctor at your first inclination that something may not be right.


Warnings
- Do not attempt to drain any blisters or remove the toenail if you have diabetes, peripheral arterial disease, or any condition that negatively impacts your immune system.⧼thumbs_response⧽
- Do not attempt to remove any toenail that has not already died. If you need to remove a nail for other reasons, consult with your doctor about having the nail surgically or non-surgically removed by a medical professional.⧼thumbs_response⧽
Things You'll Need
- Warm water
- Soap
- Clean towels
- Sharp pin and/or blunt paper clip
- Cotton pads
- Rubbing alcohol
- Lighter or similar flame source
- Nonstick gauze bandages
- Nail clippers
- Antibiotic ointment


References
- ↑ http://www.footvitals.com/toenails/black-toenail.html
- ↑ http://www.webmd.com/skin-problems-and-treatments/nonsurgical-nail-removal-for-fungal-nail-infections
- ↑ https://www.drugs.com/cg/nail-removal.html
- ↑ http://woundcaresociety.org/if-my-toenail-is-falling-off-should-i-take-it-off
- ↑ http://runblog.adamcondit.com/2013/07/30/5-steps-to-safely-remove-dead-toenails/
- ↑ http://www.webmd.com/first-aid/how-to-drain-blood-from-under-a-nail
- ↑ http://www.mayoclinic.org/first-aid/first-aid-blisters/basics/ART-20056691
- ↑ http://www.cdc.gov/hicpac/Disinfection_Sterilization/8_0Iodophors.html
- ↑ http://runblog.adamcondit.com/2013/07/30/5-steps-to-safely-remove-dead-toenails/
- ↑ http://www.mayoclinic.org/first-aid/first-aid-blisters/basics/art-20056691
- ↑ http://runblog.adamcondit.com/2013/07/30/5-steps-to-safely-remove-dead-toenails/
- ↑ http://runblog.adamcondit.com/2013/07/30/5-steps-to-safely-remove-dead-toenails/
- ↑ http://runblog.adamcondit.com/2013/07/30/5-steps-to-safely-remove-dead-toenails/
- ↑ http://www.footvitals.com/surgery/toenail-removal.html
- ↑ https://www.drugs.com/cg/nail-removal.html
- ↑ https://www.drugs.com/cg/nail-removal.html
About This Article

To remove a dead toenail, first wash your toe with soapy water. Then, use nail clippers to carefully clip off any portion of the nail that isn’t firmly resting against the nail bed. Avoid clipping off any healthy portions of the nail. Use a nail file to carefully smooth down any jagged edges on the remaining part of your nail. Clean your toe again with soapy water, then apply antibiotic ointment and cover it with a bandage. Change the bandage regularly while you wait for your toe to heal, which may take around 6-12 months. If your entire toenail falls off or your toenail won't stop bleeding, get immediate medical treatment. For more advice from our Medical co-author, including how to care for your skin once the nail is completely removed, keep reading!