This article was medically reviewed by Luba Lee, FNP-BC, MS. Luba Lee, FNP-BC is a Board-Certified Family Nurse Practitioner (FNP) and educator in Tennessee with over a decade of clinical experience. Luba has certifications in Pediatric Advanced Life Support (PALS), Emergency Medicine, Advanced Cardiac Life Support (ACLS), Team Building, and Critical Care Nursing. She received her Master of Science in Nursing (MSN) from the University of Tennessee in 2006.
wikiHow marks an article as reader-approved once it receives enough positive feedback. This article received 21 testimonials and 85% of readers who voted found it helpful, earning it our reader-approved status.
This article has been viewed 729,781 times.
Having a split nail can be painful and inconvenient. When your nail is split, you always have to worry about catching it on something that could rip it even further. That’s why repairing your split nail is so important. Not only does repairing the split help prevent the nail for tearing any further, it also allows you to strategically cover up the unsightly split with nail polish.
Things You Should Know
- Cut the top off a tea bag and dump out the tea leaves. Trim the tea bag down to be about the same size as your fingernail.
- Apply a thin layer of base coat to the split nail and press the tea bag over it while the base coat is still wet.
- Let the base coat dry, then trim off any excess tea bag so it fits the nail perfectly. Apply 2 more layers of base coat and finish with regular polish.
Steps
Prepping To Repair The Split Nail
-
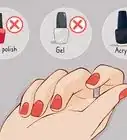
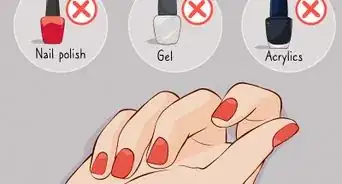
1Remove any polish from your nails. Use a cotton ball soaked in nail polish remover to take off any current nail polish. Rub your nails from side to side, making sure to remove the polish on the side edges of your nail.
- Be careful to not get cotton particles caught in the split of your nail. If you are worried about catching your nail on the cotton ball, remove the nail polish moving in the direction of the split.
-
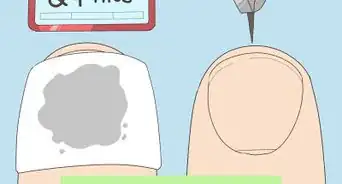
2Cut the top off a teabag. Use scissors to cut off the top portion of an unused tea bag. The bag is what you will use to repair your nail, so keep the teabag paper intact, and pour out the tea leaves in the garbage.[1]Advertisement
-
3Cut the teabag to fit your nail. Depending on where the nail split is, cut the tea bag in a rectangle shape to completely fit on your nail, just past the split toward the free edge of your nail.[2] For example, if the free edge of your nail has the split, cut the tea bag to cover the split and about half of your nail. If the split is deeper, cut the tea bag longer to reach just before your cuticle.
- Be sure that the sides of the cut teabag reach to the sides of your nail.
- Once the teabag is applied onto your nail, you can leave the end of the teabag hanging off the free edge of your nail; you’ll remove it later.
Repairing Your Split Nail
-
1Apply a clear base coat. Paint a thin layer of a clear nail polish as a base coat. Be sure to cover the split section of your nail.[3] This clear polish will act as glue to hold the teabag in place.
-
2Place the teabag on your nail. When the clear base coat is still wet, carefully place the rectangle piece of tea bag onto your nail to cover the split section. Gently smooth the tea bag out with your finger or a cuticle stick, to make sure there are no air bubbles underneath the surface of the teabag.[4] Allow the nail polish to dry for about 5 minutes.
-
3
-
4Apply another layer of clear nail polish. Now that the tea bag is secure on your nail, paint on another layer of clear polish.[6] Be sure to extend the paint stroke past your nail onto the tea bag. Allow this layer of nail polish to dry for about 5-10 minutes.
- At this point, the teabag will look see-through.
-
5Remove the excess teabag. Once the clear layer of nail polish has dried, use a nail file to file in one direction and remove the rest of teabag paper.[7]
- The nail file will help sand off any paper particles remaining on the edge of your nail.
-
6Apply another clear coat of polish. To seal everything down, paint on another thin coat of clear nail polish.[8] This time, be sure to swipe along the free edge of your nail where the teabag had been cut off. Allow this coat of polish to dry for at least 10 minutes. You don’t want to mess up your nail after having the rectangle of teabag paper and three coats of nail polish applied.
- Swiping along the free edge of your nail helps to prevent and lifting or fraying of the teabag.
-
7


Expert Q&A
-
QuestionDo UV and LED lights cause skin sun damage? Do they send out a lot of UV rays?
 Luba Lee, FNP-BC, MSLuba Lee, FNP-BC is a Board-Certified Family Nurse Practitioner (FNP) and educator in Tennessee with over a decade of clinical experience. Luba has certifications in Pediatric Advanced Life Support (PALS), Emergency Medicine, Advanced Cardiac Life Support (ACLS), Team Building, and Critical Care Nursing. She received her Master of Science in Nursing (MSN) from the University of Tennessee in 2006.
Board-Certified Family Nurse PractitionerAccording to a 2016 article published in Clinical and Aesthetic Dermatology, it's a good idea to limit the frequency and time you spend under UV lamps at nail salons. Additionally, ask the salon owner what type of light bulb the use. LED lights are a better option than UV lights. If you are going to use a UV light, wearing UV-protected lenses over your eyes and fingerless gloves on your hands can protect you from excess exposure.
Things You'll Need
- Nail polish remover
- Cotton balls
- A teabag
- A clear base coat
- Scissors
- Cuticle stick
- Nail file
Warnings
- Initially using nail glue rather than a clear base coat is an alternative way to fix a split nail. However, nail glue is extremely difficult to get off, and could potentially damage your nail. A clear base coat serves as an easy to remove adhesive.⧼thumbs_response⧽


References
- ↑ http://stylecaster.com/beauty-high/how-to-fix-a-broken-nail/
- ↑ http://www.xovain.com/nails/tea-bag-wraps-for-broken-nails
- ↑ http://www.xovain.com/nails/tea-bag-wraps-for-broken-nails
- ↑ http://stylecaster.com/beauty-high/how-to-fix-a-broken-nail/
- ↑ http://www.xovain.com/nails/tea-bag-wraps-for-broken-nails
- ↑ http://stylecaster.com/beauty-high/how-to-fix-a-broken-nail/
- ↑ http://stylecaster.com/beauty-high/how-to-fix-a-broken-nail/
- ↑ http://stylecaster.com/beauty-high/how-to-fix-a-broken-nail/
- ↑ http://stylecaster.com/beauty-high/how-to-fix-a-broken-nail/
About This Article

To fix a split nail, remove any polish from the nail and empty an unused tea bag. Cut a small rectangular piece off of the bag to cover the nail. Then, apply a clear base coat over the nail, and position the tea bag on the nail while the base coat is still wet. Wait for the polish to dry and trim off any part of the bag that extends past the edge of your nail. Apply another coat of clear polish and wait for it to dry before filing the edge of the nail smooth. After filing, apply a final layer of clear polish, and then paint your nails as normal. For more tips, like how to fit the tea bag to the nail, read on!