This article was co-authored by Abraham Schwartz. Abraham Schwartz is a handyman and the owner of Fixin’ To Do, a home improvement service in Austin, Texas. Abraham specializes in both small to medium residential and commercial sized jobs, ranging from TV mounting to furniture assembly to home automation setup. Prior to starting Fixin’ To Do, Abraham worked for over 10 years as a handyman for third party services and had a lifetime of learning how to improve houses. He holds both his TSBPE Plumbing Examiners and Electrical Apprentice (TX) Licenses. In 2018 and 2019, Fixin’ To do was rated as a Top Pro by Thumbtack.
There are 15 references cited in this article, which can be found at the bottom of the page.
wikiHow marks an article as reader-approved once it receives enough positive feedback. This article received 24 testimonials and 100% of readers who voted found it helpful, earning it our reader-approved status.
This article has been viewed 1,343,475 times.
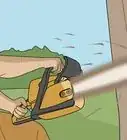
Using a chainsaw makes cutting through trees or any other wood so much easier, but over time your chain will begin to dull. If using your chainsaw becomes difficult, you have to apply pressure for it to cut through anything, it might need to be sharpened. By knowing the right tools to use and the right way to use them, you can easily sharpen your chainsaw and get in back in working condition.
Steps
Setting the File
-
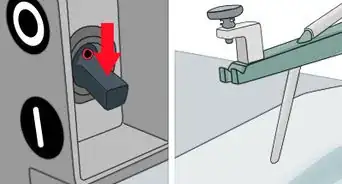
1Clamp the bar of the chainsaw to your work surface. Use a tabletop clamp or a vise to hold the chainsaw in place on your work surface. This will prevent the saw from shifting as you sharpen it, and result in a much more consistent and easy sharpening process.[1]
- If you don’t have a clamp or vise that will keep your chainsaw in place, you can remove the chain and secure that in your vise instead. This will require a little more adjustment but is an easy alternative.[2]
- You might find it easier to secure the chainsaw upside down on your work surface. There’s no one right way, so find the method that works best for you.
Note: If you need to sharpen a chainsaw but don’t have a vise or clamp, you can go without it. Be careful to keep the chainsaw steady as you file it if you can’t secure it in place.
-
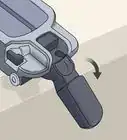
2Use the tension adjusting screw to tighten the chain. Find the tension adjusting screw on your chainsaw, usually perpendicular to the direction of the chain. Use a screwdriver to tighten the chain by tightening this screw. Make sure the chain is tight, but it is still able to move around the saw with a little effort. This stops the chain from moving as you sharpen it.[3]
Tip: The adjustment screw will be in different places on different chainsaws. Consult your owner’s manual for the chainsaw if you can’t find it.
Advertisement -
3Mark your first tooth with a permanent marker. Choose the first tooth you’re going to sharpen. Color it in or mark it with a bright permanent marker so you can easily keep track of where you started and prevent you from sharpening the same section twice. As you use the chainsaw, this mark will disappear.[4]
- Most chainsaws will have their own method of marking a single tooth at which to start sharpening, but this can often be difficult to locate and easy to miss as you sharpen the chain. If you don’t want to mark your chainsaw, look for a unique link in the chain. It might have no teeth, or already be a different color.[5]
-
4Select a round file the same diameter as the chainsaw's teeth. Different chainsaws have different sized teeth, and therefore will require different sized files to sharpen. You can normally find the size of your saw’s chain in the owner’s manual or online.[6]
Note: Typical sizes for the chain are 3⁄16 inch (4.8 mm), 5⁄32 inch (4.0 mm), and 7⁄32 inch (5.6 mm) in diameter.
-
5Set your file in the notch on the front of the cutter. This is the angled “tooth” on the front of the flat surface of the chain link. Place the tip of the file just inside the notch on the tooth you have marked so that roughly 20% of the file’s diameter is above the top of the tooth.[7]
- The chain will have two types of cutters facing alternate directions. Choose one type of cutter to focus on first before moving onto the other type.
-
6Use a file holder to hold your file at the same angle the cutter was initially ground. Check your owner's manual or look online to find the correct angle at which to file each cutter. Position the line on the file holder at the appropriate angle for your chainsaw, keeping it in line with the rest of the chain as you file.[8]
- Some chainsaws will have lines etched into the top of each cutter to help guide your file at the appropriate angle. Line your file up so that it is parallel with this etching to set the proper angle.
- The angle for filing will normally be 25 or 30 degrees, but some may be flatter. Always check the angle needed for your saw before beginning.


Sharpening the Cutters
-
1Slide the file across the face of the cutter. Hold the file so that it remains level and flat over the top of the chain. In one smooth motion, push the file through the cutter. You shouldn’t need to apply a lot of pressure, only enough so that you feel the file grinding against the cutter. Lift the file out of the cutter and reset it to the same place and at the same angle as it was previously.[9]
Note: Never pull the file backward through the cutter, as this will damage both your file and the cutter itself.[10]
-
2File the cutter 3 to 10 times until it is sharp. Repeat the exact same motion of running the file through the cutter until the cutter is a shiny, silver color and appears sharp. To ensure consistency across the sharpness of each cutter, count how many times you file the first cutter and file each subsequent cutter the same number of times.[11]
- If you’re unsure whether or not the cutter is sharp, feel for a slight burr along the top of the cutter. If this is present, the cutter should be adequately sharpened. Run the file over the burr once to knock it away.
- If you notice shavings of metal getting caught in the file, simply tap the file on a solid surface to clear it and continue sharpening.[12]
-
3Sharpen every second tooth from the starting point. Once you have fully sharpened your starting tooth, rotate the chain to bring a new tooth closer. The cutters on a chainsaw alternate directions, so sharpen every other cutter using the same motion, at the same angle, the same number of times until it is sharp. Repeat until you get back to the starting mark you made.[13] [14]
These two cutters are referred to as right and left cutters. By alternating them, the chainsaw is more easily able to cut in a straight line without leaning to one side or another. If you file one type of cutter more than another, you will risk throwing the balance of the chainsaw off. Make sure you stay consistent across all cutters.
-
4Rotate the chainsaw 180 degrees. Loosen your vise or clamp and rotate the chainsaw 180 degrees. This reveals the alternate cutters that you skipped sharpening in the first loop around the chain and means you don’t need to change your stance or method.[15]
Tip: If you can’t easily adjust the position in which the chainsaw is held, you can also move around the chainsaw or adjust the position of your file so that it faces the other direction. Regardless, make sure you remain consistent.
-
5Use the same motion to sharpen every other tooth. Move around the chain again, sharpening each tooth that has not yet been sharpened. Make sure to use the same amount of pressure and run the file through the same amount of times in order to keep each cutter consistent and level.[16]


Filing the Rakers
-
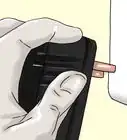
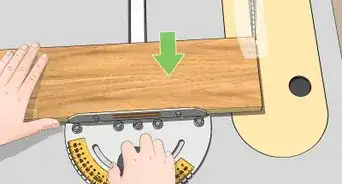
1Place a depth gauge over the chain. A depth gauge is a tool used to ensure the heights of the rakers are kept at the right height. They should be available at your local hardware store, and may even come with the file. Set the depth gauge over the chain near your starting point and push it forward until it presses against a raker.[17]
The rakers are the bumps along the chain in between each cutter. They function to keep the depth of the cut consistent as the chain spins around the saw, so making sure each is level is very important.[18]
-
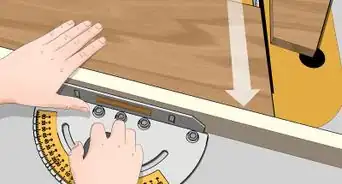
2Check for any part of the raker above the top of the depth gauge. Either by observing it or by feeling over the top of the depth gauge for a bump, check whether or not the top of the raker sits higher than the top of the depth gauge. If it does, it will need to be filed down. If not, move the gauge forward to the next raker until you find one that does.[19]
-
3Use a flat mill bastard file to level the raker. Holding the depth gauge in place, run a flat file over the top of the raker until it is level with the depth gauge. While the depth gauge will protect other teeth from being filed, there is nothing to stop the gauge itself from being filed down. Be careful not to file away the gauge, as this can lead to inconsistencies between rakers.[20]
- To entirely avoid filing the gauge, slide it back while you file over the raker. Check the height of the raker consistently as you file until it lines up with the top of the depth gauge.
- Once you have filed the raker down, it might have a square top. Use the flat file to very slightly smooth off the edges without filing down the height of the raker any further.[21]
- A flat file that will work for the rakers should be available at your local hardware store. Unlike the round file, it doesn’t need to be any specific size.
-
4File every other raker to the same height. Continue the same process of checking rakers with a depth gauge and filing them down all the way around the rest of the chain. Unlike the cutters, you don’t need to worry about filing the same raker twice as you are filing the rakers down.
Tip: As with the round file, if you notice any metal shavings getting caught up in the flat file, tap it on a surface once or twice to loosen them before continuing to file.
-
5Loosen the chain and release the chainsaw. Use the adjustment screws to loosen the chain of your chainsaw back to a usable tension. Loosen the clamp or vise holding the chainsaw in place and take the chainsaw out. Your chainsaw should now be sharpened evenly and ready to use.
- A chain on a chainsaw at a usable tension should have no visible slack as you hold it. When you lift the chain up, it should have around 1⁄8 inch (3.2 mm) of give and snap back when released.[22]
-
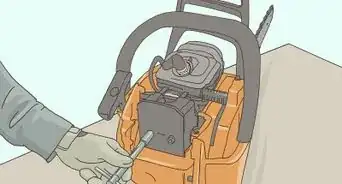
6Refill the bar oil reservoir in your chainsaw. Turn your chainsaw on its side to reveal the cap for the oil reservoir. Unscrew the cap and use a funnel to pour in bar and chain oil, which should be available from your local hardware store. Make sure the cap is tightly screwed back in before you operate your chainsaw.
Tip: Instead of bar and chain oil, you can use a vegetable oil such as canola oil. This is biodegradable and therefore more environmentally friendly.[23]


Community Q&A
-
QuestionMy chain is half worn and is cutting in an arc, as if one side of the teeth are sharper than the other. But they look the same. Any suggestions?
 Community AnswerThis is not uncommon. Your problem could be attributed to whether you are right or left handed. Over time, the teeth on one side of the chain will get sharpened more aggressively, causing them to be shorter (front to rear) after several sharpenings, which will cause your saw to cut in an arc. One way to check for this is to use a micrometer (purchase at any hardware store or on line from $10 - up) and check the length of each tooth. They should be equal. File the longer teeth to match the shortest ones. The other issue could be simply that, depending on how you set up your saw for sharpening and how you stand behind it, you are sharpening one side at a different angle from the other.
 -
QuestionHow do I know when to renew the bar?Community AnswerWhen the chain wobbles side to side. This means that the track in the bar has worn too wide.
-
QuestionAre the chain cuts properly and is it dull on the left or right side?
 Community AnswerThe angle could be more aggressive on one side as well causing those teeth to bite more, also usually due to hand dominance. The file should be drawn in from the opposite side of the tooth being sharpened. The cutting tool should travel through the tooth in the same direction the wood chip does during operation, this makes the edge stay sharp longer.
Warnings
- For best results, adjust chains when they are cool, as all chains tend to loosen (expand) in the heat of operation, even after the break-in period.⧼thumbs_response⧽
- Do not force the chainsaw file. It could shatter if too much force is applied.⧼thumbs_response⧽
- Never trigger the saw while sharpening the chain. Advance the chain only by hand during the sharpening process. For safety's sake, disconnect the spark plug wire before working on the chain.⧼thumbs_response⧽
- New or sharpened chains always deserve careful treatment and use. It is recommended to fully saturate (soak) a new or reconditioned chain in the recommended oil.⧼thumbs_response⧽
- Leave your chain to cool before sharpening it. If a chain is adjusted while hot, it may bind after cooling and require further adjustment.⧼thumbs_response⧽
- Manufacturers recommend checking and readjusting chains often, especially when first using a new chain (the break-in period).⧼thumbs_response⧽
- Wear gloves and safety glasses/goggles during the sharpening process. You are dealing with extremely sharp edges, and without gloves, you could easily cut yourself.⧼thumbs_response⧽
- Not all chain bars are standard in how they are attached or adjusted. Always check your owner's manual when working on your own chainsaw.⧼thumbs_response⧽
Things You'll Need
- Chainsaw file (correct size for your chain)
- Flat mill bastard file
- File guide or gauge
- Safety equipment
- Wrench for adjusting your saw bar
- Cleaner and rags


References
- ↑ https://youtu.be/GFMUYWUqVYc?t=52s
- ↑ https://youtu.be/GFMUYWUqVYc?t=3m22s
- ↑ https://youtu.be/xoQnsR_2R4U?t=58s
- ↑ https://youtu.be/7CdS4HrNRk4?t=3m31s
- ↑ https://www.popularmechanics.com/home/tools/a21996/how-to-sharpen-chainsaw-tips/
- ↑ https://www.familyhandyman.com/tools/saws/how-to-sharpen-a-chain-saw/view-all/
- ↑ https://www.familyhandyman.com/tools/saws/how-to-sharpen-a-chain-saw/view-all/
- ↑ https://www.artofmanliness.com/articles/chainsaws-101-how-to-maintain-and-sharpen-a-chainsaw/
- ↑ https://www.popularmechanics.com/home/tools/a21996/how-to-sharpen-chainsaw-tips/
- ↑ https://youtu.be/7CdS4HrNRk4?t=4m9s
- ↑ https://www.familyhandyman.com/tools/saws/how-to-sharpen-a-chain-saw/view-all/
- ↑ https://youtu.be/GFMUYWUqVYc?t=7m2s
- ↑ https://youtu.be/7CdS4HrNRk4?t=4m42s
- ↑ https://www.familyhandyman.com/tools/saws/how-to-sharpen-a-chain-saw/view-all/
- ↑ https://www.familyhandyman.com/tools/saws/how-to-sharpen-a-chain-saw/view-all/
- ↑ https://www.familyhandyman.com/tools/saws/how-to-sharpen-a-chain-saw/view-all/
- ↑ https://youtu.be/7CdS4HrNRk4?t=5m37s
- ↑ https://www.familyhandyman.com/tools/saws/how-to-sharpen-a-chain-saw/view-all/
- ↑ https://youtu.be/7CdS4HrNRk4?t=5m39s
- ↑ https://youtu.be/GFMUYWUqVYc?t=8m20s
- ↑ https://youtu.be/GFMUYWUqVYc?t=9m3s
- ↑ https://www.artofmanliness.com/articles/chainsaws-101-how-to-maintain-and-sharpen-a-chainsaw/
- ↑ https://www.fs.fed.us/eng/pubs/html/98511316/98511316.html
About This Article

To sharpen a dull chainsaw, clamp the bar of the chainsaw to your work station and tighten the chain using the tension adjusting screw to make sure it won't move. Then, use a permanent marker to draw a line on the link where you're going to start filing, and get a specialty chainsaw file that's the same diameter as the chainsaw teeth. To file, hold the file between the teeth at a 30 degree angle, and slide it across the face of the cutter 3-10 times until it is sharp. Sharpen every other tooth until you return to the starting link. For tips on filing the rakers properly, read on!