This article was co-authored by wikiHow staff writer, Hunter Rising. Hunter Rising is a wikiHow Staff Writer based in Los Angeles. He has more than three years of experience writing for and working with wikiHow. Hunter holds a BFA in Entertainment Design from the University of Wisconsin - Stout and a Minor in English Writing.
There are 12 references cited in this article, which can be found at the bottom of the page.
The wikiHow Video Team also followed the article's instructions and verified that they work.
This article has been viewed 4,162 times.
Learn more...
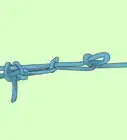
Beer knots are used by rock climbers to join 2 pieces of tubular webbing, which are flat, hollow harnesses, into a loop and make slings. Since you insert one end of the webbing into the other when you tie a beer knot, it stays extremely secure and keeps you safe while climbing. If you want to make your own slings, you can easily tie beer knots with a few tools. Cut the end of the webbing and tie an overhand knot in it before forming the webbing into a loop. After you reposition the knot over the loop, your sling is ready to use!
Steps
Cutting and Tying the Webbing
-
1Cut 1 in (2.5 cm) from the end of the webbing so it’s at a 45-degree angle. Use tubular webbing that’s at least 1 inch (2.5 cm) thick and 36 inches (91 cm) long for your sling. Lay one end of the webbing flat on a cutting board or sturdy work surface. Start cutting from the corner of the webbing with a utility knife so it makes a 45-degree angle. Throw out the cut piece of webbing.[1]
- You can buy tubular webbing from outdoor supply stores or online.
- It may take 2–3 slices to completely cut through the webbing.
- Try using a pair of scissors to cut the webbing if you don’t have a utility knife.
-
2Seal the corner of the cut end with a lighter to form a pocket. Hold a lit match or lighter about 1 inch (2.5 cm) underneath the cut end of the webbing. Run the pointed corner of the webbing through the flame for 1–2 seconds before removing it. Press 1⁄2 inch (1.3 cm) of the cut edges together so they stick to each other before running them through the flame again. Keep singeing the cut edges on the pointed corner until they stick together and create a 1⁄2 in × 1⁄2 in (1.3 cm × 1.3 cm) pocket.[2]
- Don’t seal the entire cut edge, or else it will be more difficult to insert into the hollow opening on the other end of the webbing.
Advertisement -
3Tie a loose overhand knot 18 in (46 cm) from one end of the webbing. Lay the tubular webbing flat on your work surface so it doesn’t have any twists or tangles. Grab a spot on the webbing that’s 18 inches (46 cm) down from the cut end and form a 2–3 in (5.1–7.6 cm) loop. Feed the cut end of the webbing through the loop and pull it through to form your knot.[3]
- You need to pre-tie a knot in the webbing since you won’t be able to make one once you form the webbing into a loop.
Warning: Don’t pull the overhand knot so tight that you won’t be able to undo or loosen it later on. You will eventually need to reposition it to form the beer knot.
-
4Pinch open the sides on the flat end of the webbing. Grab the narrow edges at the uncut end of the webbing and squeeze them together. As you pinch the sides, the opening in the middle of the tubular webbing will widen. Let go of the sides to see if the end stays open, and if it doesn’t, continue pinching them together until they do.[4]
- If the end doesn’t stay open, run a flame around the edges for 1–2 seconds while you’re pinching the sides so they don’t bend as easily.

Forming the Closed Loop
-
1Straighten a piece of wire hanger with a pair of pliers. Cut the hook off the top of a metal hanger with a pair of wire cutters and throw it away. Grip a corner of the remaining section of the hanger with pliers and slowly bend it so it’s straight. Continue straightening out the other bends in the wire until you have a section that’s about 18 inches (46 cm) long.[5]
- You can also use a skewer or knitting needle instead of a wire hanger.
Tip: Bend one end of the straightened wire into a 1⁄4 in (0.64 cm) loop to help prevent the webbing from slipping off of it.
-
2Put the end of the straightened hanger into the pocket in the webbing. Pinch the long sides on the cut end to open up the hollow center. Slide the wire hanger into the pocket at the end of the webbing so the end catches. Push the wire as far into the point as it will go to ensure it doesn’t slip out when you form the loop.[6]
- Don’t force the wire into the pocket since you could tear through the singed edge.
- If you bent a loop into the end of the hanger, put that end inside of the pocket.
-
3Push the hanger 12 in (30 cm) into the open end of the webbing. Poke the pointed corner of the webbing into the opening on the flat side, using the wire as a guide. Continue sliding the hanger deeper into the opening so the webbing forms a loop. Stop once you have 12 inches (30 cm) of webbing from the cut end pushed into the opening.[7]
- Draw a line or mark on the wire 12 inches (30 cm) from the end so you know how far you need to push it into the opening.
- Try to keep the webbing as flat as possible while you’re inserting it so it doesn’t twist or snag.
-
4Pull the hanger out from the webbing so you have a closed loop. Push down on the webbing where you can feel the cut end inside with your nondominant hand. Carefully guide the wire straight from the opening so it doesn’t pull the webbing out. After you remove the wire, pinch the opening closed so it’s less likely to slide out.[8]

Securing and Using the Knot
-
1Reposition the knot so it’s 3 in (7.6 cm) from the exposed end of webbing. Grab the looped section of the overhand knot with your dominant hand. Guide the knot toward the section of webbing that you inserted into the other so it’s 3 inches (7.6 cm) from the visible end. Pull the webbing on the other side of the knot in the opposite direction until you don’t feel any more slack.[9]
- If you pull the looped section of the knot and it gets tighter, try guiding it in the opposite direction so it gets looser.
- Avoid twisting or tangling the webbing while repositioning the knot since it can affect the sling’s strength.
-
2Tighten the knot to secure the ends. Grab the webbing on both sides of the knot and pull them away from each other. Keep the webbing as flat as possible so you can pull the knot as tight as possible. Make sure the ends of the webbing extend out at least 3 inches (7.6 cm) from each side of the knot, or else they could slip out and come loose. Yank on each side of the knot to ensure the knot doesn’t come undone.[10]
- If you try to tighten the knot and it comes undone, then you will need to reinsert the cut end.
-
3Loop the sling around rocks while climbing to use as a safety harness. Make sure there aren’t any sharp edges or points on the rock since they could slice the tubing. Position the sling so it loops around the widest and sturdiest portion of the rock so it can support your weight. Attach carabiners to the sling so you can clip onto it and use it for support.[11]
- Slings made with 1 in (2.5 cm) tubular webbing can usually support about 400 pounds (180 kg).
- Keep the knot away from the rock to help ensure that it doesn’t come undone.
Tip: You can easily undo beer knots while you’re climbing if you need the length of tubular webbing. However, it is difficult to retie the knot while you’re in the field.

Warnings
- Using 1 in (2.5 cm) tubular webbing with a beer knot can safely support a load of 400 pounds (180 kg). Don’t apply any additional weight to the knot, or else it could break.[12]⧼thumbs_response⧽
- Avoid resting the knot against rocks when you hang the sling since it can apply additional stress and weaken the harness.[13]⧼thumbs_response⧽
Things You’ll Need
- 1 in (2.5 cm) tubular webbing
- Utility knife
- Lighter
- Wire hanger
- Pliers
- Carabiners


References
- ↑ https://youtu.be/jDHcV3uEeIQ?t=23
- ↑ https://youtu.be/jDHcV3uEeIQ?t=32
- ↑ https://youtu.be/4Wz1WKSRf_g?t=45
- ↑ https://youtu.be/4Wz1WKSRf_g?t=119
- ↑ https://youtu.be/DRn2daNCfJ0?t=23
- ↑ https://youtu.be/DRn2daNCfJ0?t=38
- ↑ https://youtu.be/4Wz1WKSRf_g?t=136
- ↑ https://youtu.be/jDHcV3uEeIQ?t=96
- ↑ https://youtu.be/4Wz1WKSRf_g?t=168
About This Article

-Step-11-Version-2.webp)