X
wikiHow is a “wiki,” similar to Wikipedia, which means that many of our articles are co-written by multiple authors. To create this article, volunteer authors worked to edit and improve it over time.
This article has been viewed 31,426 times.
Learn more...
The toolbar is a great feature in Internet browsers that will improve the user experience when surfing the web. They are convenient rows of tools that will help you navigate the web more easily, as well as help you perform operations in a streamlined manner. If you want to add toolbars to your web browsers, you can do so easily and in just a few steps.
Steps
Method 1
Method 1 of 3:
Adding a Toolbar in Firefox
-
1Launch Firefox. Double-click on the browser’s shortcut icon on your desktop to launch it.
-
2Open the menu. Click the menu button at the upper-right corner of the browser window, which is an icon of three rows stacked upon each other. This will open the menu where you can customize your FireFox browsing experience.Advertisement
-
3Select a tool. Under the menu, you will see icons of common and useful operations. Click and hold the tool you want.
-
4Add the tool to the toolbar. Drag the selected tool to the bar that is right beside the Menu button. Release the mouse, and the tool will place itself in the toolbar.
- You can actually place the tools anywhere along the top of the browser window for convenient tool placement.
-
5Repeat. Do the same operation (Steps 3 and 4) for every tool you want in your FireFox toolbar.
-
6Exit. Once you’re done, click the green “Exit Customize” button on the bottom of the menu.


Advertisement
Method 2
Method 2 of 3:
Adding a Toolbar in Internet Explorer
-
1Launch Internet Explorer. Double-click the browser’s shortcut icon on your desktop to launch it.
-
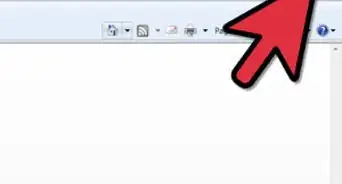
2Open the menu. Once at the Internet Explorer window, click on the gear icon in the upper-right corner of the window.
- This will show you some options, but most importantly, it will show you the different toolbars that you can activate or disable in the browser.
-
3Select a toolbar. Choose between the Favorites Bar, Menu Bar, Command Bar, and Status Bar.
-
4Activate a toolbar. Click on a toolbar you want to activate, and it will show a check mark on the left side of the toolbar name. This means that you have turned on the toolbar that you have selected.
-
5Deactivate a toolbar. If you want to hide a toolbar, click it again in the gear menu to remove the check mark and disable the toolbar.


Advertisement
Method 3
Method 3 of 3:
Adding a Toolbar in Safari
-
1Launch Safari. Double-click on Safari found in the Doc at the bottom of the screen.
-
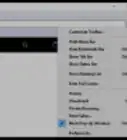
2Open the View menu. In Safari, click on the View menu in the menu bar at the top of the window.
-
3Select “Customize Toolbar.” Here, you can click an item you want to add to the toolbar in your Safari browser.
-
4Add an item to the toolbar. Add the item by clicking and dragging the tool you want onto the toolbar.
-
5Save. When you are happy with your customized toolbar, click on “Done” in the lower-right portion of the toolbar customization window, and your toolbar should appear as you customized it.


Advertisement
Community Q&A
-
QuestionHow can I attach a printer to my tablet?
 Rahul BhattCommunity AnswerYou can access a printer from your tablet by installing a printing application. You can choose to install a printer app that is specific to your model of printer.
Advertisement


About This Article
Advertisement