This article was co-authored by Ndeye Anta Niang. Ndeye Anta Niang is a Hair Stylist, Master Braider, and Founder of AntaBraids, a traveling braiding service based in New York City. Ndeye has over 20 years of experience in African hair including braiding box braids, Senegalese twists, crochet braids, faux dread locs, goddess locs, kinky twists, and lakhass braids. Ndeye was the first female of her tribe in Africa to move to America and is now sharing her knowledge of African braids passed on from generation to generation.
This article has been viewed 10,175 times.
Grecian hair is beautiful and elegant. While many Grecian hairstyles are for long hair, Grecian braids are great for both short and long hair. While a style for short hair won't be a true crown, you can make two braids look like a crown. You can use different techniques to create a similar style, regardless of your hair length. If you want a more traditional style, that shows off your gorgeous, long locks, then there is an option for you as well!
Steps
Braiding a Grecian Crown for Short Hair
-
1
-
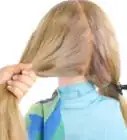
2Part your hair on the side. Use the handle of a rat-tail comb to get a clean, even part. Drape each side of your hair over your shoulders as best as you can. Twist one of the sides into a temporary bun or use a clip to keep it out of the way.[3]Advertisement
-
3Begin to Dutch braid your hair. Gather a thin section of hair close to the part and split it into three strands. Begin with a regular braid by crossing the left and right strands under the middle one.[4]
- Make sure that you are crossing the left and right strands under the middle one, or the Dutch braid won't work.
-
4Continue with a Dutch braid until you reach the nape of your neck. Add hair to the left and right sections before crossing them under the middle one. Gather the hair from your part of hairline, which ever is closest to the strand you are crossing. You should have a crown starting at your hair part and going down the side of your head. [5]
- If you want, you can go ahead and mist your hair with hairspray and smooth down any flyaways as you go.
- Keep the braid centered between your part and hairline.
-
5Finish off with a regular braid. Once you reach the nape of your neck, you won't have any hair left to gather. Instead, continue braiding your hair as normal, then tie the braid off with a small hair tie.[6]
- You can also use a clear hair elastic instead. If you have dark hair, you could use a black one instead.
-
6Repeat the process for the other side of your head. Once you finish the first braid, unclip the hair on the other side of your head. Begin with a regular braid starting at the part, then continue with a Dutch braid until you reach your nape. Finish off with a regular braid, then tie it off with a mini hair tie.[7]
-
7Fluff the braids up. Starting from the end of each braid, gently tug on the outer loops. Work your way up to the top of each Dutch braid. Be careful not to pull the braids apart, especially if you have very short hair.[8]
-
8Cross and pin the braids at the nape of your neck. Right now, your hair should form a crown starting at the part of your hair. To finish it, take the left braid, and cross it across your nape. Pin it to the right Dutch braid, tucking the tail-end out of sight. Cross the right braid across your nape, and pin it to the left Dutch braid; be sure to tuck the tail out of sight![9]
- Use bobby pins that match your hair color.
-
9Set your style with hairspray. Let the hairspray dry, then head out and rock your new style!


Braiding a Grecian Crown for Long Hair
-
1Brush your hair until it is smooth and free of tangles.[10] This style works best with hair that falls well past your shoulders—the longer, the better! If you have feshly-washed hair, consider adding some dry shampoo first to help give it a more workable texture.
- If you have curly hair, try blow drying it straight first.
-
2Part your hair down the middle, then tie one side out of the way. Use the handle of a rat-tail comb to create an even part, from your front hairline down to the nape of your neck. Pull one side of your hair into a temporary pigtail.[11]
- Exclude the hair in front of your ear from the pigtail. This will make one of the later steps easier.[12]
-
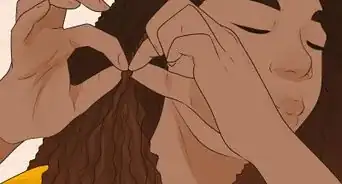
3Braid the hair from your nape for two stitches. Gather a section of hair from one side of your nape, and split it into three strands. Cross the top strand under the middle one, then cross the bottom strand under the middle one.[13]
-
4Begin to Dutch braid your hair. Add some hair to the top strand, then cross it under the middle one. Next, add some hair to the bottom strand, and cross it under the middle one as well. This technique will create a raised braid or cornrow (as opposed to a flat braid).
-
5Continue Dutch braiding until you reach your opposite ear. Keep the Dutch braid as close to your hairline as you can. Include the hair you excluded from the pigtail in your Dutch braid. When you reach the pigtail and your ear, stop.[14]
-
6Gather the rest of your hair and finish with a regular braid. Undo the pigtail first. Pull the rest of your hair to your Dutch braid, distributing it evenly between the three strands. Braid your hair as normal, without adding strands, then tie it off with a clear hair elastic.[15]
- If you have dark hair, you can use a mini black hair elastic instead.
-
7Fluff the braid up, if desired. Stating from the end of the braid, gently tug on the outer loops to fluff and loosen them. Work your way around the Dutch braid until you reach the nape of your neck.[16]
-
8Wrap the braid around your head, then secure it with bobby pins. Continue wrapping when you reach the Dutch braid, placing the braid right above it. When you reach the end of your braid, secure it to your hair with bobby pins.[17]
- Tuck the tail end out of sight.
- Secure the braid to the Dutch braid as well for extra security.
-
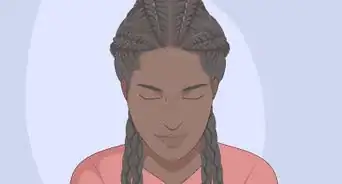
9Finish off with a light misting of hairspray. After this, you are ready to show off your new Grecian braid!
Doing a Grecian Half-Up Braid
-
1Brush your hair. This style works best hair that is shoulder length or longer. If you just washed your hair, consider adding some dry shampoo to it, especially the roots. This will give it some texture and make it easier to braid.
-
2Part your hair down the center. Use the handle of a rat-tail comb to create a clean, even part. You can create a side part later on for a more stylish look, but start with a center part for now.[18]
-
3Clip the front of your hair out of the way. Use the handle of a rat-tail comb to section off your hair. Start at the left side of center part, 1 to 2 inches (2.54 to 5.08 centimeters) from your hairline, and finish right in front of your hair. Secure the section with a clip, then repeat for the right side of your head.[19]
-
4Begin to braid the hair on the left side of your part. Gather a thin section of hair from the left side of your part, right behind the gathered section. Split it into three strands. Cross the left and right strands under the middle one.[20]
- Make sure that you are crossing the strands under and not over, otherwise the Dutch braid won't turn out right.
-
5Dutch braid until you reach the edge of your nape. Add a little bit of hair to the left strand, then cross it under the middle one. Add some more hair to the right strand, and cross it under the middle one as well. Continue braiding like this until you reach the left edge of your nape.[21]
- Try to position the Dutch braid about 1 to 2 inches (2.54 to 5.08 centimeters) above your nape; it should be level with your ear.
-
6Finish off with a regular braid. Without adding anymore strands into the Dutch braid, regular braid whatever you have left. Tie the braid off with a clear hair elastic.[22]
-
7Repeat the process on the right side of your head. Begin with a regular braid, then Dutch braid until you reach the right edge of your nape. Finish off with a regular braid, then with it off as well. You will have a gap between the two braids where your hair is left long.[23]
- If you have thin or straight hair, you can add volume to the braids by gently tugging on the outer loops. This will make your braid look bigger. Start from the ends and finish at the top.
-
8Cross the left and right braids, then pin them in place. Pull the left braid across the back of your head towards the right Dutch braid. Secure it with bobby pins, tucking the tail-end out of the way. Repeat the process for the right braid, crossing it towards the left Dutch braid.[24]
- Make sure that you are crossing the braids over the loose hair, not under.
-
9Unclip the hair you sectioned off at the beginning. Use the handle of a rat-tail comb to create a side part, if desired. If your hair is very long in the front, you can add a gentle curl to the ends with a curling iron.
- Consider curling the long, loose hair at the back of your head as well. Focus on the ends for a more romantic look.
- Remember to apply a heat protectant spray before curling your hair.
-
10Set the style with a light misting of hairspray. After this, you are ready to go!

Things You'll Need
- Rat-tail comb
- Clear or black hair elastics
- Bobby pins
- Hairspray
- Dry shampoo (optional)
References
- ↑ Ndeye Anta Niang. Hair Stylist & Master Braider. Expert Interview. 10 January 2020.
- ↑ https://www.youtube.com/watch?v=_PNCY16B3qs
- ↑ https://www.youtube.com/watch?v=_PNCY16B3qs
- ↑ Ndeye Anta Niang. Hair Stylist & Master Braider. Expert Interview. 10 January 2020.
- ↑ https://www.youtube.com/watch?v=_PNCY16B3qs
- ↑ https://www.youtube.com/watch?v=_PNCY16B3qs
- ↑ https://www.youtube.com/watch?v=_PNCY16B3qs
- ↑ https://www.youtube.com/watch?v=_PNCY16B3qs
- ↑ https://www.youtube.com/watch?v=_PNCY16B3qs
- ↑ Ndeye Anta Niang. Hair Stylist & Master Braider. Expert Interview. 10 January 2020.
- ↑ http://www.weddingchicks.com/blog/hair-tutorial--how-to-halo-braid-l-6773-l-60.html
- ↑ http://www.weddingchicks.com/blog/hair-tutorial--how-to-halo-braid-l-6773-l-60.html
- ↑ http://abeautifulmess.com/2011/12/how-to-style-a-braided-crown.html
- ↑ http://www.weddingchicks.com/blog/hair-tutorial--how-to-halo-braid-l-6773-l-60.html
- ↑ http://abeautifulmess.com/2011/12/how-to-style-a-braided-crown.html
- ↑ http://www.weddingchicks.com/blog/hair-tutorial--how-to-halo-braid-l-6773-l-60.html
- ↑ http://abeautifulmess.com/2011/12/how-to-style-a-braided-crown.html
- ↑ https://www.youtube.com/watch?v=abFQrHdT_cE
- ↑ https://www.youtube.com/watch?v=abFQrHdT_cE
- ↑ https://www.youtube.com/watch?v=abFQrHdT_cE
- ↑ https://www.youtube.com/watch?v=abFQrHdT_cE
- ↑ https://www.youtube.com/watch?v=abFQrHdT_cE
- ↑ https://www.youtube.com/watch?v=abFQrHdT_cE
- ↑ https://www.youtube.com/watch?v=abFQrHdT_cE
About This Article