This article was co-authored by Randall Chambers and by wikiHow staff writer, Hunter Rising. Randall (Randy) Chambers is a Personal Chef and the Owner of Luxury Meals From Home based in Arvada, Colorado. He has more than 16 years of commercial kitchen experience, five years of sous chef experience, and two years of experience as an executive chef. Chef Randy draws inspiration from his half Bolivian background and his forte is South American cuisine. He holds an Associate’s degree in Culinary Arts from The Art Institute.
There are 20 references cited in this article, which can be found at the bottom of the page.
Are you tired of food sticking to and falling through your grill grates while you’re cooking? Then using a grill stone may be the perfect fix for your cookouts. Grill stones work for cooking anything you’d normally toss on your BBQ, and they are so easy to use and clean. There are just a few things you should know before you start grilling with one. Once you finish reading, you’ll know how to set up and use your grilling stone and what delicious meals you can make with it.
Things You Should Know
- Season your grill stone before you use it the first time. Coat the stone with a thin layer of olive oil and heat it on your grill for around 1 hour.
- Set the stone on your grill while it’s still cold. Heat the stone up completely before you start cooking on it.
- Put your cooking oil and your food on the stone once it’s hot. Try searing steak or chicken, roasting veggies, or making a fresh pizza.
- Scrape the stone off with a metal spatula to clean it. Flip the stone over so the residue cooks off the next time you use your grill.
Steps

Using a Grill Stone
-
1Heat your grill stone on the grill. Set your grill stone onto the grates while they’re still cold. Start your grill on low or medium heat for the first 15–20 minutes to warm the stone up slowly. Then, set the grill to the temperature you need. Check the temperature of the stone with a laser thermometer to see if it’s the right temperature for the recipe you’re cooking.[5]
- Avoid putting your stone over high heat while it’s still cold since the temperature shock could cause the stone to break.
-
2Spread a thin layer of cooking oil over the hot stone. Add about 1–2 tablespoons (15–30 ml) of olive oil or any other cooking oil you’re using to the middle of the grill stone. Use a grill basting brush or a spatula to spread the oil over the entire surface.[6]
- Adding oil helps your food crisp up and prevents it from sticking to your grill stone.
- If you’ve already tossed or coated your food in cooking oil, you can skip this step.
-
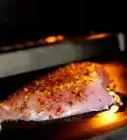
3Place your food on the stone to cook. Add whatever you’re cooking to the middle of the stone and spread it out so it cooks evenly. Use the same temperature and cooking times for your food as you normally would grilling without the stone. When your food is finished cooking, take it off the stone to serve.[7]
- Grill burgers at 375–400 °F (191–204 °C) for about 3–4 minutes on each side for the perfect medium cook.[8]
- Vegetables take different times to cook through depending on how thick the pieces are. Asparagus may be done within 4 minutes, but zucchini or tomatoes take around 4–5 minutes per side.[9]
- Your grilling stone won’t lose heat when you add your ingredients on top of it, so it will cook all of your food at an even temperature without any cold spots.
-
4Clean your grill stone by scraping off residue with a spatula. Try to scrape your grill stone clean as soon as you finish cooking so it’s easier to remove. Run the edge of your spatula over the stone’s surface to break apart as much of the residue as you can. Toss the scraps into the trash so they don’t get into the bottom of your grill.[10]
- It’s okay if you aren’t able to remove all of the residue. It will burn off the next time you grill on your stone.
- You don’t have to do any additional cleaning with soap or water for your grill stone.
-
5Flip the stone over once it’s cool for the next time you cook. Let the stone cool down for a couple of hours after you finish cooking with it. Turn the stone so the side that you just cooked on is face-down. That way, you have a clean, seasoned surface on top and any leftover residue will cook off the next time you heat up the stone.[11]


Seasoning a Grill Stone
-
1Wash your grill stone with soap and water. As soon as you get a new grill stone, take it out and wash it by hand with your standard dish soap. Give the stone a thorough rinse under warm water and pat it dry. Let the stone dry out completely, which may take an hour or two.[19]
- This is the only time you need to use soap to clean off the grilling stone for your BBQ. If you wash your grill stone with soap later on, you could strip the non-stick seasoning.
-
2Coat both sides of the stone with olive oil. Set your grilling stone on a piece of parchment paper or on top of your grill grates. Pour about 1–2 tablespoons (15–30 ml) of olive oil onto the stone, and rub it into the surface in an even layer. Flip over your stone and rub the oil into the other side as well.[20]
- Wipe off any large excess puddles of oil with a new piece of paper towel
-
3Heat the stone in your barbecue for 50–60 minutes. Put your grill stone inside your grill when it’s still cold so it can warm up at the same time. Start your grill on a low or medium temperature setting and warm the stone up for about 30 minutes before turning it on high. Leave your stone in your grill for another 20–30 minutes before turning off the heat.[21]
- If you’re cooking with a charcoal grill, then just put your stone on the grill right when you light your coals.
- Heating the stone too quickly could cause it to crack or break.
-
4Turn the stone over when it’s completely cool. Let the stone cool back down for an hour or two so you don’t hurt yourself handling it. Flip the stone over so the bottom faces up. Since the bottom of the stone came into contact with the heat, the non-stick seasoning will have set in more and be easier to cook with the first time around.[22]
- If you see any excess oil pooling still pooled on the stone’s surface, wipe it off with a paper towel.
- Put on a pair of heatproof grill gloves to handle your grill stone while it’s still warm.


Warnings
- Avoid setting your grill stone on a hot grill or putting it directly over high heat since you could cause it to crack or break.[23]⧼thumbs_response⧽
References
- ↑ https://www.jacksongrills.com/_docs/Island-Grill-Stone.pdf
- ↑ https://youtu.be/BTro9hG_Qqc?t=74
- ↑ https://youtu.be/BTro9hG_Qqc?t=84
- ↑ https://youtu.be/JTj0Ocay5F8?t=34
- ↑ https://www.jacksongrills.com/_docs/Island-Grill-Stone.pdf
- ↑ https://youtu.be/bD1yxRvGjPs?t=382
- ↑ https://www.jacksongrills.com/_docs/Island-Grill-Stone.pdf
- ↑ https://www.thekitchn.com/the-secret-to-grilling-burgers-that-23038129
- ↑ https://www.allrecipes.com/article/how-to-grill-vegetables/
- ↑ https://youtu.be/dJNBa5DyY4U?t=485
- ↑ https://www.jacksongrills.com/_docs/Island-Grill-Stone.pdf
- ↑ https://youtu.be/ySrcirJU9aM?t=397
- ↑ https://www.health.state.mn.us/people/foodsafety/cook/cooktemp.html
- ↑ https://www.bbcgoodfood.com/howto/guide/how-grill-chicken
- ↑ https://www.esquire.com/food-drink/food/a7577/how-to-grill-fish-052110/
- ↑ https://youtu.be/-EbtCmQmXzA?t=253
- ↑ https://youtu.be/bD1yxRvGjPs?t=407
- ↑ https://www.epicurious.com/shopping/the-best-place-for-your-pizza-stone-is-on-the-grill-article
- ↑ https://files.bbystatic.com/EWCl6OHSOcbB4CFBM9ffog%3D%3D/14560eb4-829d-4c45-a1cc-398b49b292ac.pdf
- ↑ https://youtu.be/dJNBa5DyY4U?t=222
- ↑ https://youtu.be/ef33GxwVDLQ?t=340
- ↑ https://www.jacksongrills.com/_docs/Island-Grill-Stone.pdf
- ↑ https://www.jacksongrills.com/_docs/Island-Grill-Stone.pdf
About This Article