This article was co-authored by wikiHow Staff. Our trained team of editors and researchers validate articles for accuracy and comprehensiveness. wikiHow's Content Management Team carefully monitors the work from our editorial staff to ensure that each article is backed by trusted research and meets our high quality standards.
There are 7 references cited in this article, which can be found at the bottom of the page.
This article has been viewed 26,756 times.
Learn more...
A messy but fun task, all plucking a pheasant takes is some patience and a steady hand. Plucking will be easier if the pheasant is properly hung ahead of time, but is possible no matter the bird. Make sure you have an open area and a trash bin ready -- this is a very messy task.
Steps
Dry Plucking a Pheasant
-
1Gather plenty of newspaper or a very large plastic bag to lay the pheasant on. This is a very messy process, so lay out a nice area to work on that you can easily clean later. Have a trash bin handy to put the plucked feathers in while plucking.[1]
-
2Know the two types of feathers you will encounter and how to deal with them. Pheasants have two types of feathers, each of which come out a little differently. Be ready for them to avoid any surprises and ugly plucked pheasants.
- Thick, quill-like feathers are found along the neck, sides of the breast, and flanks. They should be removed 1-2 at a time.
- Thin, wispy "under-feathers" are found along the body, and come out relatively easily, even in bunches.[2]
Advertisement -
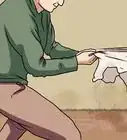
3Hold the skin in place with your supporting hand whenever pulling out feathers. Don't let the skin of the bird pull with the feathers, as this will rip it and lead to an ugly, ungainly roast bird. Instead, use the hand holding the bird to keep the skin in place around the area where you are plucking.
- Slow down even more around pellet holes from hunting or joints -- these areas are often the softest and most prone for rips.
- This should slow you down as you pluck. Pheasants have delicate skin, and you need to work slowly to get a nice bird.
-
4Start by removing the long, thick tail feathers one at a time. These feathers will take a bit of effort to get out, but work slowly for the best results. Hold the bird under your arm, tucked against your ribs for support, and pull in the direction the feather is pointing. You want a quick, forceful yank to get the feather out, not a gradual pull.
- If you're struggling to remove feathers, think about the direction you're pulling in. You want to pull hard in the direction the feather is going, but at the last minute you can pull upwards a bit, away from the pheasant, to get some extra power.
-
5Work on the wings next, pulling 1-2 feathers at a time. Again, work slowly here, using a strong, quick yanking motion in the direction of the feather. Do not try and grab a handful of feathers and remove them all at once -- this usually leads to ripped skin or wings.
- The wing are the deepest quills, and often take most effort.
-
6Pull off the back feathers slowly by working against the grain. Start near the tail, grabbing only 2-3 feathers at once. This time, pull the feathers off by yanking up towards the head of the pheasant, opposite the natural direction of the feathers. You only want to pull a few feathers at once, as pheasant skin is thin and this motion can quickly rip the bird to shreds.[3]
-
7Using the same strategy as used on the back feathers, move on to the breast. Again, work in small areas, going slowly and holding the skin in place as you work. These are the thinnest, easiest feathers and will likely come off easily.[4]
-
8Remove the thick feathers around the neck, and under the wing one at a time. These are the thickest feathers and some of the softest skin, so work slowly. Make sure you keep the skin in place to prevent large rips.[5]
- While it seems counter-intuitive, a rapid, forceful yank will protect the bird much better than a slow, gradual pull.
-
9Carefully remove the last bits of feather around the feet, neck, and tail. There should be some more thin under-feather around the bird, so simply rotate the pheasant and pluck away any last feathers you find. Remember to go slowly, especially in these hard-to-reach areas.
-
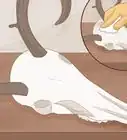
10Optionally, hang pheasants for 3-4 days before plucking to make processing easier. Most people will dry their birds by the neck before plucking. Simply use a meat hook in the neck or beak to let the birds dangle for a few days in a cool, dry place, like your garage. This loosens the skin and feathers and prepares for later drawing and gutting.
- Feathers come off best in heat. If you do hang the pheasants, let them return to room temperature before you start plucking.[6]


Wet Plucking A Pheasant
-
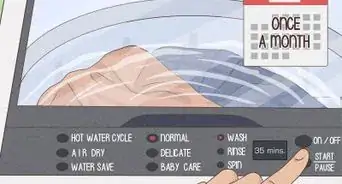
1Soak the birds quickly in hot water to make plucking much faster and easier. Dunking the birds into simmering water for 90 seconds will make the skin looser and the feathers more likely to slide out. It can weaken the skin a bit, and is likely overkill if you only have to clean 1-2 birds. However, if you have a large number of pheasants to pluck, this will save you tons of time.
- Make sure the pot is big enough to fit a whole bird.
- While this makes plucking faster, you only want to soak one pheasant at a time.[7]
-
2Set a large pot of water on the stove until it reaches roughly 140–150 °F (60–66 °C). The important thing is that the water is steaming, but not yet boiling. This is shortly after the water becomes too hot to touch. You want to scald the pheasants, not cook them.
-
3Holding it by the neck, dunk the body of the pheasant into the scalding water for 30 seconds. This will heat the skin and feathers, but won't allow any of it to actually start cooking.
-
4Remove the bird, draining over the pot until water no longer streams down the sides. Remove the bird just long enough that it stops pouring water off it. This will temporarily cool it down.
-
5Dunk and drain the bird two more times so it "cooks" for 90 seconds total. You want to work quickly, as it is the heat, not the water, that makes plucking easier.[8]
-
6Quickly pluck the pheasant as if you were doing a normal dry pluck. You should have your work station, with garbage bag and newspaper, already laid out. Let the last bits of water drain off, then get to work plucking while the pheasant is still hot. All of the normal rules apply:
- Only remove 1-2 feathers at a time.
- Hold the skin around the feathers tight with your supporting hand.
- Use quick, forceful movements to yank out feathers.[9]
-
7Heat and pluck only one pheasant at a time. Remember that the heat, not the water, is what makes plucking easier. Don't try and dunk all of your pheasants at once, then pluck them all afterwards. Heat a pheasant, pluck it, then move on to the next one when it is done.[10]


Warnings
- Make sure there are no draughts that can blow the feathers around.⧼thumbs_response⧽


References
- ↑ http://www.cottagesmallholder.com/how-to-pluck-and-draw-game-a-partridge-or-pheasant-157/
- ↑ https://www.pheasantsforever.org/BlogLanding/Blogs/Gamebird-Gourmet/Tips-on-Plucking-Pheasants-and-Quail.aspx
- ↑ http://www.cookeryonline.com/Game/Preparing%20Game.htm
- ↑ http://www.cookeryonline.com/Game/Preparing%20Game.htm
- ↑ http://www.cottagesmallholder.com/how-to-pluck-and-draw-game-a-partridge-or-pheasant-157/
- ↑ http://www.cottagesmallholder.com/how-to-pluck-and-draw-game-a-partridge-or-pheasant-157/
- ↑ http://www.motherearthnews.com/diy/tips-for-plucking-game-fowl-zmaz82sozgoe.aspx
- ↑ http://www.motherearthnews.com/diy/tips-for-plucking-game-fowl-zmaz82sozgoe.aspx
- ↑ https://www.pheasantsforever.org/BlogLanding/Blogs/Gamebird-Gourmet/Tips-on-Plucking-Pheasants-and-Quail.aspx
About This Article

To pluck a pheasant, hang it in a cool, dry place for 3-4 days beforehand, which will make it easier to remove the feathers. Keep in mind that pheasants have 2 types of feathers and that each should be removed differently. For the thick, quill-like feathers found along the neck, sides of the breast, and flanks, pluck them off 1-2 at a time. For the thin, wispy feathers found along the body, pull them out in even bunches. Also, make sure you hold the skin in place as you're pulling the feathers so it doesn't pull and tear. To learn how to wet pluck a pheasant, scroll down!